Vue 2.0学习笔记:Vue组件内容分发(slot)
在实际项目开发当中,时常会把父组件的内容与子组件自己的模板混合起来使用。而这样的一个过程在Vue中被称为内容分发。也常常被称为**slot(插槽)**。其主要参照了当前Web Components规范草案,使用特殊的<slot>元素作为原始内容的插槽。今天主要来学习如何在Vue中使用slot的功能。
先简单的了解一个概念
在深入理解Vue的slot之前,先来简单的了解一个有关于slot的概念,便于后续的学习和理解。
前面也说过了,Vue中的slot源于Web Components规范草案,也被称之为插槽,是组件的一块HTML模板,而这块模板显示不显示,以及怎么显示由父组件来决定。那么,Vue中一个slot最核心的两个问题就出来了:
- 显示不显示
- 怎么显示
由于slot是一块模板,因此对于任何一个组件,从模板种类的角度来分,共实都可分为非插槽模板和插槽模板。其中非插槽模板指的是HTML模板(也就是HTML的一些元素,比如div、span等构成的),其显与否及怎么显示完全由插件自身控制;但插槽模板(也就是slot)是一个空壳子,它显示与否以及怎么显示完全是由父组件来控制。不过,插槽显示的位置由子组件自身决定,slot写在组件template的哪块,父组件传过来的模板将来就显示在哪块。
Vue的编译作用域
简单的了解了slot中的基本概念,从基本概念中可以获知,使用slot会涉及Vue的模板,而Vue的模板在渲染成UI之前是有一个编译过程的,也会存在模板编译作用域一说。理解清楚这部分内容,也更有助于我们理解slot,所以花点时间先简单的理解一下Vue的编译作用域。
在前面的《Vue实例和生命周期》一文中,我们了解了Vue的生命周期相关的知识点,此处不再阐述,上张介绍Vue生命周期的图:
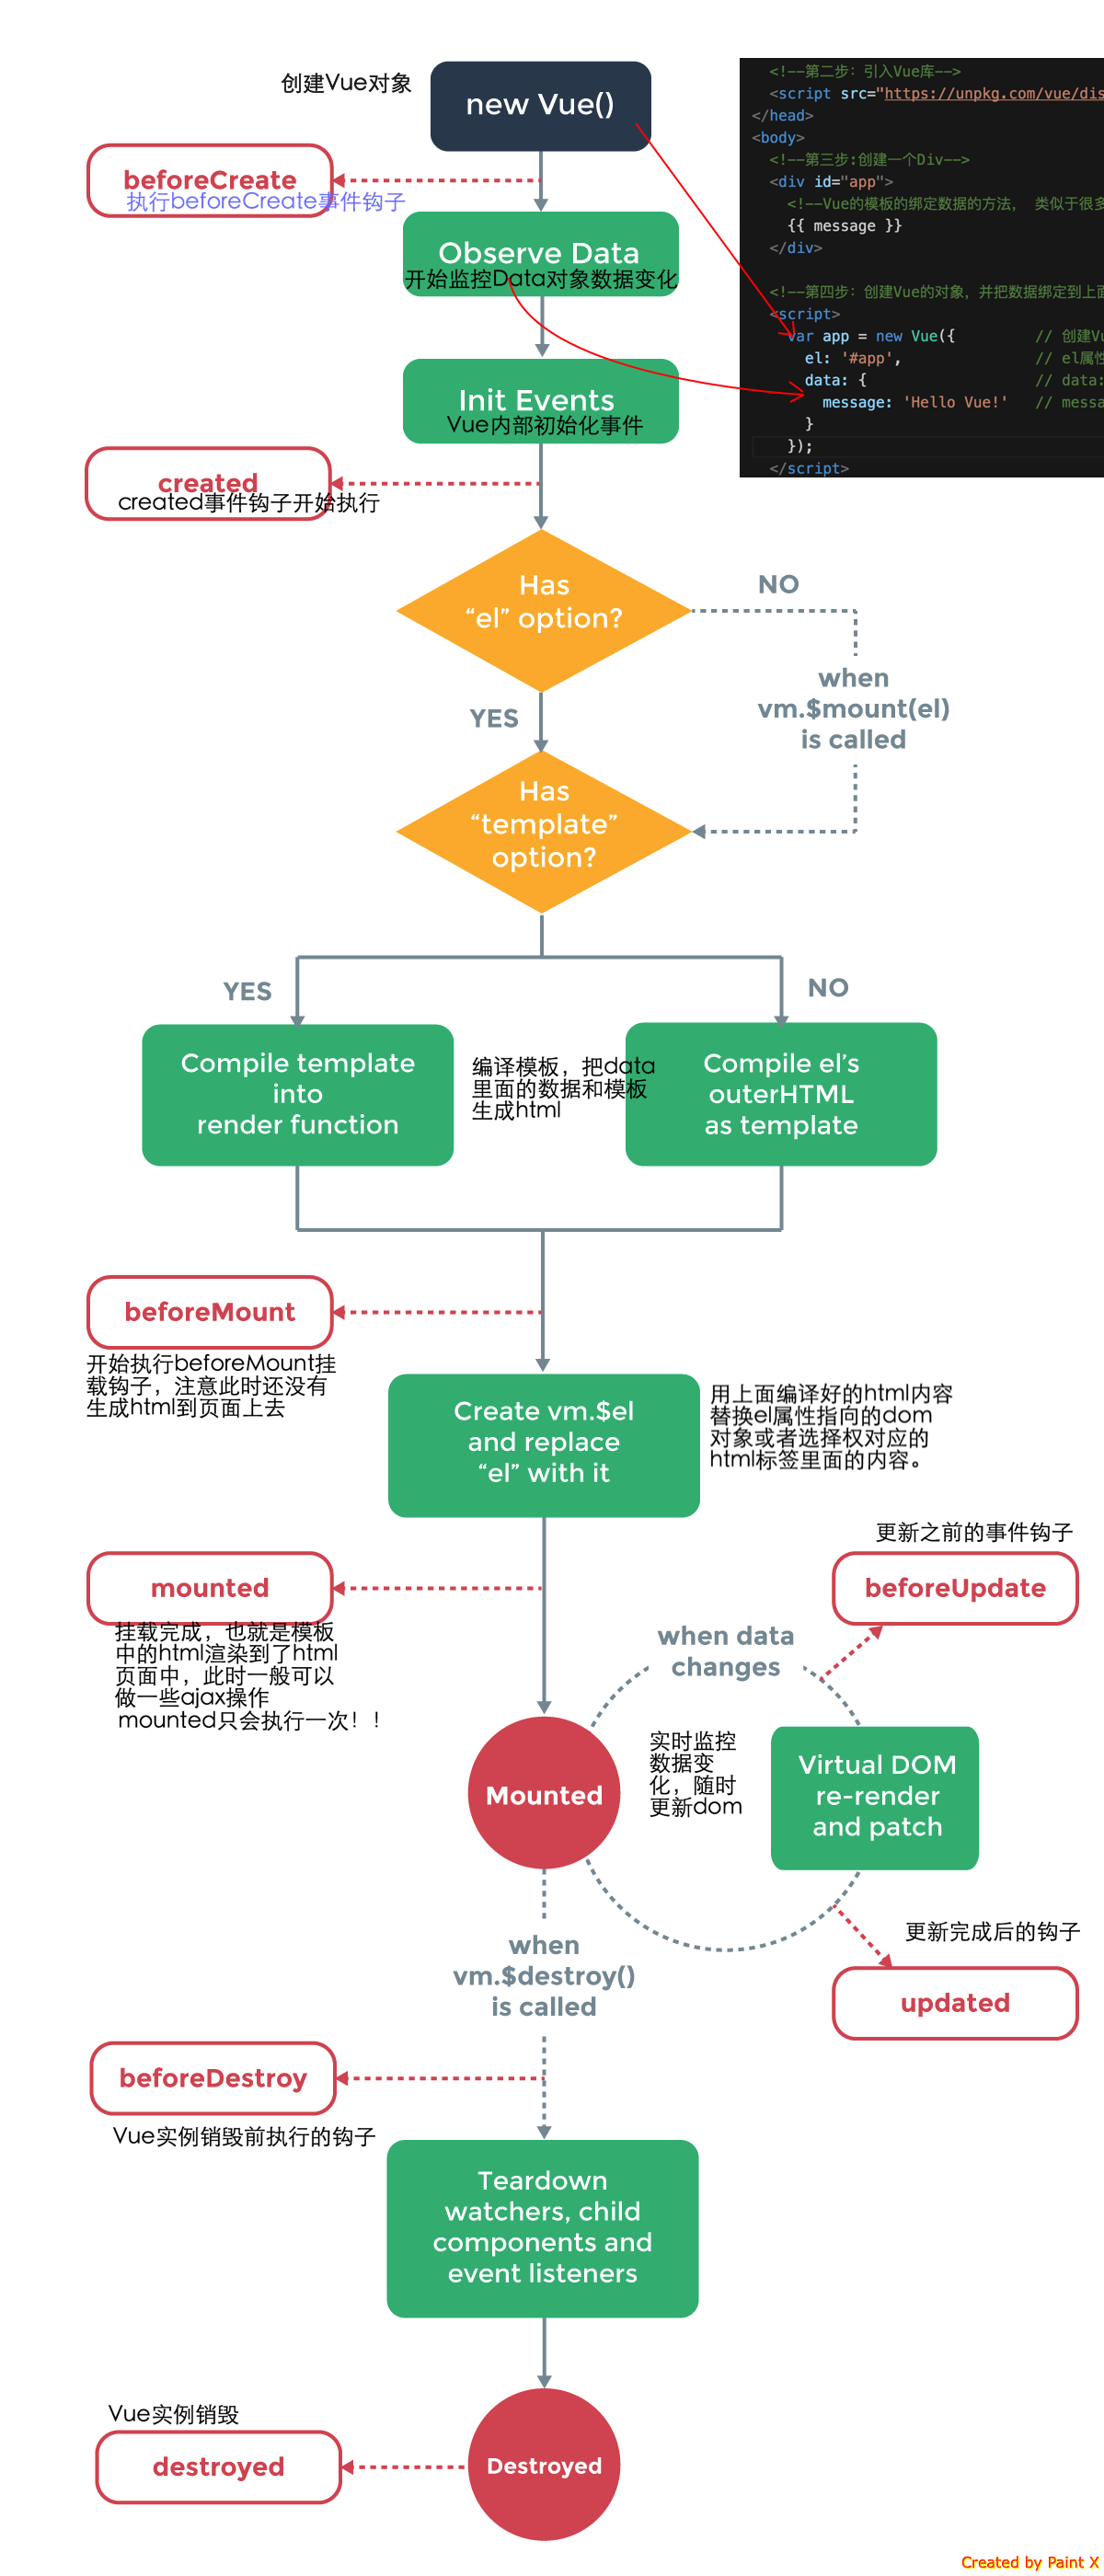
碰到是否有template选项时,会询问是否要对template进行编译:
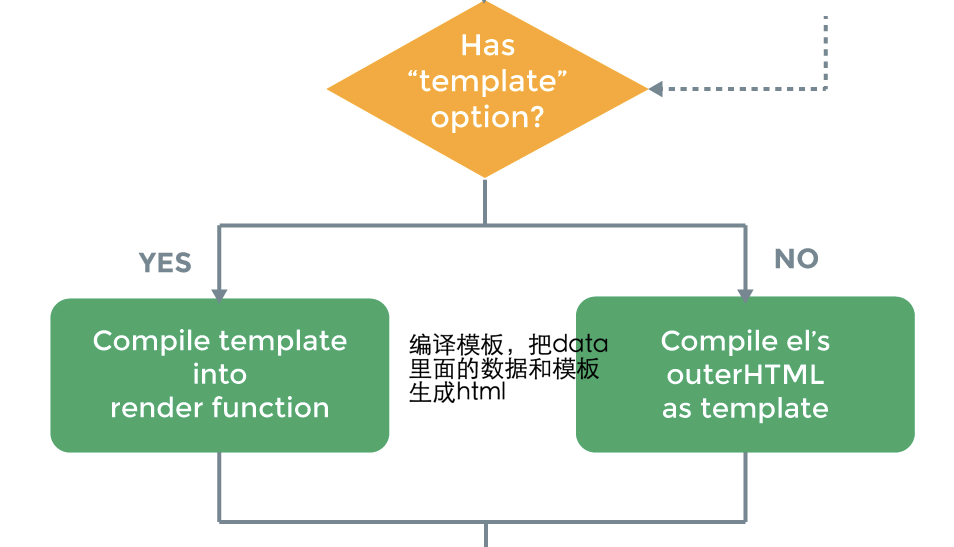
在template编译(渲染成UI)有一个过程。模板通过编译生成AST,再由AST生成Vue的渲染函数,渲染函数结合数据生成Virtual DOM树,对Virtual DOM进行diff和patch后生成新的UI。将上图细化一下,也就是template编译的过程如下图所示:
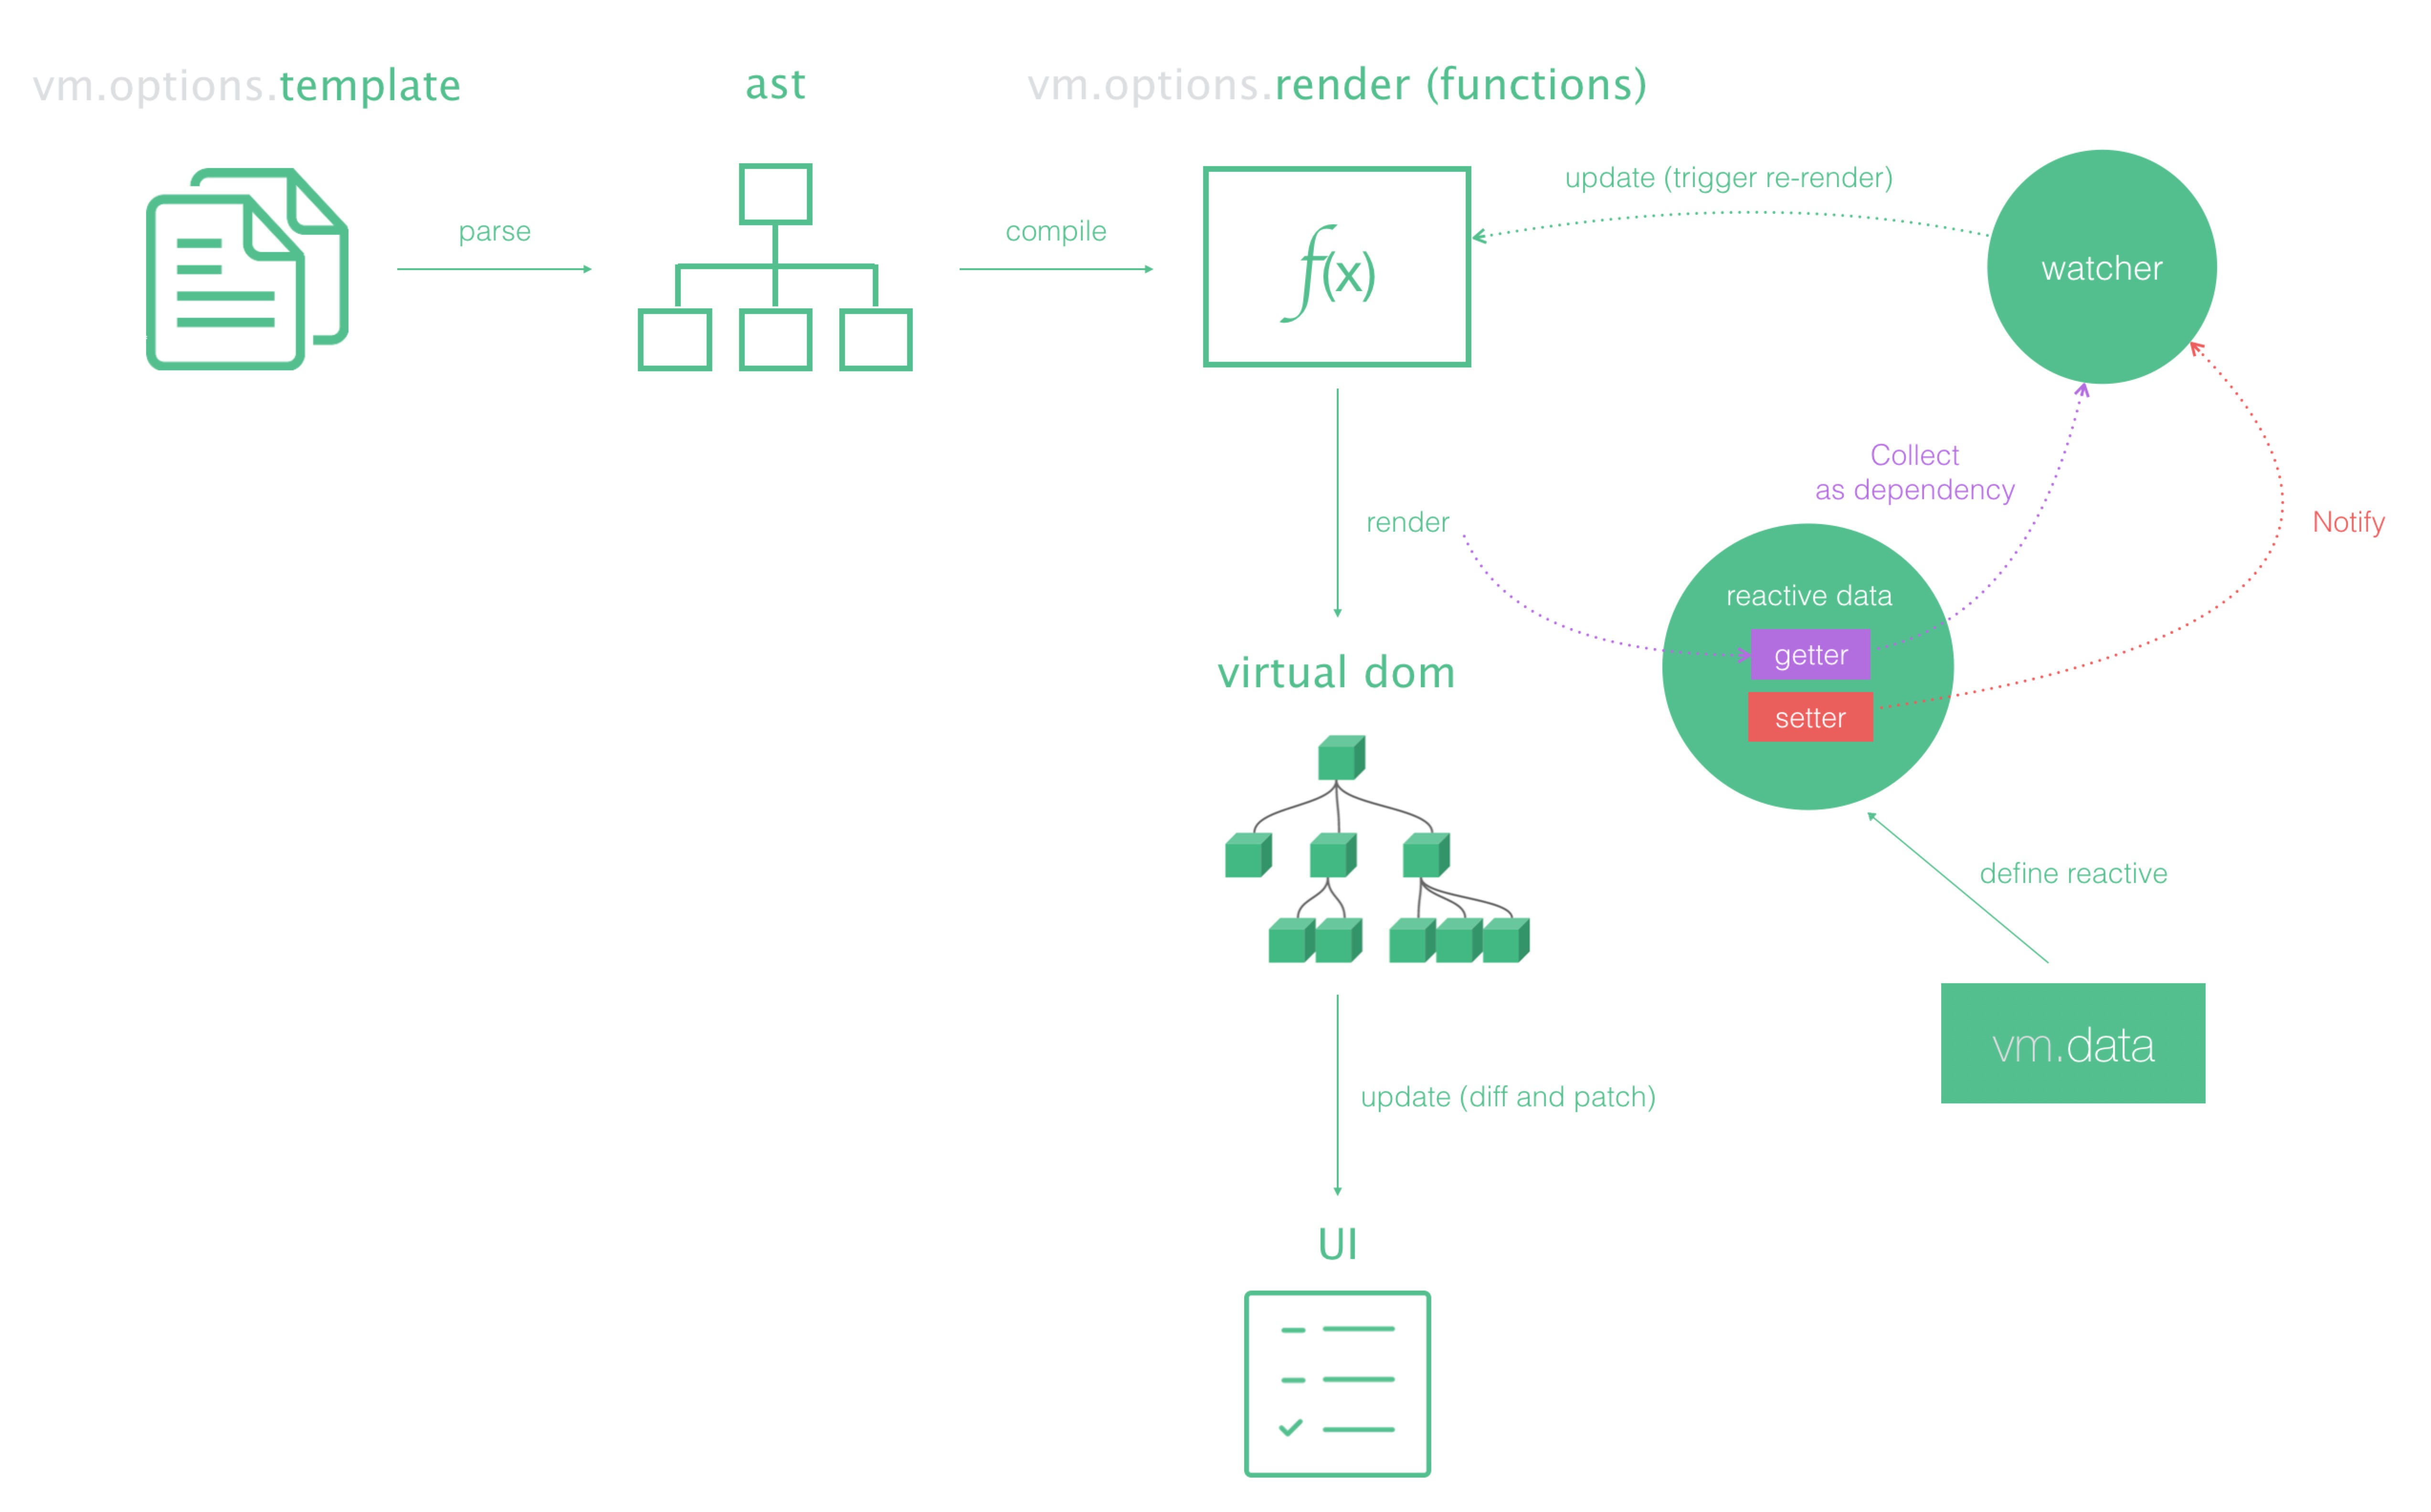
在深入一点,如下:
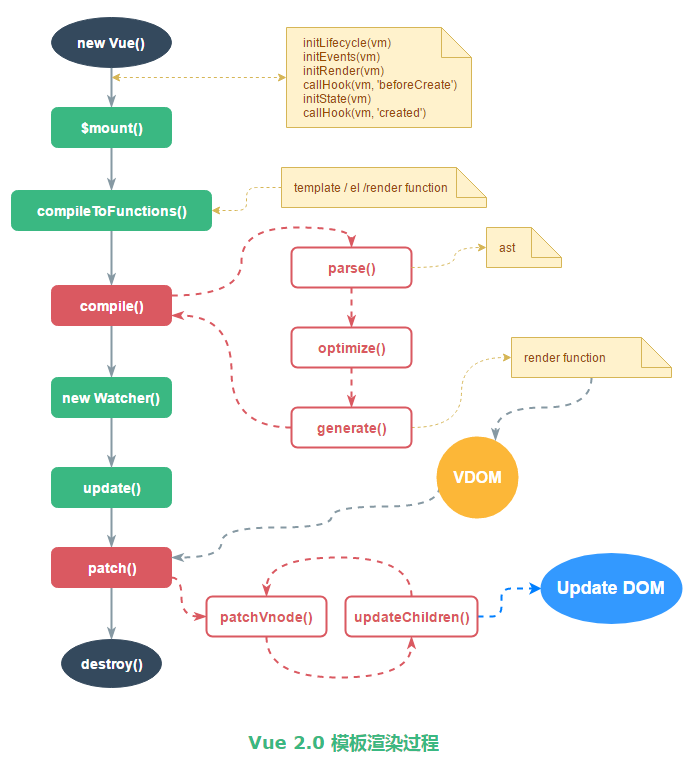
有关于Vue中
template的渲染的详细过程,可以阅读《Vue的模板》一文。
简理的理解就是Vue中的template编译成浏览器可识的过程会经过不少的过程。言外之意,最终在浏览器中呈现的并不是<template>,而是会解析成标准的HTML,然后将组件的标签替换为对应的HTML片段。用个小示例来举例:
<div id="app">
    <my-component></my-component>
</div>

<template id="myComponent">
    <div>
        <h2>{{ message }}</h2>
        <button @click="show">Show Message</button>
    </div>
</template>

Vue.component('my-component', {
    template: '#myComponent',
    data () {
        return {
            message: '我是一个Vue组件!'
        }
    },
    methods: {
        show: function () {
            alert(this.message)
        }
    }
})

let app = new Vue({
    el: '#app'
})
Vue将会通过其自身的编译机制(如前图所示的过程),将<my-component>编译成让浏览器可以识别的HTML代码。可以借助浏览器开发者工具一探究竟:
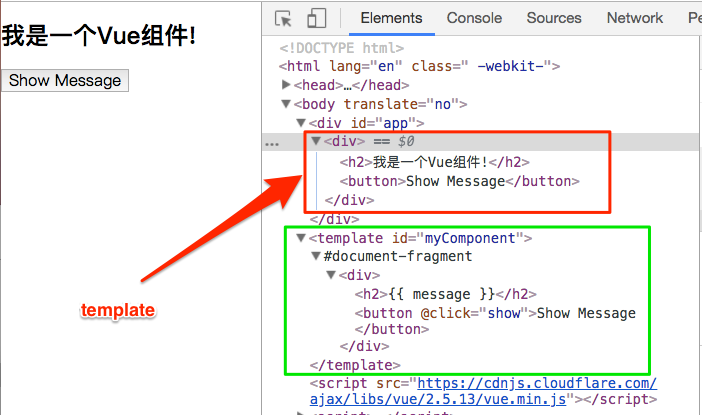
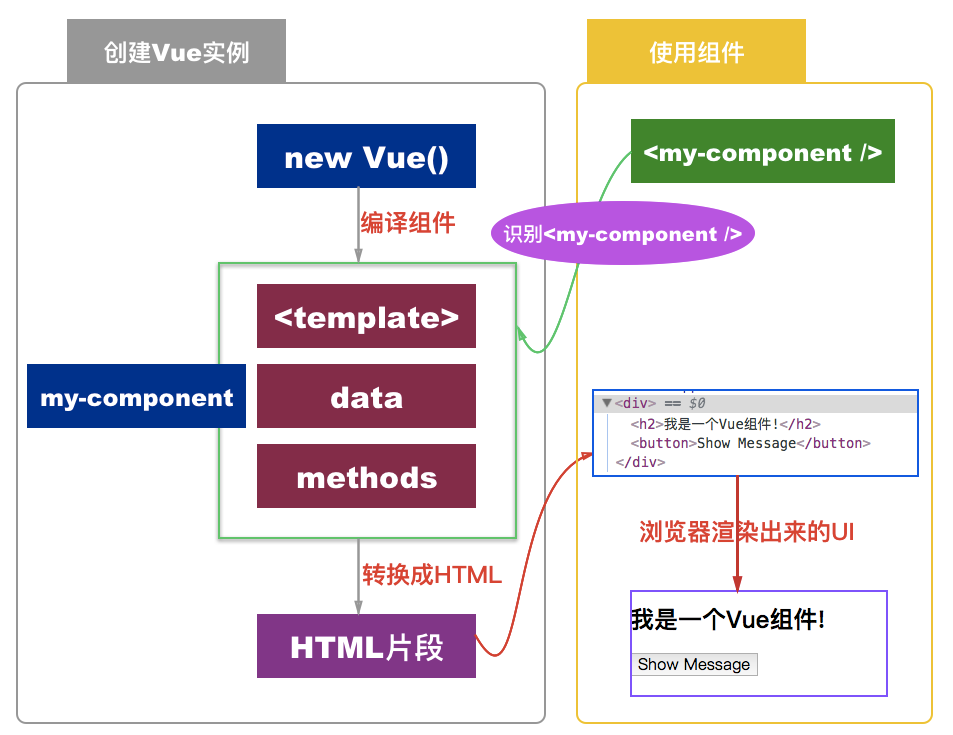
我的理解是这样的。上面的示例通过new Vue()创建一下人Vue的实例,并且将这个实例挂载到div#app的元素下,然后把组件<my-component>编译成HTML,最终渲染所需要的UI效果。继续用张图来描述这个过程,一图胜过千言万语嘛。
我们要说的是模板编译的作用域,在Vue中,组件是有一个作用域的:**组件模板(<template>)**内的就是组件作用域,而其之外的就不是组件的作用域了,比如上面的示例,my-component组件的作用域就是下面这部分:
<template id="myComponent">
    <div>
        <h2>{{ message }}</h2>
        <button @click="show">Show Message</button>
    </div>
</template>
组件的模板是在其作用域内编译的,因此组件选项对象中的data也是在组件模板中使用的。如果我们在前面的示例中的Vue实例的组件my-component中同时追加一个display属性:
Vue.component('my-component', {
    template: '#myComponent',
    data () {
        return {
            message: '我是一个Vue组件!',
            display: false
        }
    },
    methods: {
        show: function () {
            alert(this.message)
        }
    }
})

let app = new Vue({
    el: '#app',
    data () {
        return {
            display: true
        }
    }
})
然后在<my-component>中使用指令v-show="display":
<div id="app">
    <my-component v-show="display"></my-component>
</div>
试问,此时display是来源于Vue实例,还是my-component组件呢?答案很简单:display来源于Vue实例。也就是说,在Vue中组件的作用域是独立的:
父组件模板的内容在父组件作用域内编译;子组件模板的内容在子组件作用域内编译。
通俗地讲,在子组件中定义的数据,只能用在子组件的模板。在父组件中定义的数据,只能用在父组件的模板。如果父组件的数据要在子组件中使用,则需要子组件定义props。有关于这方面的内容可以阅读:
- 《组件数据传递》
- 《实现组件数据的双向绑定》
- 《不同场景下组件间的数据通讯》
简单的了解了Vue编译的作用域之后,咱们接着回到我们今天要聊的主题,Vue的slot。
slot大致用法
先来简单的看一下Vue中的slot的使用方法。比如我们有一个类似alert的小组件:
<div id="app">
<alert></alert>
</div>
<template id="alert">
<div class="alert info">
<button class="close">×</button>
<slot>This is alert box!</slot>
</div>
</template>
Vue.component('alert', {
template: '#alert',
})
let app = new Vue({
el: '#app'
})
上面的代码在alert组件的模板中指定了一个<slot>元素,并且在该元素中放置了一个默认内容“This is alert box!”。在调用alert组件时,并没有向该组件分发任何内容,这个时候运行的结果如下:

从上面的效果中可以得知:如果父组件未向模板中分发内容(插入内容),则显示插槽中默认内容(前提是slot中设置了默认内容)。
接下来,在上面的示例上,做小小的修改,在<alert>使用的时候,插入你想要的内容(也就是指父组件向模板分发内容):
<div id="app">
    <alert>
        <div>
            <h2>Hello W3cplus!</h2>
            <p>欢迎您来到w3cplus.com!</p>
        </div>
    </alert>
</div>
运行上面的代码得到的效果是:
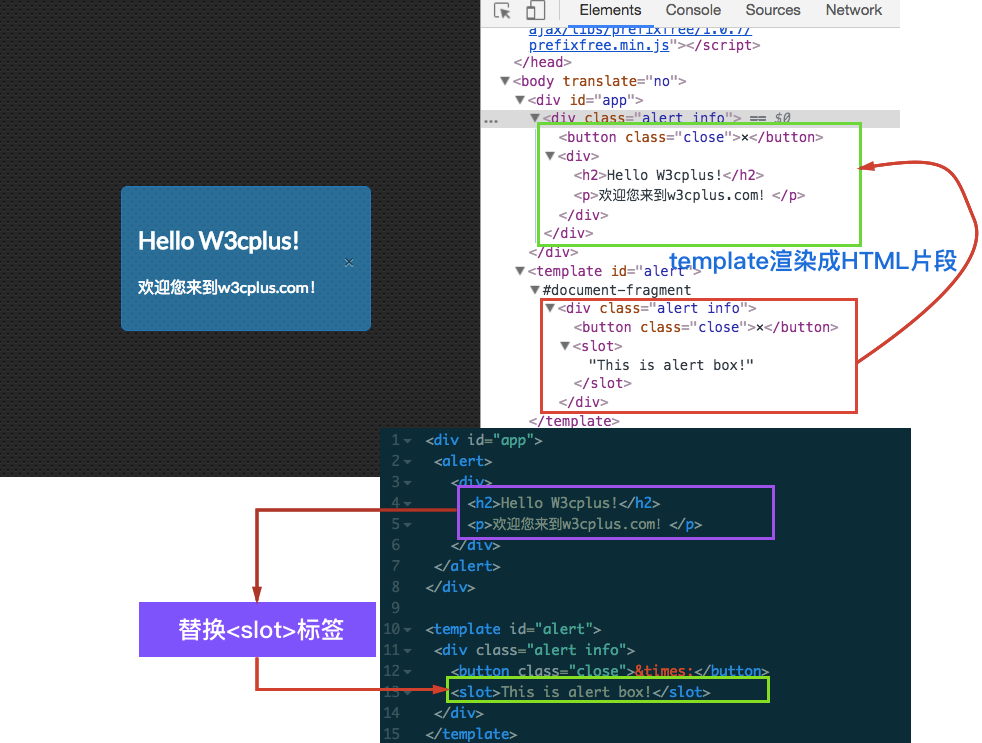
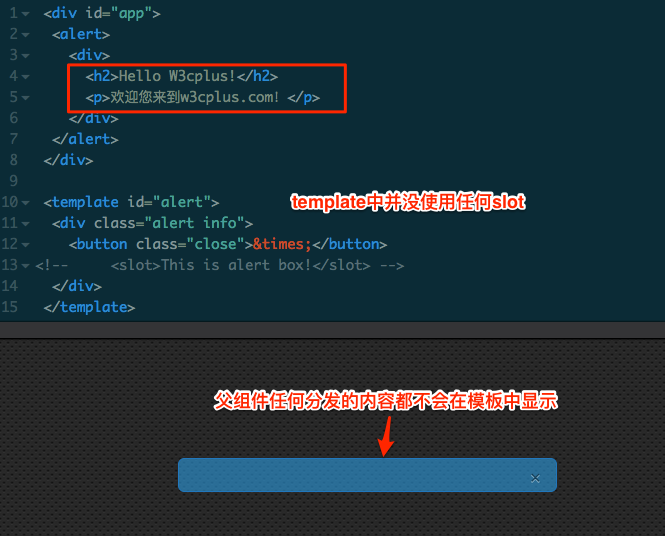
从代码运行的结果可以得知:父组件给模板分发了内容,则分发的内容会替换slot标签。除此之外,假设模板中未设置插槽,父组件依旧向其分发了内容,但最终任何分发的内容都不会显示。比如下图所示:
在介绍编译作用域时,了解到,父组件的内容是在父组件作用域编译,子组件的内容是在子组件作用域编译。而Vue的slot一般用在父组件向子组件分发内容,该内容的编译作用域名为父组件作用域。
继续拿上面的alert组件来举例。在我们的alert组件中,很多时候有多种样式风格,除了info之外,还有success、danger和warning之类。我们可以在父组件的编译时绑定status状态。
<div id="app">
<alert v-for="statu in status" :status=statu>
<div>
<h2>{{ statu }}</h2>
<p>欢迎您来到w3cplus.com!</p>
</div>
</alert>
</div>
<template id="alert">
<div class="alert" :class="[alertStatus]" v-show="isShow">
<button class="close" @click="close">×</button>
<slot>This is alert box!</slot>
</div>
</template>
Vue.component('alert', {
template: '#alert',
props: ['status'],
data () {
return {
isShow: true
}
},
computed: {
alertStatus: function () {
return this.status
}
},
methods: {
close: function () {
this.isShow = !this.isShow
}
}
})
let app = new Vue({
el: '#app',
data () {
return {
status: ['info', 'success', 'danger', 'warning']
}
}
})
最终效果如下:
slot分类
在Vue中,slot也分多种,从Vue的官网中可以获知,其主要分为:单个插槽、具名插槽和作用域插槽三种。接下来我们借助modal组件为例,看看Vue中的这几种插槽怎么使用。
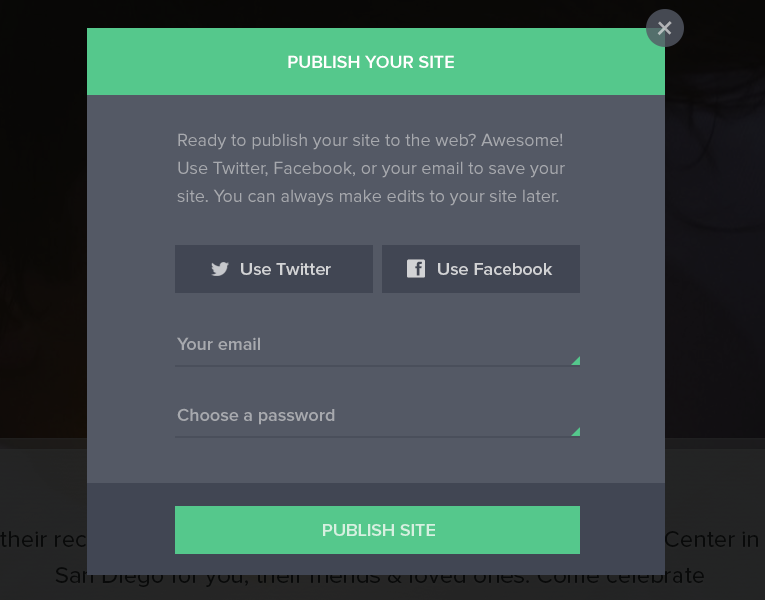
Web中常见的modal弹框外形长得大致都如下图这样:
单个插槽
在介绍slot大致使用方法的一节中,已经知道了,如果子组件template中没有包含任何一个<slot>时,就算父组件分发再多的内容也将会被丢弃。只有子组件模板只要有一个没有属性的slot(因为在模板中可以有多个带属性的slot,后面的内容会介绍),父组件传入的整个内容片段将插入到slot所在的DOM位置,并将替换掉slot本身。
最初在<slot>中的任何内容都被视为备用内容(也可以在最初的<slot>中不放置任何默认内容)。备用内容在子组件的作用域内编译,并且只有在宿主元素(父组件没有分发任何内容)为空,且没有要插入的内容时才显示备用内容。
如果拿modal来举例,在单个插槽时,整个modal的内容都将需要通过父组件来进行分发。我们可以这样写(可能不太理想,但我们后面会慢慢让她变得更完善):
<!-- modal组件模板 -->
<template id="modal">
    <div class="modal-backdrop">
        <div class="modal" @click.stop>
            <slot></slot>
        </div>
    </div>
</template>

// JavaScript Code
Vue.component('modal', {
    template: '#modal',
    methods: {
        close: function (event) {
            this.$emit('close');
        }
    }
})

let app = new Vue({
    el: '#app',
    data () {
        return {
            toggleModal: false
        }
    },
    methods: {
        showModal: function () {
            this.toggleModal = true
        },
        closeModal: function () {
            this.toggleModal = false
        }
    }
})
在modal组件的template中,只使用了一个<slot>,这个时候在父组件中使用modal组件时,父组件分发的内容就会替换<slot>中的内容:
<div id="app">
    <modal v-show="toggleModal" @click="closeModal">
        <div>
            <div class="modal-header">
                <div  class="close rotate" @click="closeModal">
                    <i class="fa-times fa"></i>
                </div>
                <h3 class="modal-title">Modal Header</h3>
            </div>
            <div class="modal-body">
                <h3>Modal Body</h3>
                <p>Modal body conent...</p>
            </div>
            <div class="modal-footer">
                <button class="btn" @click="closeModal">关闭</button>
            </div>
        </div>
    </modal>
    <button class="btn btn-open" @click="showModal">Show Modal</button>
</div
最终的效果如下:
这样写感觉是不是怪怪的。我也是这么认为的,这只是为了说明单个slot的使用。接下来我们看看具名插槽。
具名插槽
<slot>可以用一个特殊的属性name来进一步配置父组件如何分发内容。多个插槽可以有不同的名字。具名插槽将匹配内容片段中有对应slot特性的元素。
仍然可以有一个匿名插槽,它是默认插槽,作为找不到匹配的内容片段的备用插槽。如果没有默认插槽,这些找不到匹配的内容片段将被抛弃。
前面示例写的modal组件使用了一个匿名slot。如果我们使用多个slot时,会让modal组件变得更为灵活。众所周知,对于一个modal组件,其主体结构包括了modal-header、modal-body和modal-footer(当然,很多时候可能不会同时出现,根据需要选择)。那么在定义modal组件的template时,可以使用三个slot,它们的name属性分别命名为header、body和footer。
基于上例,把模板修改成:
<template id="modal">
    <div class="modal-backdrop">
        <div class="modal" @click.stop>
            <slot name="header"></slot>
            <slot name="body"></slot>
            <slot name="footer"></slot>
        </div>
    </div>
</template>
在使用模板的时候:
<div id="app">
    <modal v-show="toggleModal" @click="closeModal">
        <div class="modal-header" slot="header">
            <div  class="close rotate" @click="closeModal">
            <i class="fa-times fa"></i>
            </div>
            <h3 class="modal-title">Modal Header</h3>
        </div>
        <div class="modal-body" slot="body">
            <h3>Modal Body</h3>
            <p>Modal body conent...</p>
        </div>
        <div class="modal-footer" slot="footer">
            <button class="btn" @click="closeModal">关闭</button>
        </div>
    </modal>
    <button class="btn btn-open" @click="showModal">Show Modal</button>
</div>
其他不变,最终的效果如下:
这个时候,你可以根据你的需要,在使用的时候视项目情况去选择,使用具名的插槽。
在《使用Vue创建Modal组件》一文中,也涉及到了
slot的内容,现在回过头来看,将会变得更轻松些。
作用域插槽
作用域插槽是一种特殊类型的插槽,用作一个(能被传递数据的)可重用模板,来代替已经渲染好的元素。
在子组件中,只需将数据传递到插槽,就像你将prop传递给组件一样:
<div class="child">
    <slot text="hello from child"></slot>
</div>
在父级中,具有特殊特性 slot-scope 的 <template> 元素必须存在,表示它是作用域插槽的模板。slot-scope 的值将被用作一个临时变量名,此变量接收从子组件传递过来的 prop 对象:
<div class="parent">
    <child>
        <template slot-scope="props">
            <span>hello from parent</span>
            <span>{{ props.text }}</span>
        </template>
    </child>
</div>
如果我们渲染上述模板,得到的输出会是:
<div class="parent">
    <div class="child">
        <span>hello from parent</span>
        <span>hello from child</span>
    </div>
</div>
在 2.5.0+,
slot-scope能被用在任意元素或组件中而不再局限于<template>。
作用域插槽更典型的用例是在列表组件中,允许使用者自定义如何渲染列表的每一项:
<my-awesome-list :items="items">
    <!-- 作用域插槽也可以是具名的 -->
    <li
        slot="item"
        slot-scope="props"
        class="my-fancy-item">
        {{ props.text }}
    </li>
</my-awesome-list>
列表组件的模板:
<ul>
    <slot name="item"
        v-for="item in items"
        :text="item.text">
        <!-- 这里写入备用内容 -->
    </slot>
</ul>
slot-scope 的值实际上是一个可以出现在函数签名参数位置的合法的 JavaScript 表达式。这意味着在受支持的环境 (单文件组件或现代浏览器) 中,您还可以在表达式中使用 ES2015 解构:
<child>
    <span slot-scope="{ text }">{{ text }}</span>
</child>
比如下面这个示例:
如果想进一步的了解slot中的作用域插槽,可以阅读《Vue的作用域插槽》一文。
总结
这篇文章主要学习和了解了Vue中的插槽<slot>。是一个空壳子,它显示与否以及怎么显示完全是由父组件来控制。不过,插槽显示的位置由子组件自身决定,slot写在组件template的哪块,父组件传过来的模板将来就显示在哪块。在写一些组件的时候,slot能帮助我们做很多事情,也能让组件可复用性变得更为灵活。
如需转载,烦请注明出处:https://www.fedev.cn/vue/vue-slot.htmlAir Jordan 89 Shoes

