初探React Context API
最近在整理CSS自定义属性在React中的使用时了解到“可以使用React Context API相关的知识更好的在React组件中使用CSS自定义属性”,但是自己对这方面的知识了解的并不多,因此想借此机会来学习React Context API相关的知识。也基于这个原因有了这篇文章。
为什么要React Context API
我们从一个React的实例开始。假设你要构建一个React的应用,该应用有一个最简单的功能,就是Dark Mode的切换。简单地说,在Web应用上一个切换组件(比如ThemeToggle),用户点击该切换按钮可以让页面在暗色系(dark)和亮色系(light)之间切换。
通常我们会通过props为所有组件提供当前主题的模式,并使用state来更新当前的主题。
在/src/components/目录下分别创建了GrandChild、Child、ParentComponent和ThemeToggle几个组件:
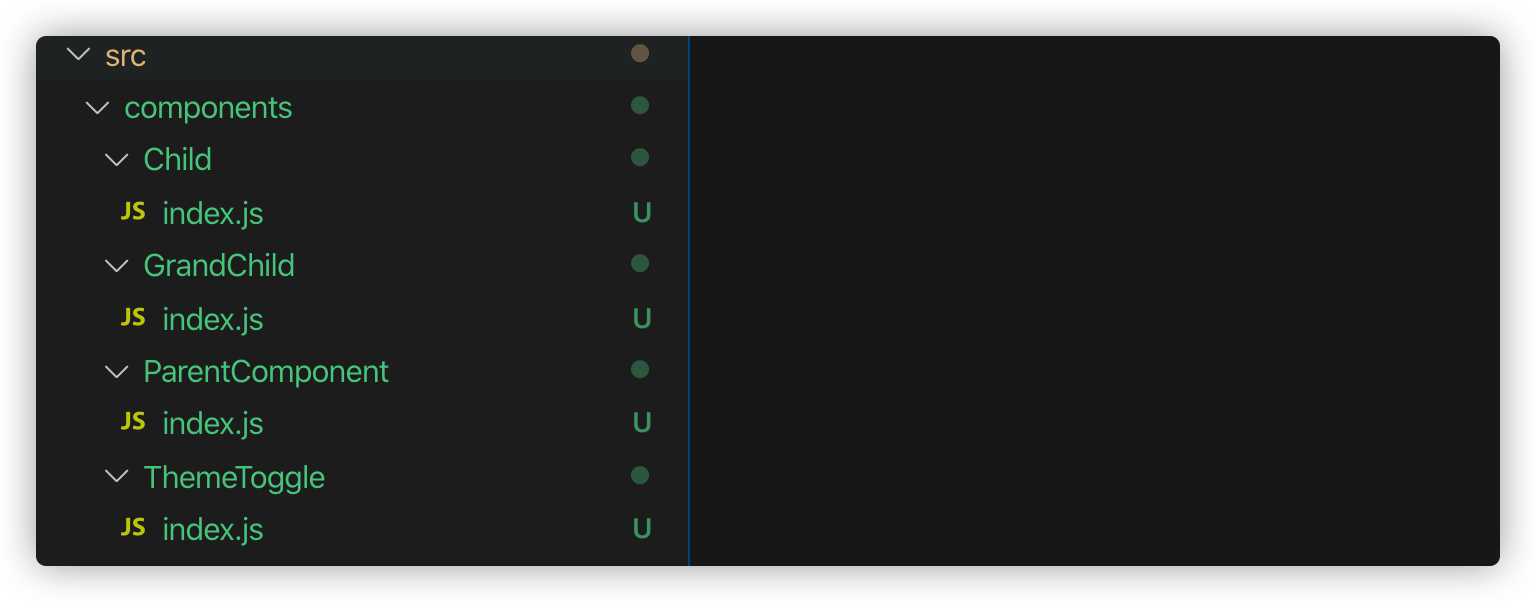
示例代码如下:
// /src/components/GrandChild
import React from 'react'

const GrandChild = (props) => {
    const styled = {
        color: `${props.theme.color}`,
        background: `${props.theme.background}`
    }
    return <h1 style={{...styled,...props.styles}}>Theme Toggle</h1>
}

export default GrandChild;

// /src/components/Child
import React from 'react'
import GrandChild from '../GrandChild'

const Child = (props) => {
    const styled = {
        border: `5px solid ${props.theme.color}`,
        padding: `10vmin 20vmin`,
        borderRadius: '8px'
    }

    return <GrandChild theme = {props.theme} styles={styled} />
}

export default Child

// /src/components/ParentComponent
import React from 'react'
import Child from '../Child'

const ParentComponent = (props) => <Child theme = {props.theme} />

export default ParentComponent

// /src/components/ThemeToggle
import React from 'react'

const ThemeToggle = (props) => {
    const styled = {
        background: `${props.theme.background}`,
        color: `${props.theme.color}`,
        border: `4px solid currentColor`,
        borderRadius: `6px`,
        padding: `2vmin 4vmin`,
        margin: `4vmin`,
        cursor: `pointer`
    }
    return <button onClick={props.click} style={styled}>Toggle Dark Mode</button>
}

export default ThemeToggle

// /src/App.js
import React, {Fragment} from 'react';
import ParentComponent from './components/ParentComponent'
import ThemeToggle from './components/ThemeToggle'

const dark = {
    background: '#121212',
    color: '#fff'
}

const light = {
    background: '#fff',
    color: '#444'
}

const App = () => {
    const [theme, setTheme] = React.useState('light')

    const onClickHander = () => {
        theme === 'light' ? setTheme('dark') : setTheme('light')
    }


    return <Fragment>
        <ParentComponent theme={theme === 'light' ? light : dark} />
        <ThemeToggle click={onClickHander} theme={theme === 'light' ? light : dark} />
    </Fragment>
}

export default App;
效果如下:

在这个示例中,在ParentComponent组件中指定了theme这个props,并且将这个props一级一级往下传,传给组件树下的所有组件。即,将theme传递到需要它的地方,在本例中会传到GrandChild组件。而Child组件和theme(props)没有任何关系,它只是作为一个媒体而以。
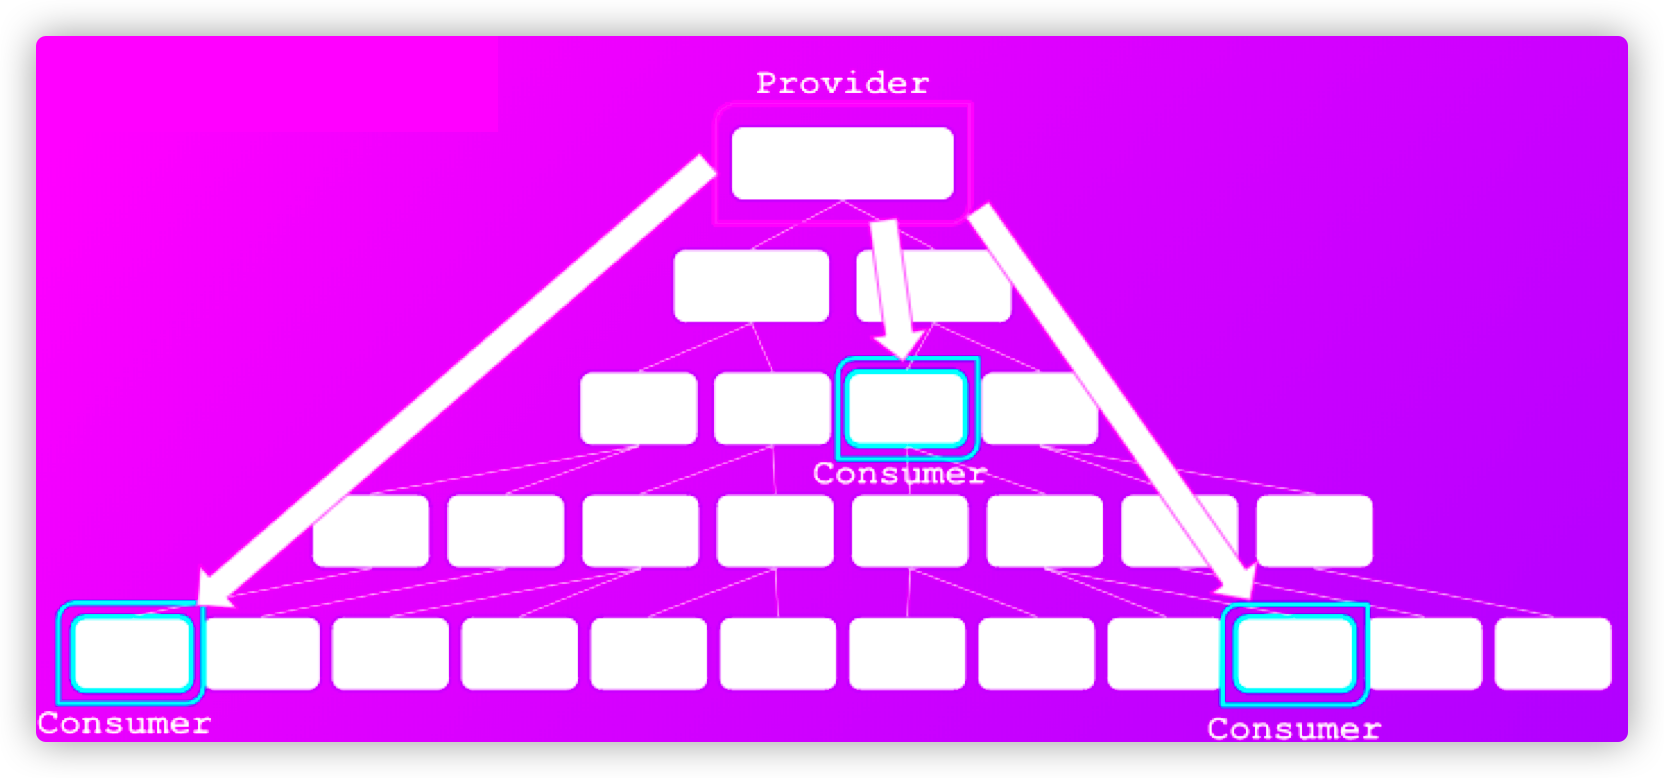
试想一下,在React中组件树就有点类似于我们熟悉的DOM树:

注意,上图中每个白色的矩形方框代表的就是React的组件。
正如上图所示,我们可以在最底层组件中添加state,但如果要将数据传递给兄弟组件的话,在React Context API之前,我们只能将state放到他们的父组件中(组件树中更高的组件位置),然后通过props将其传递回同级组件:
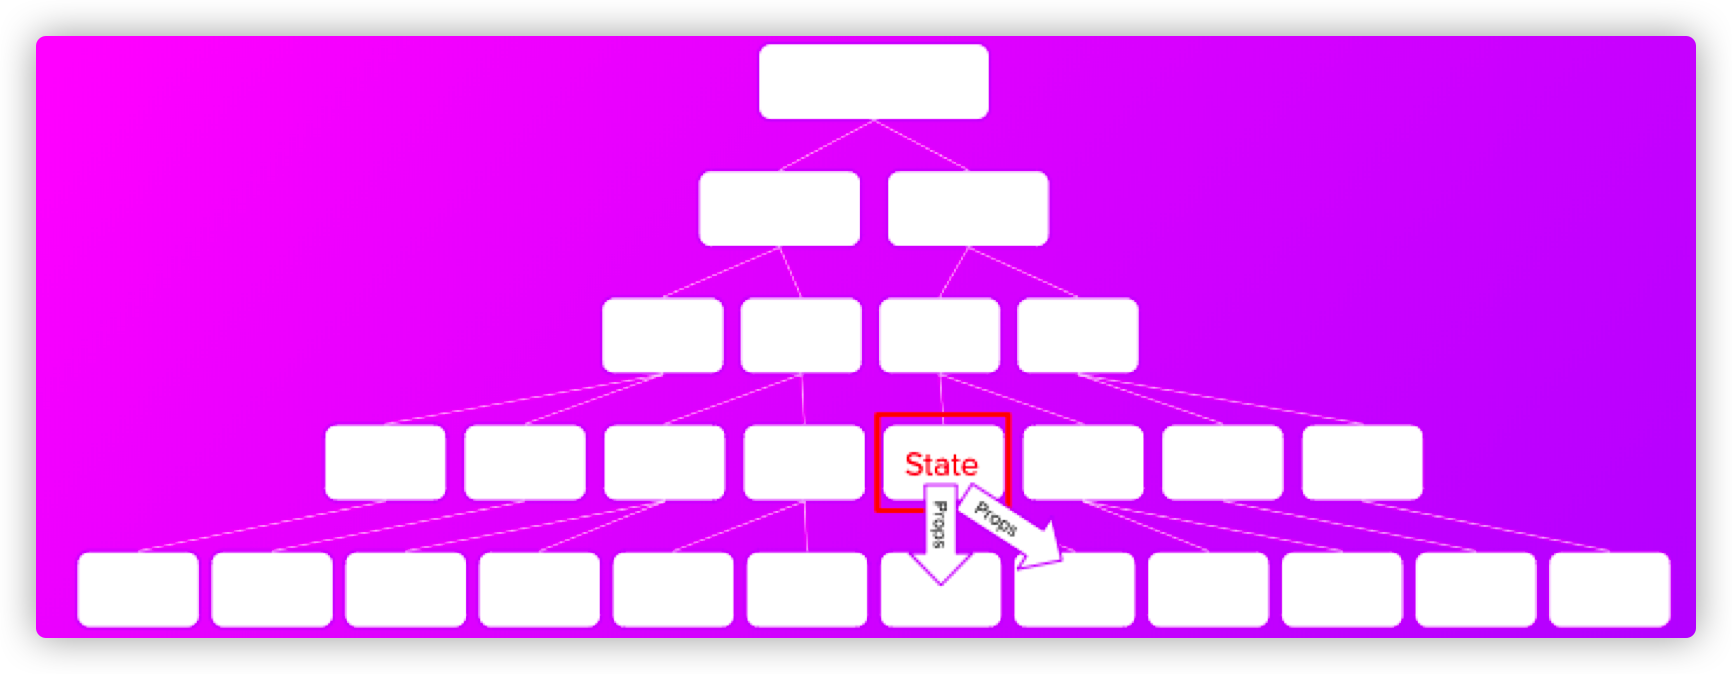
就像上面的示例,我们需要将state从组件树的最顶层一级一级往下传,哪怕是所有中间层组件不需要使用这些数据,但它必须为了后面的组件做为媒介,将state传递到最底层组件。
在React社区中,将这种冗长和耗时的过程称为Prop Drilling。
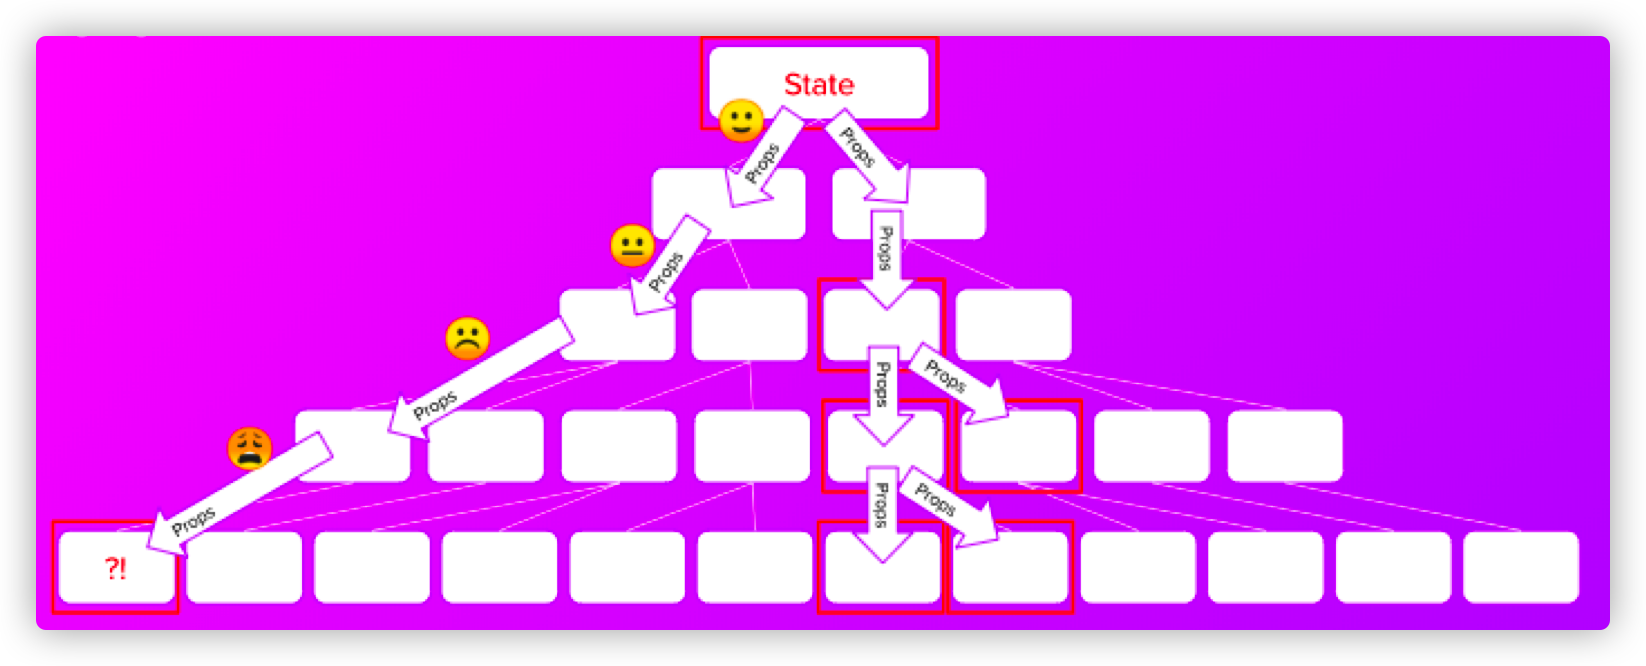
对应到上面的示例中,那就是:
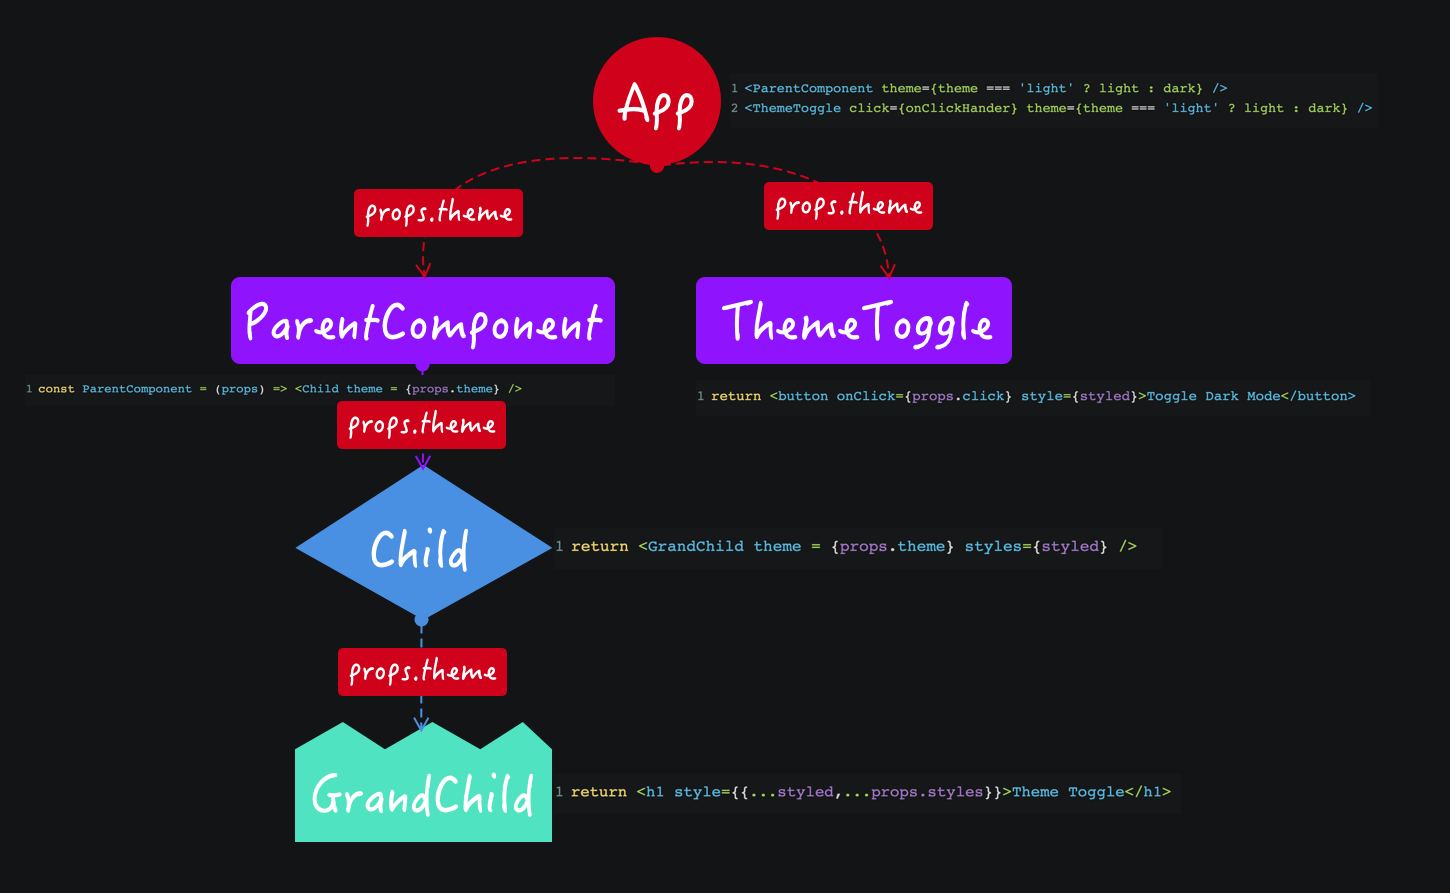
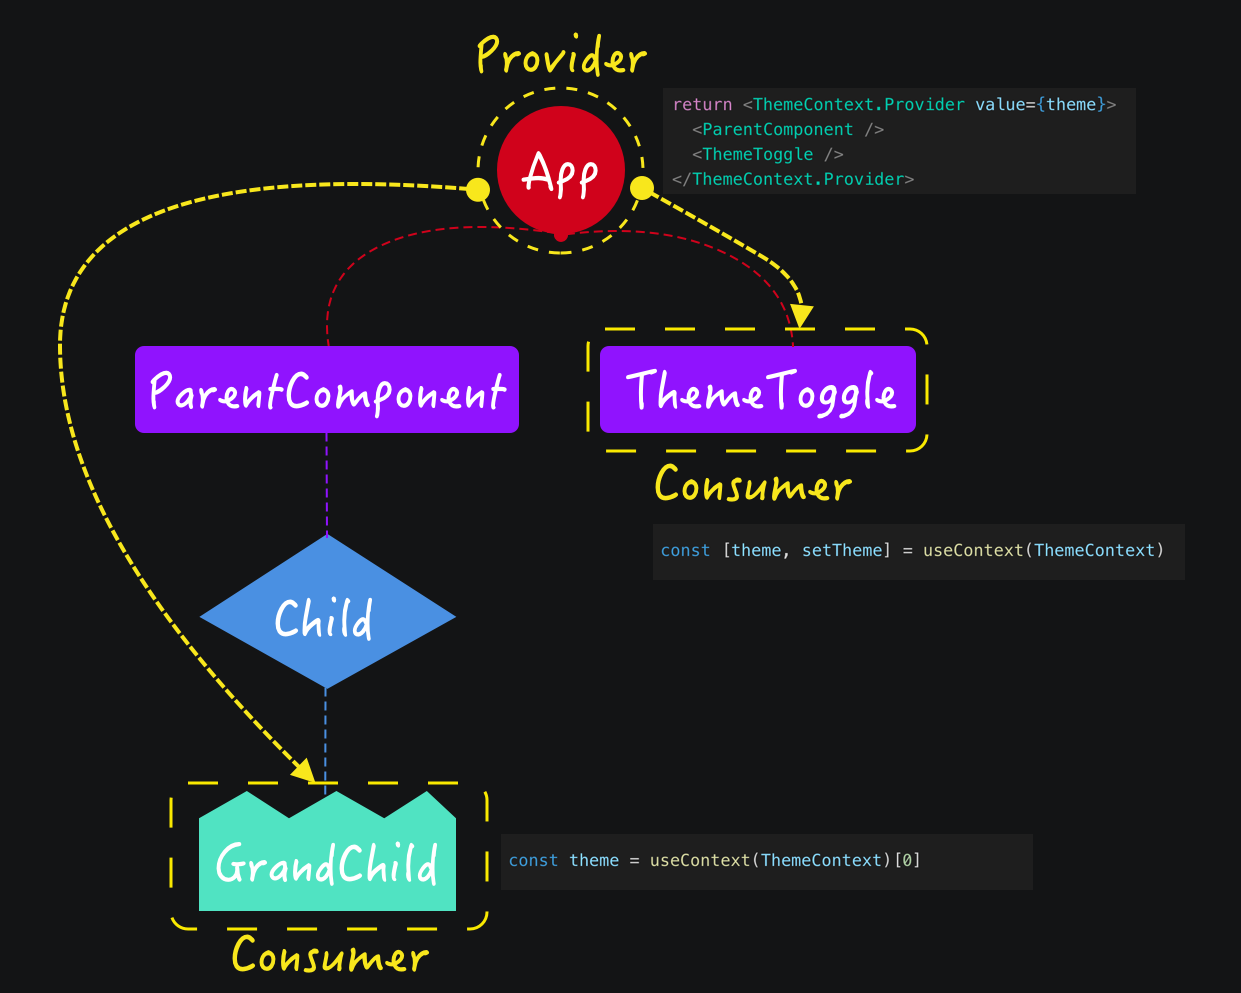
React Context API正是用来解决Prop Drilling的问题。React Context API提供了一种通过Provider和Consumer用来提供数据和消费数据,它们可以在组件件中传递数据,最主要的是不必要一级一级的通过props向组件树传递state。简单地说,在组件树最顶层的组件中通过Provider提供数据,在后面的任何一个子组件树可以通过Consumer来消费Provider提供的数据:
React Context API简介
Context提供了一个无需为每层组件手动添加
props,就能在组件树间进行数据传递的方法。
在这个特性还没出现之前,在React应用中数据的通讯是通过props属性自上而下(由父及子)进行传递的,换句话说,必须通过props传递到每个组件中,然后在组件中重复相同的过程。但这种做法对于某些类型的属性而言是极其繁锁的,也会变得非常的糟糕,最终可能会导致props在我们的组件中要不断的一层一层嵌套。
React Context API的出现主要是为了帮助我们解决这方面的问题,它提供了一种在组件之间共享此类值的方式,而不必显式地通过组件树的逐层传递props。也就是说,它允许父组件隐式地将数据传递给子组件(不管组件树有多深)。换句话说,可以将数据添加到父组件中,然后任何子组件都可以访问它。
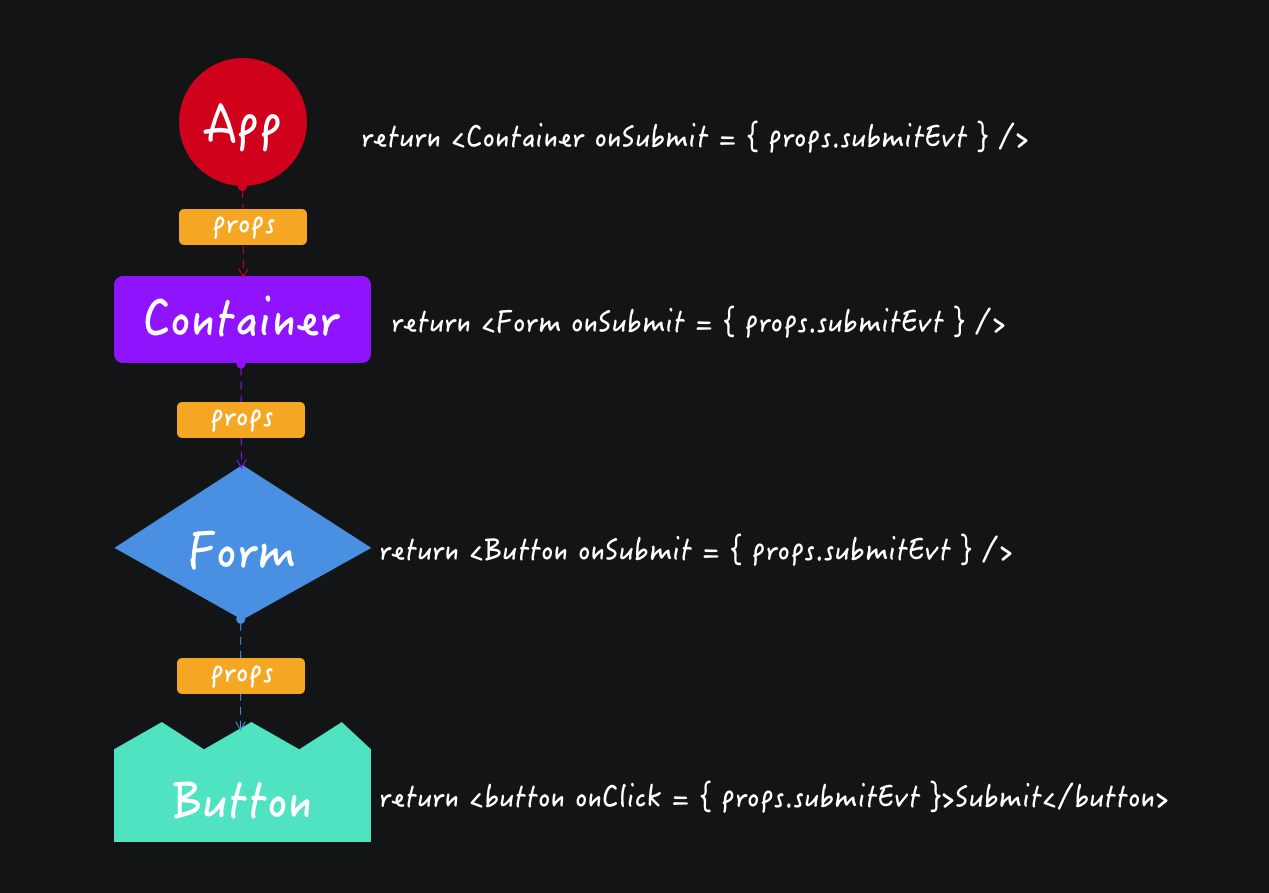
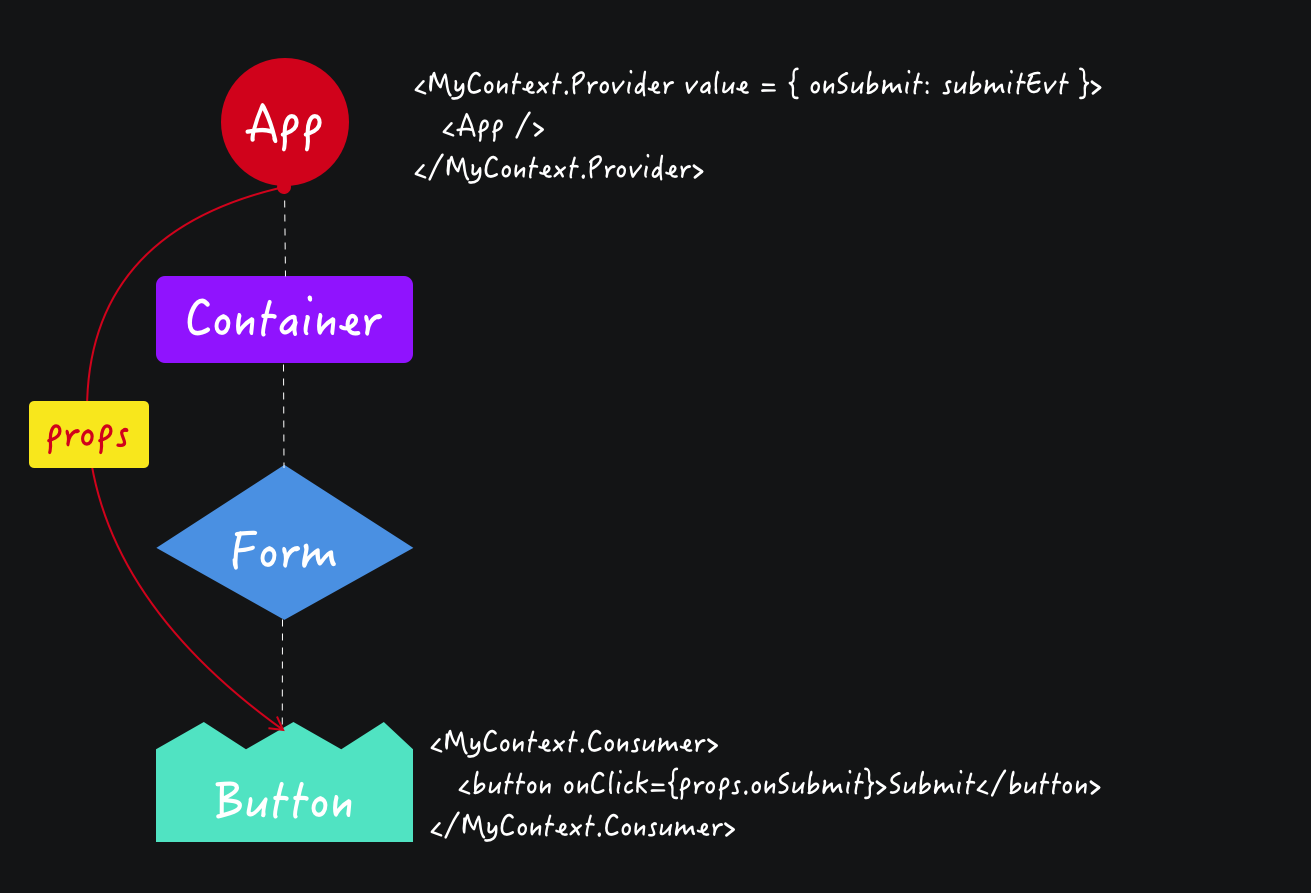
假设我们有这样的一个使用场景,在一个React应用中,我们有App、Container、Form和Button四个组件,它们之间是依次被嵌套:
App ➜ Container ➜ Form ➜ Buttton
假如我们使用props传递就需要一层一层往里传:
换成Context,就可以直接获取最顶层App组件绑定的值:
React Context API入门级应用
对于像我这样的初级使用者而言,要想彻底的了解React Context API,只能从最简单的应用开始。为了更好的理解它的使用,我们从最简单的示例开始。
创建上下文对象
在JavaScript中(或React)中常将Context称为上下文。
在React中使用Context的话,我们首要做的就是创建上下文对象(Context Object)。可以使用React上的.createContext()创建一个Context对象:
const DataContext = React.createContext()
尝试着把这个Context对象DataContext在控制台上打印出来:
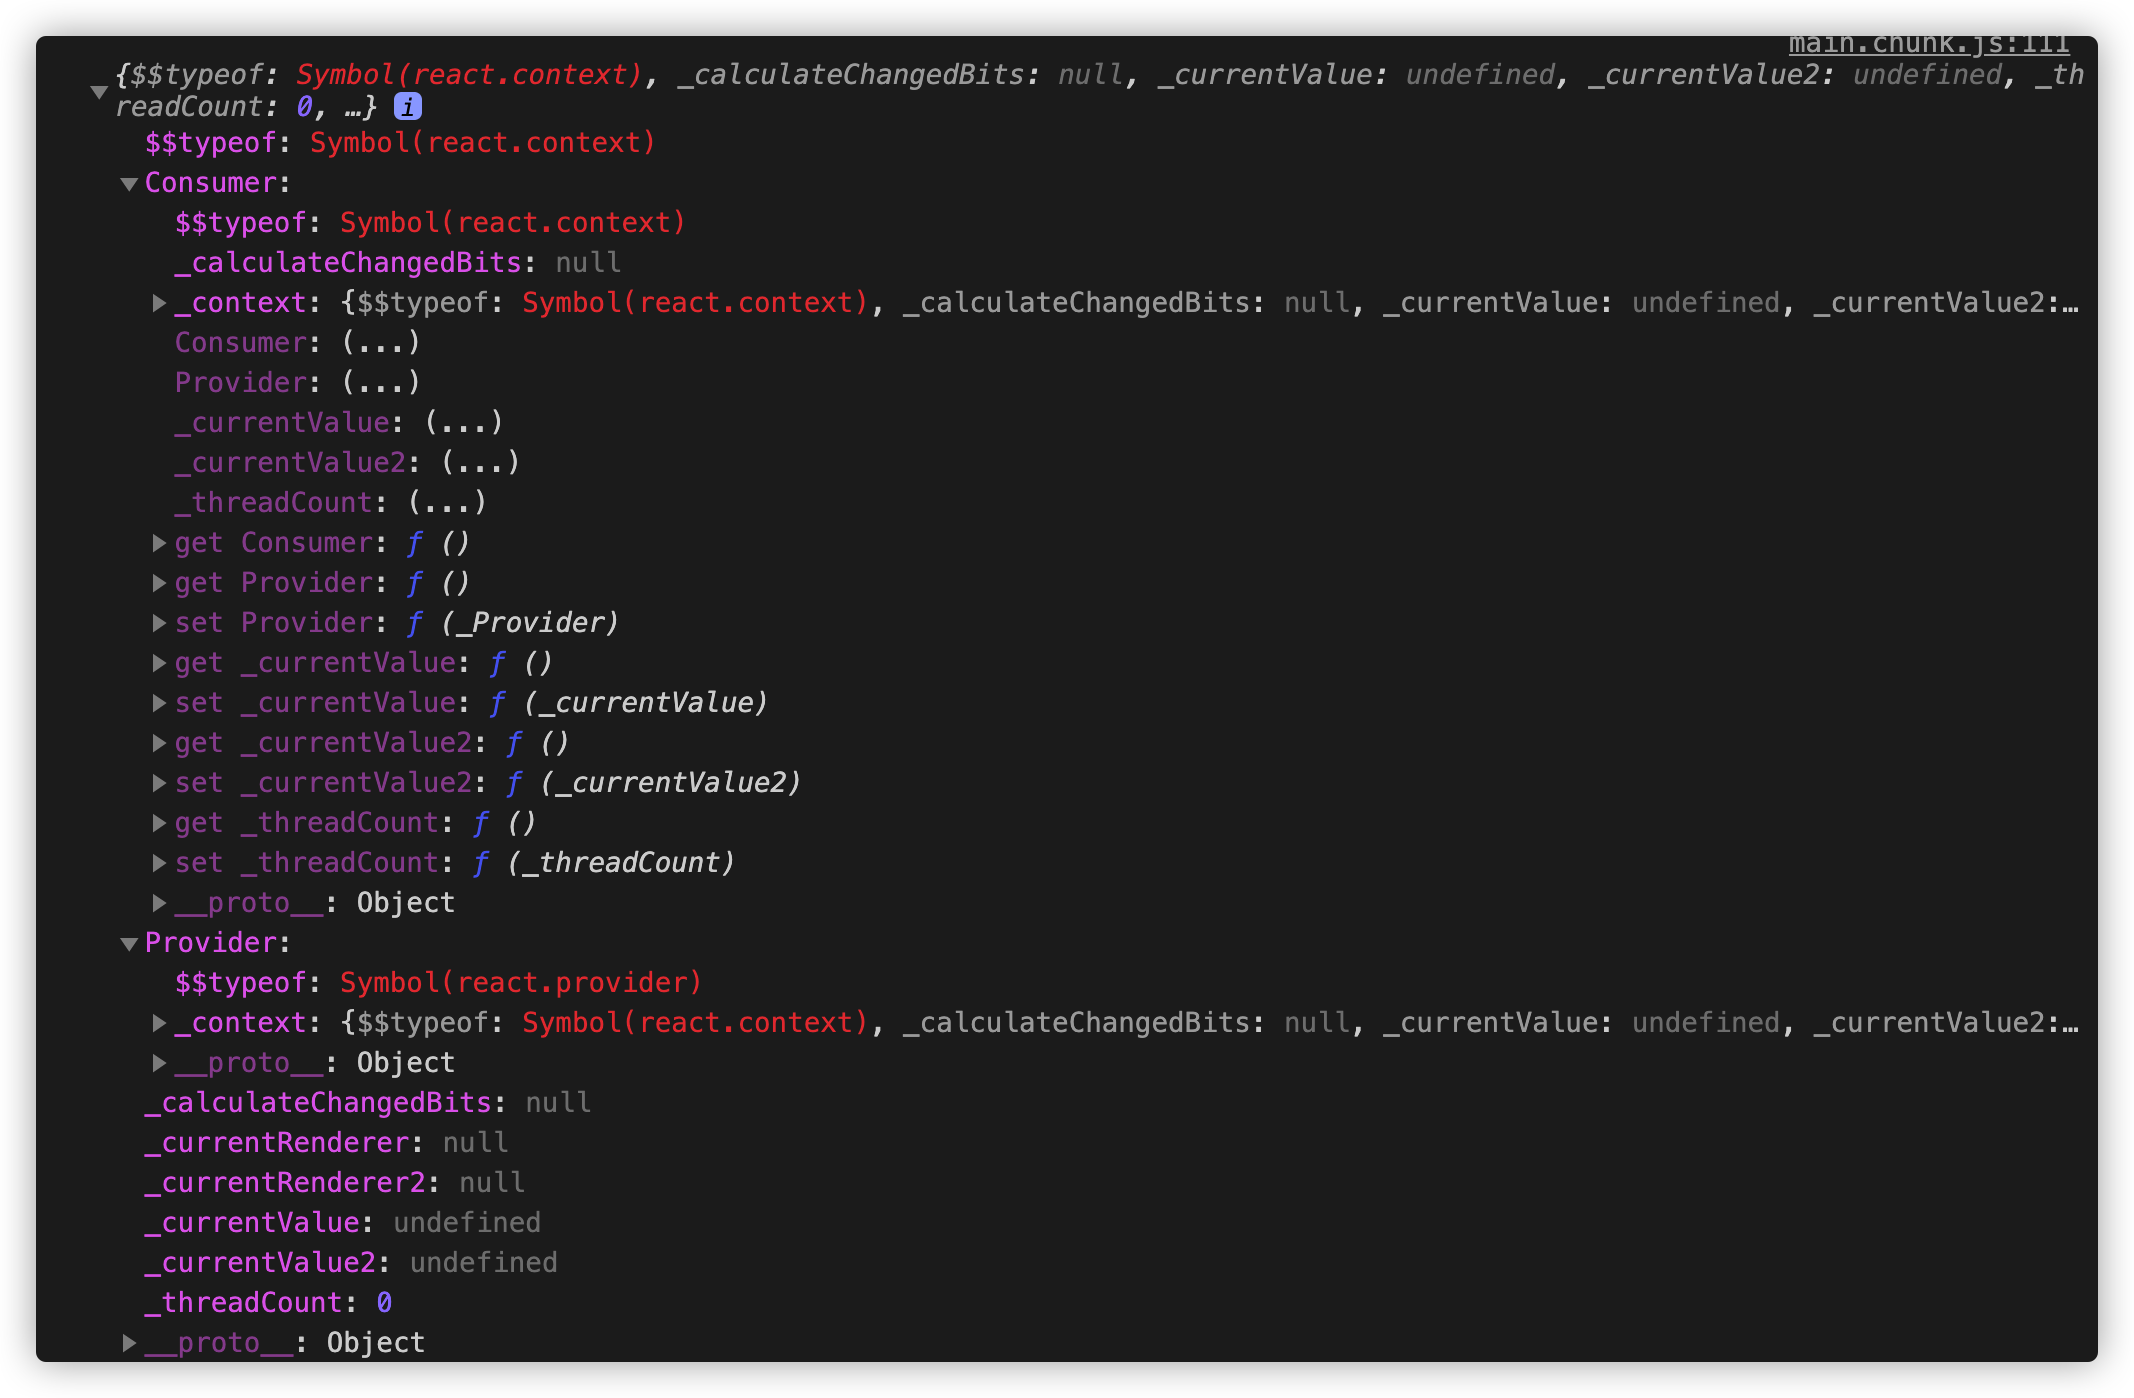
这个时候可以从组件树中离自身最近的那个匹配的Prrovider中读取到当前的context值。
只有当组件所处的树中没有匹配到Provider时,其defaultValue参数才会生效。这有助于在不使用Provider包装组件的情况下对组件进地测试。
另外,createContext()方法提供了Provider和Consumer能力,其中一个是提供者,另一个是消费者,而且这两个属性都是成对出现的,即每一个Provider都会有对应的一个Consumer。
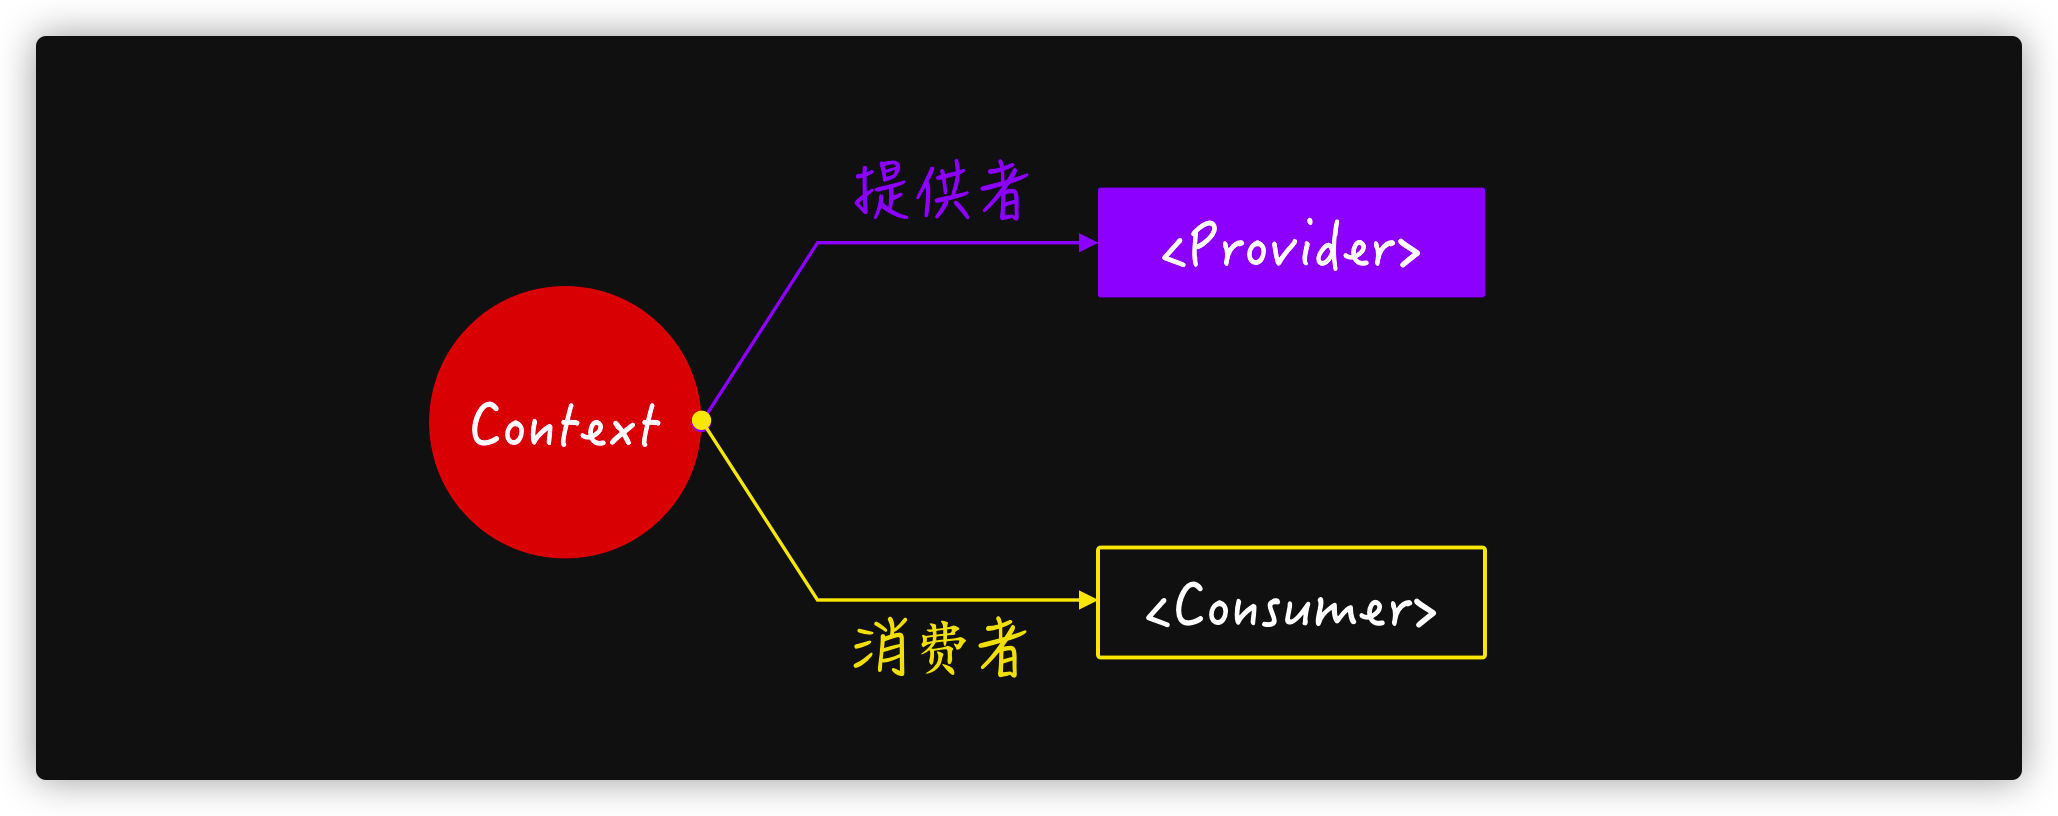
Provider将作为父组件使用,它持有所有Consumer都可以共享的值。注意,Consumer只能用于Provider的子组件。
使用Provider提供数据
上一步,使用React.createContext()创建了一个名为DataContext的上下文对象,在其中,我们用一些值(value)初始化一个状态(state),可以使用DataContext的Provider接受一个value属性,传递给子组件消费(Consumer)
const App = () => <DataContext.Provider value={{userName: 'Airen', age: 30 }}>
    <h4>Child Component</h4>
</DataContext.Provider>;
Provider的value属性的值可以是字符串、数字或对象。
消费Provider提供的数据
Provider创建了数据,其创建的数据可以通过context对象的Consumer属性给子组件消费。主要有三种方法来消费Provider属性创建的数据。
使用Consumer组件消费数据
创建一个新组件,并且在该组件中使用DataContext的Consumer来消费数据。这将返回一个函数,该函数允许组件消费Provider中设置的值。比如:
const ParagraphChildComponent = () => <DataContext.Consumer>
    { value => <h4>I'm {value.userName}, {value.age} yeas old this year!</h4>}
</DataContext.Consumer>

const App = () => <DataContext.Provider value={{userName: 'Airen', age: 30 }}>
    <ParagraphChildComponent />
</DataContext.Provider>;
浏览器渲染出来的结果如下:
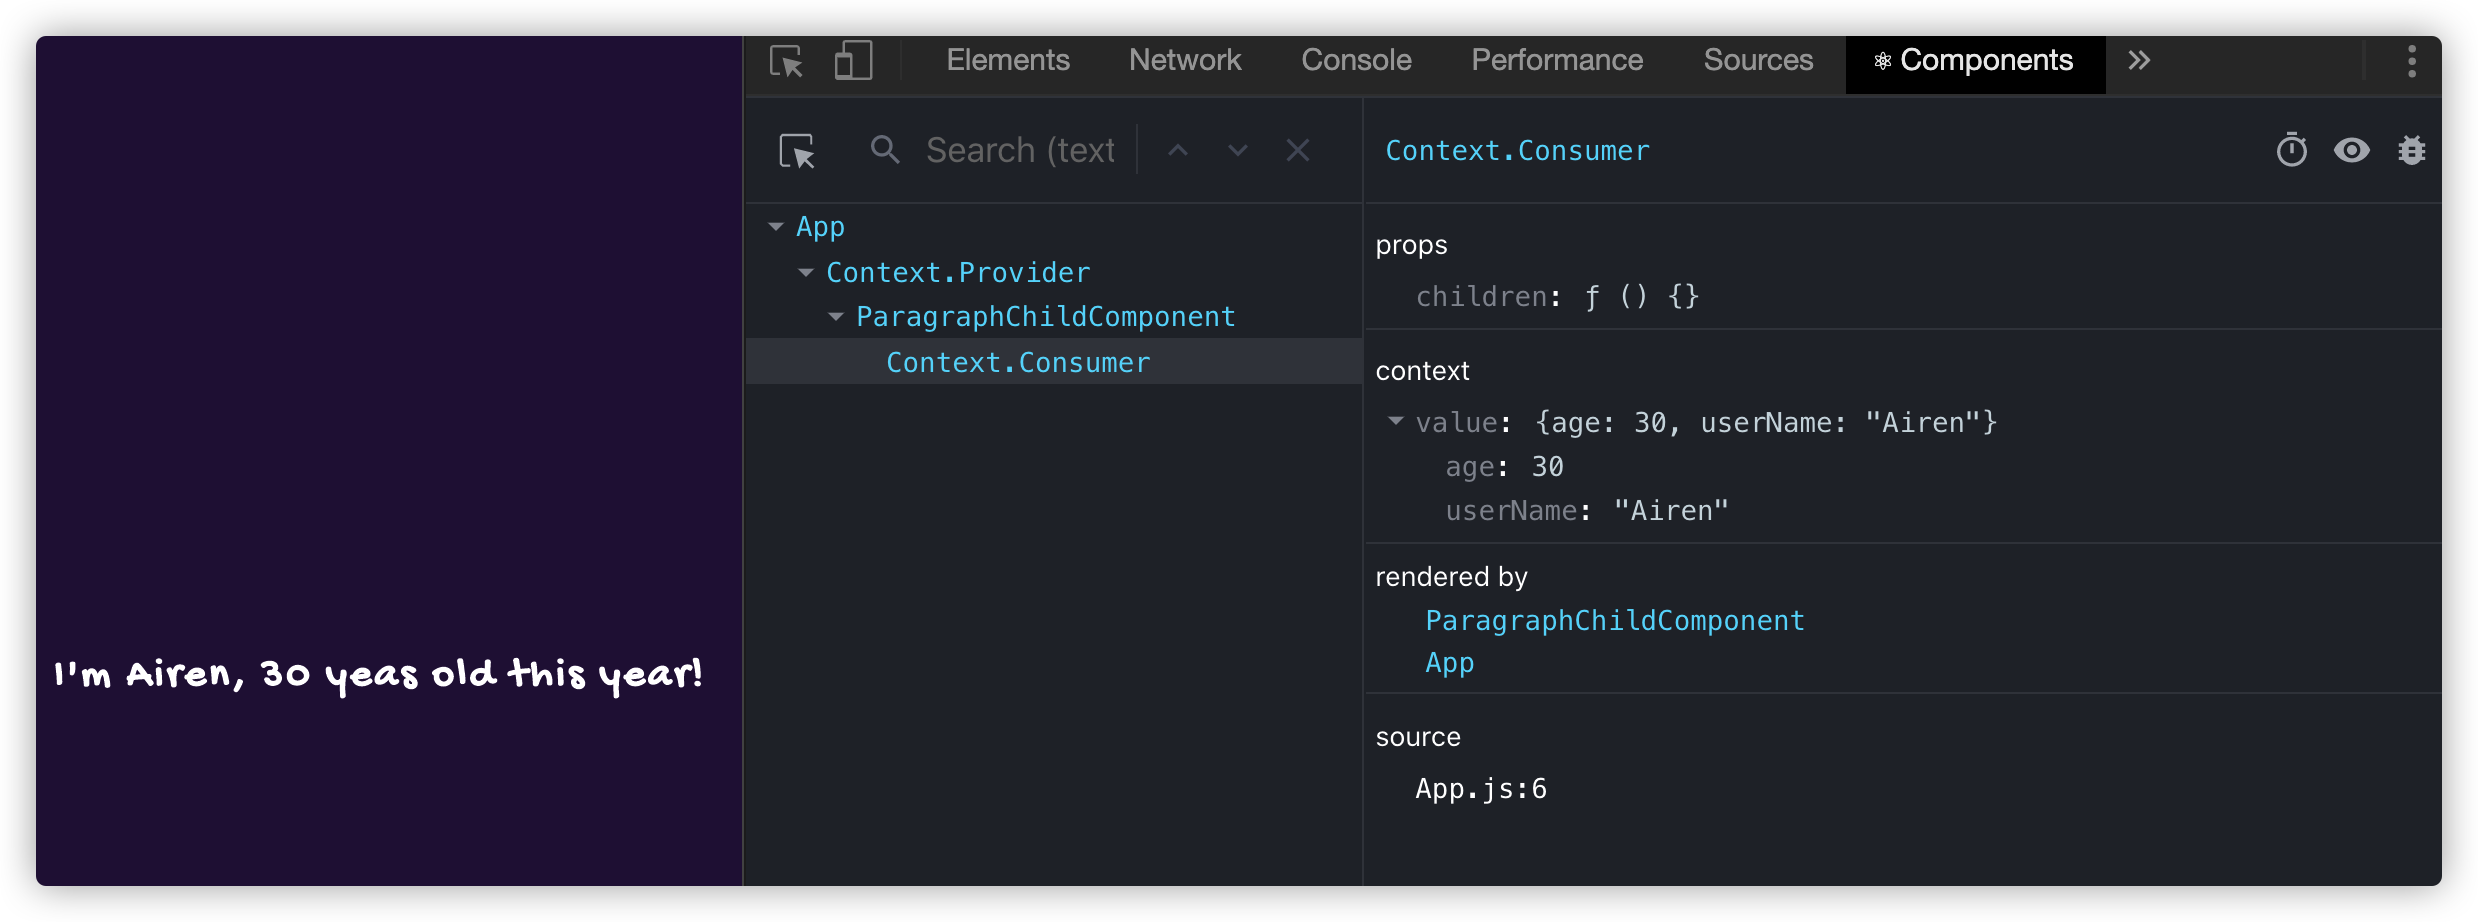
注意,DataContext.Consumer组件中返回的函数是基于context值进行渲染。
这种方式对于处理不需要任何逻辑的组件非常有用。
使用this.context和contextType来消费数据
在使用类的组件中,可以使用this.context和conteextType来消费Provider组件中设置的值。比如:
class ParagraphChildComponentWithClass extends React.Component {
    render() {
        return <h4>He is {this.context.userName}, {this.context.age} yeas old this year!</h4>
    }
}

ParagraphChildComponentWithClass.contextType = DataContext

const App = () => <DataContext.Provider value={{userName: 'Airen', age: 30 }}>
    <ParagraphChildComponentWithClass />
</DataContext.Provider>;
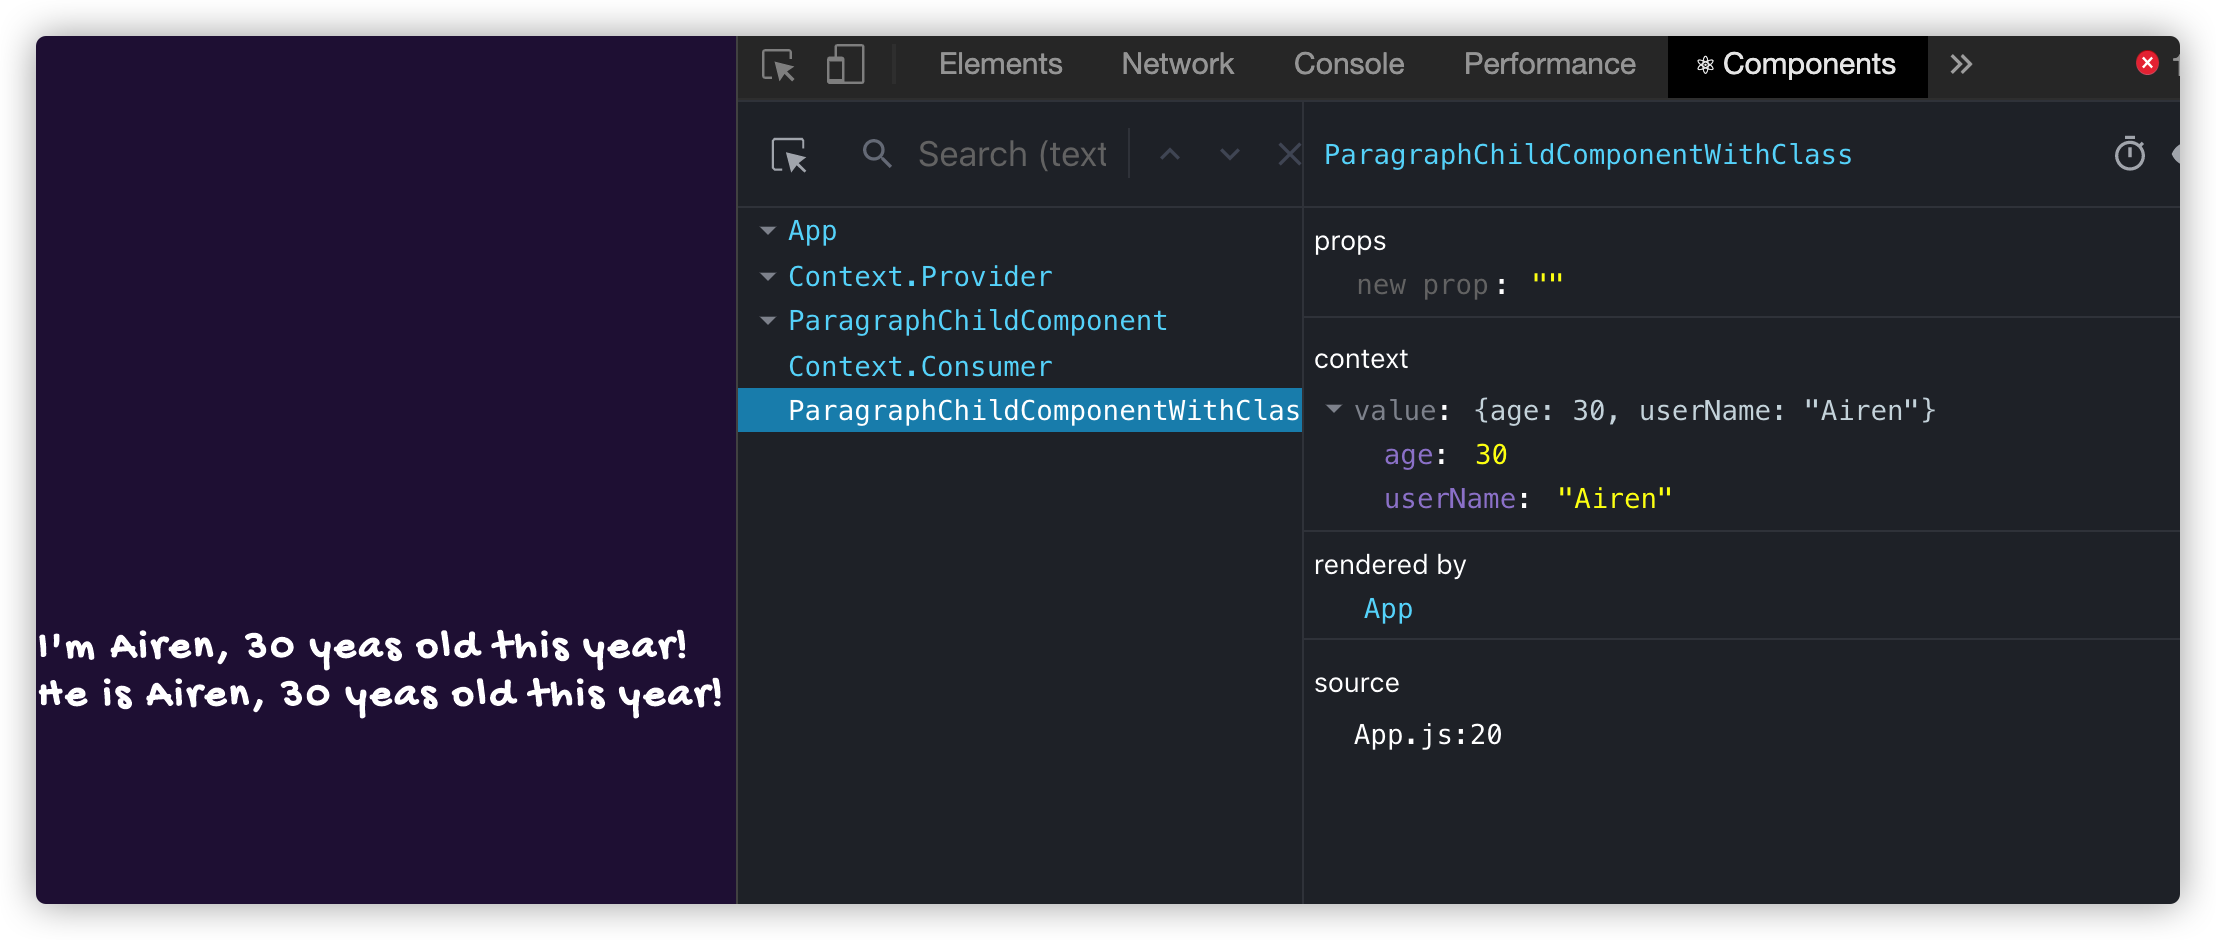
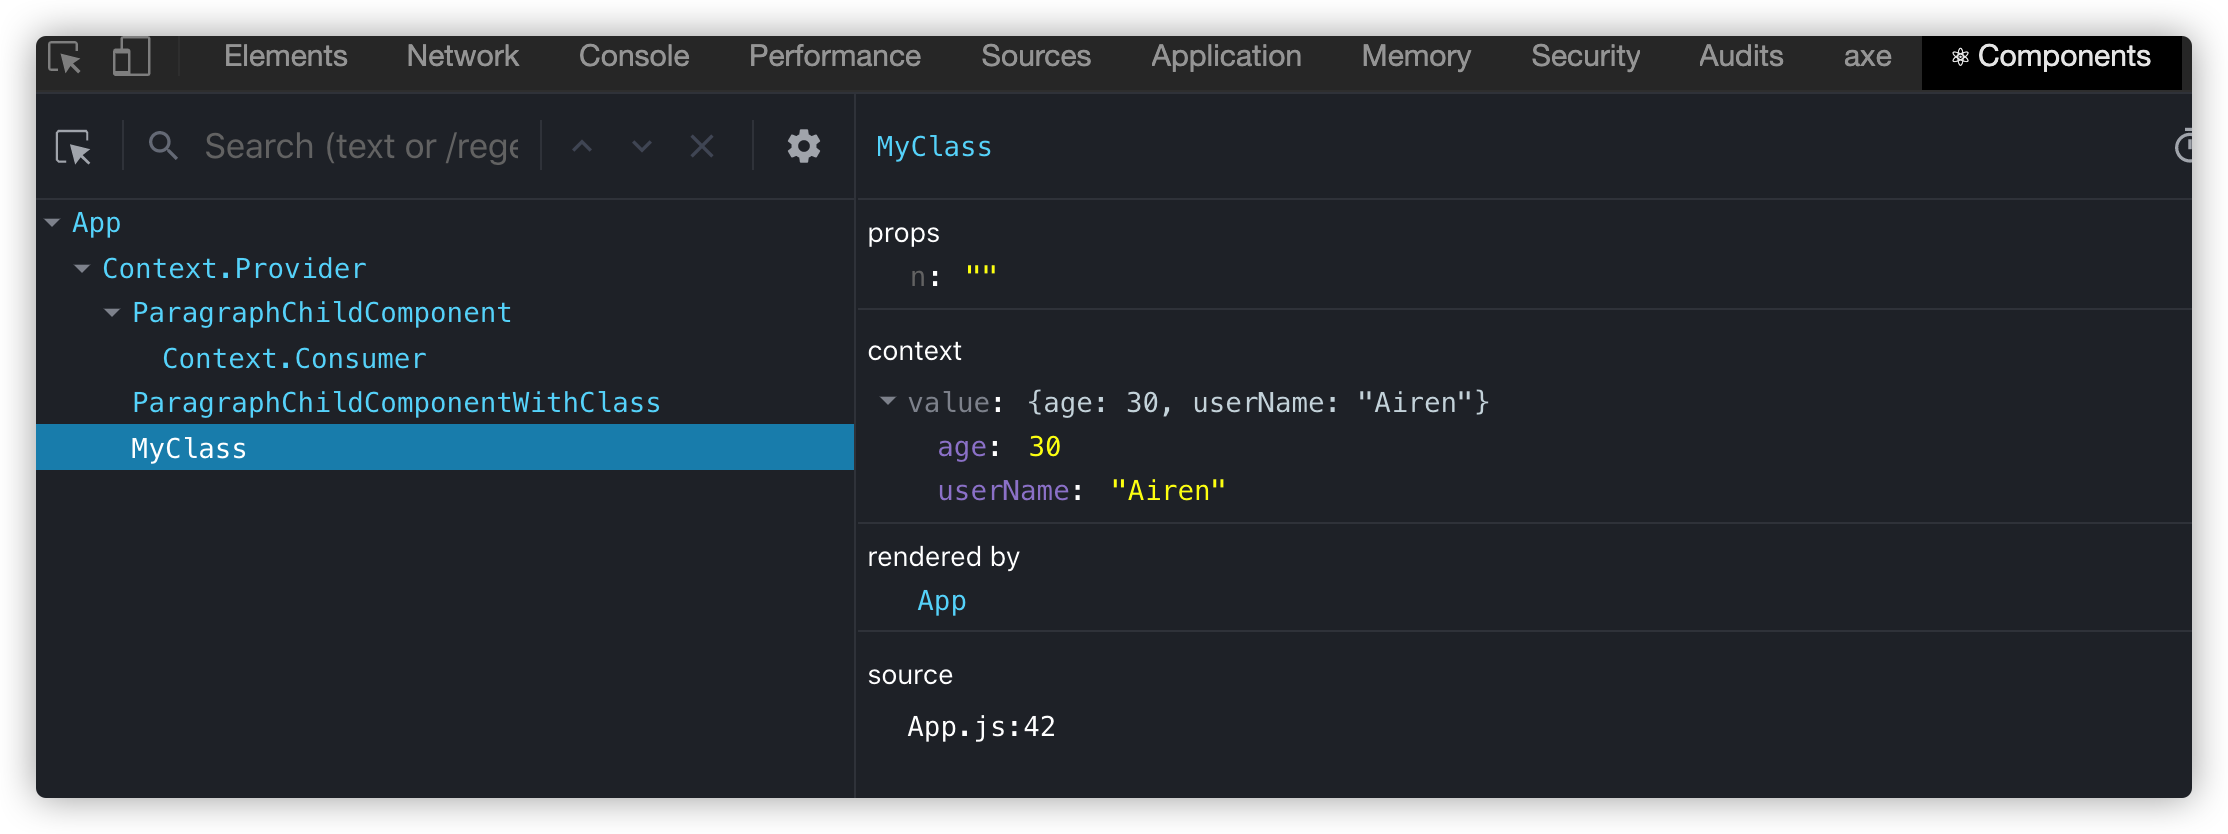
挂载在class上的contextType属性会被重新赋值为一个由React.createContext()创建的context对象。这能让你使用this.context来消费最近context上的那个值。你可以在任何生命周期中访问到它,包括render函数中。
class MyClass extends React.Component {
    componentDidMount() {
        let value = this.context
        console.log('➜componentDidMount➜➜➜', value)
    }
    componentDidUpdate() {
        let value = this.context
        console.log('➜componentDidUpdate➜➜➜', value)
    }
    componentWillUnmount(){
        let value = this.context
        console.log('➜componentWillUnmount➜➜➜', value)
    }
    render() {
        let value = this.context
        return <h4>➜UserName: {value.userName}➜➜➜ Age: {value.age}</h4>
    }
}

MyClass.contextType = DataContext

const App = () => <DataContext.Provider value={{userName: 'Airen', age: 30 }}>
    <MyClass />
</DataContext.Provider>;
使用useContext来消费数据
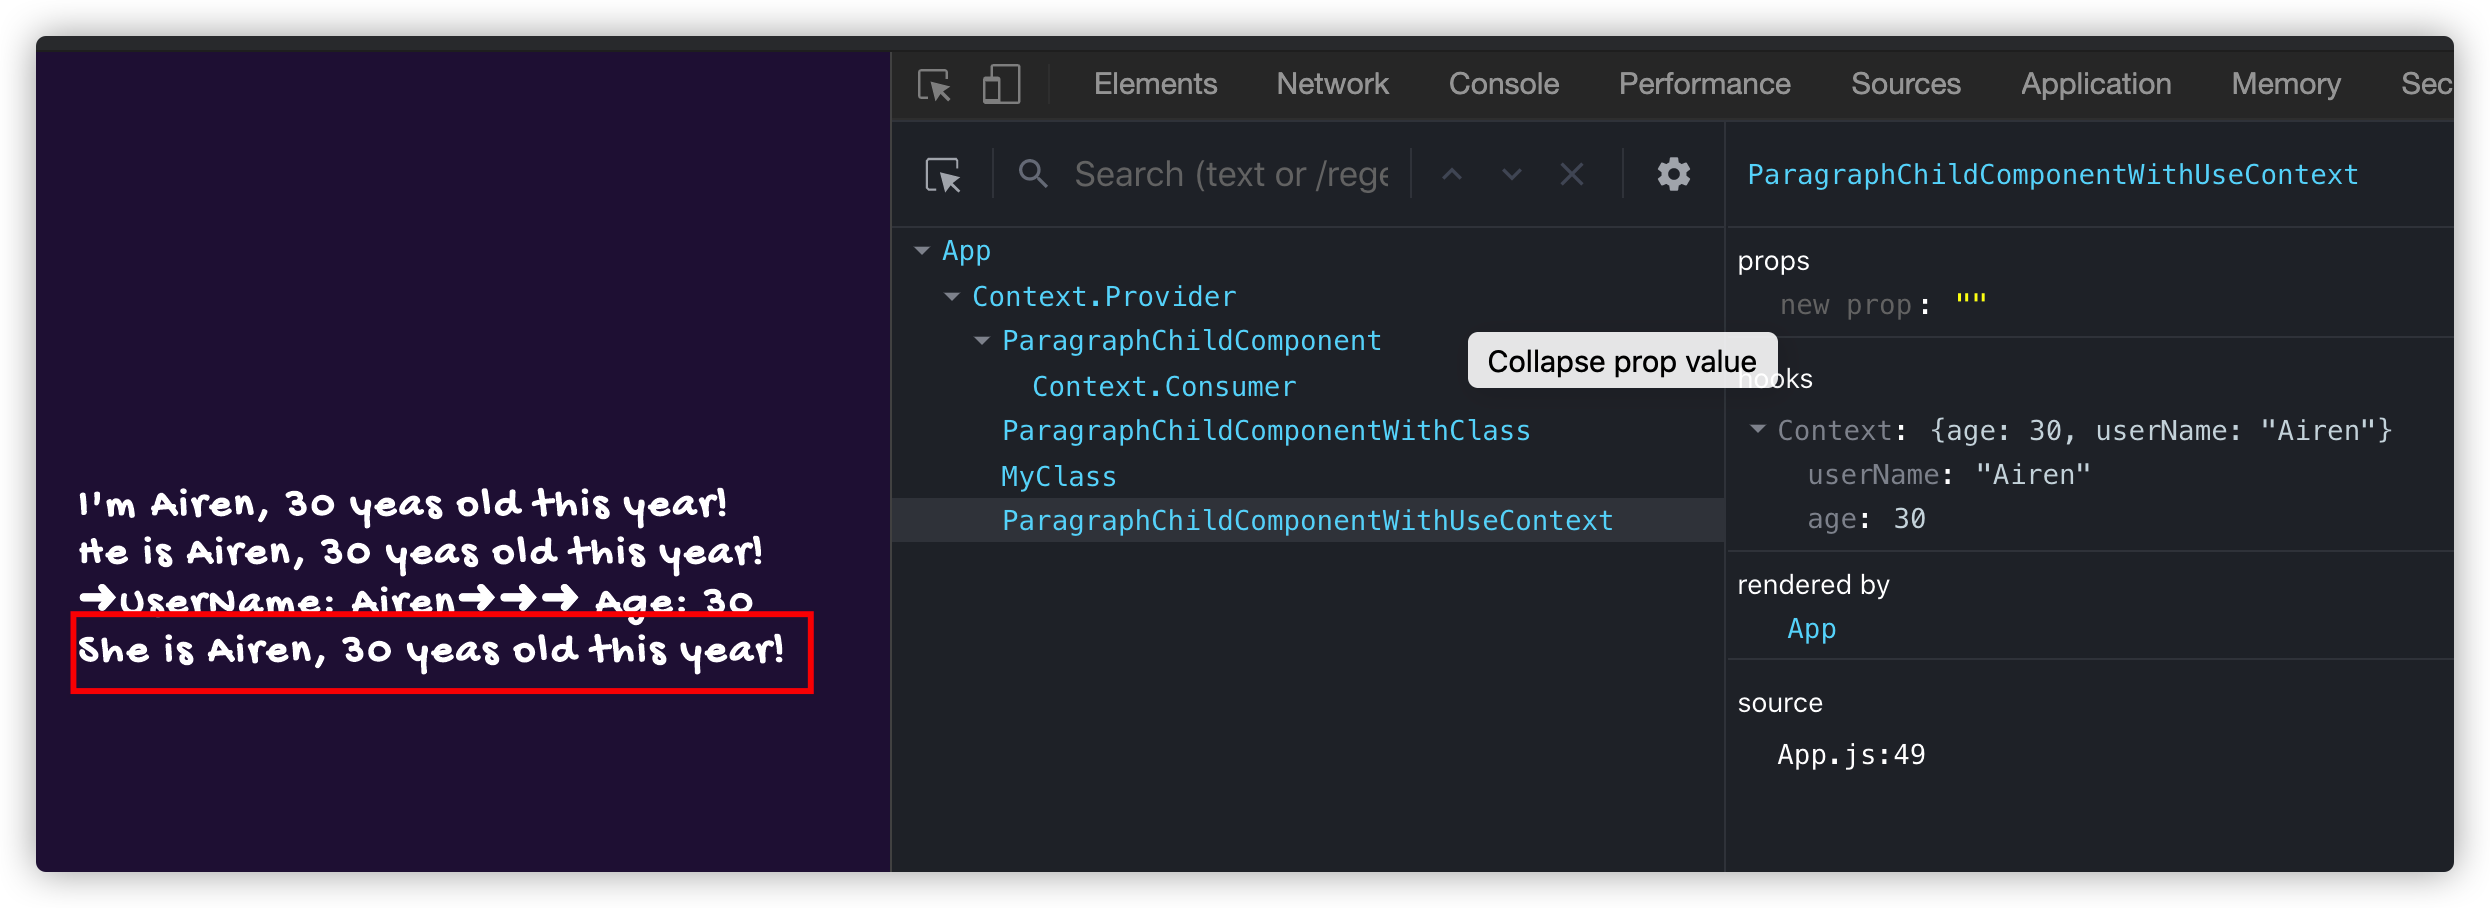
上面两种方式都可以用来消费Provider提供的数据,但这两种方法要在适用的组件中使用。除此之外,还可以使用React的useContext方法来消费Provider提供的数据。该方法用于从context中获取props,其方法与上面两种方法相同,但看起来更简单得多:
const ParagraphChildComponentWithUseContext = () => {
    const {userName, age} = useContext(DataContext)

    return <h4>She is {userName}, {age} yeas old this year!</h4>
}

const App = () => <DataContext.Provider value={{userName: 'Airen', age: 30 }}>
    <ParagraphChildComponentWithUseContext />
</DataContext.Provider>;
后面我们会多花一点时间来聊
useContext。
现在对React Context API有了一个最基础的了解,接下来我们来看看在实例中怎么使用它。
React Context API实例
我们来使用React Context API改造文章最开始的Dark Mode案例。
首先需要创建一个React的上下文context,正如上面介绍的,可以使用React.createContext来创建。比如,我在src/目录下创建一个ThemeContext.js文件,用来管理这个context。在这个示例中,给.createContext()传入一个字符串light,它是当前的主题模式:
// src/ThemeContext.js
import React from 'react'

const ThemeContext = React.createContext('light')

export default ThemeContext;
为了使ThemeContext这个上下文对所有React组件可用,我们必须在React组件树的最顶层,使用Provider来为后代子组件提供需要消费的数据。因为我们需要在light和dark两种状态下切换,因此,需要对ThemeContext.js稍作修改。使用React.createContext()创建context上下文时需要接受一个类似useState钩子结果的对象作为参数:
// src/ThemeContext.js
import React from 'react'

const ThemeContext = React.createContext(['light', () => {}])

export default ThemeContext;
在这个示例中,我们在App.js文件中来创建上下文的Provider。在创建Provider之前,需要先导入上面已创建的ThemeContext:
// src/App.js
import ThemeContext from './ThemeContext'
一旦ThemeContext被导入,那么App组件中的内容必须包含在ThemeContext.Provider标签内。Provider组件有一个名为value的props,它将包含我们想要给组件树中组件所需要的数据。这个时候,我们的App组件类似下面这样:
// src/App.js
import React from 'react';
import ThemeContext from './ThemeContext'

const App = () => {
    const theme = 'light'

    return <ThemeContext.Provider value={theme}>
        <div>子组件放在这里</div>
    </ThemeContext.Provider>
}

export default App;

这个时候,light的值可以用于React组件树中的所有组件。
现在我们可以像前面一样。创建Dark Mode所需要的颜色体系。
const dark = {
    background: '#121212',
    color: '#fff'
}

const light = {
    background: '#fff',
    color: '#444'
}
为好更好管理这两个主题颜色,这里将它们放到一个名为Color.js文件中(该文件也放在src/目录下):
// src/Color.js
export const dark = {
    background: '#121212',
    color: '#fff'
}

export const light = {
    background: '#fff',
    color: '#444'
}
接下来,我们来改造前面创建的ParentComponent、Child、GrandChild和ThemeToggle组件。先来重写ThemeToggle组件:
// src/components/ThemeToggle/index.js
import React, { useContext } from 'react'
import { dark, light} from '../../Color'
import ThemeContext from '../../ThemeContext'

const ThemeToggle = () => {
    const [theme, setTheme] = useContext(ThemeContext)

    const clickHandler = () => {setTheme(theme === 'light' ? 'dark' : 'light')}

    const currentTheme = theme === 'light' ? light : dark

    const styledButton = {
        background: `${currentTheme.background}`,
        color: `${currentTheme.color}`,
        border: `4px solid currentColor`,
        padding: `2vmin 4vmin`,
        margin: `4vmin`,
        cursor: `pointer`,
        borderRadius: `6px`,
        fontSize: `2rem`,
        fontFamily: `"Gochi Hand", sans-serif`
    }

    return <button style={styledButton} onClick={clickHandler}>{theme === 'light' ? 'Toggle Dark' : 'Toggle Light'}</button>
}

export default ThemeToggle
这里我们采用了useContext来消费顶层组件App的ThemeContext.Provider提供的数据,它将返回一个数组。我们使用ES6的解构(Destructuring),可以从数组中获取元素。然后,为ThemeToggle组件写一个onClick事件处理程序,即 clickHandler。
接下来调整最里面的组件GrandChild:
// src/components/GrandChild/index.js
import React, { useContext } from 'react'
import ThemeContext from '../../ThemeContext'
import {dark, light} from '../../Color'

const GrandChild = () => {
    const theme = useContext(ThemeContext)[0]

    const currentTheme = theme === 'light' ? light : dark

    const styled = {
        color: `${currentTheme.color}`,
        background: `${currentTheme.background}`,
        border: `5px solid ${currentTheme.color}`,
        padding: `10vmin 20vmin`,
        borderRadius: '8px'
    }

    return <h1 style={styled}>{ theme === 'light' ? 'Light' : 'Dark'} Theme</h1>
}

export default GrandChild;
在这里使用useContext(ThemeContext)[0]取出context上下文中数组中的第一个值,即theme。然后根据theme值的变化获取Color.js对应的两个颜色主题dark和light。这样就可以将对应主题的颜色运用到元素中。
对于Child和ParentComponent两个组件,我们要变得容易地多:
// src/components/ParentComponent/index.js
import React from 'react'
import Child from '../Child'

const ParentComponent = () =>  <Child  />

export default ParentComponent

// src/components/Child/index.js
import React from 'react'
import GrandChild from '../GrandChild'

const Child = () => <GrandChild  />

export default Child
最后的效果如下:

虽然GrandChild组件是组件树中最底层,但通过useContext()可以直接消费最顶层提供的数据:
React Context API来管理全局状态
在React中,以往都是使用Redux工具来管理全局状态,但随着React Context API的出现,我们可以使用它来创建一个类似于Redux的全局状态管理工具。
React的官方文档也提到过,React Context API提供了一种通过组件树传递数据的方式,而不履在每一层手动传递props。事实上,在React中我们可以结合useContext笔useReducer两个钩子函数,创建一个全局存储(store)来管理整个应用程序的状态,并支持在整个应用程序中方便地更新状态(state)。
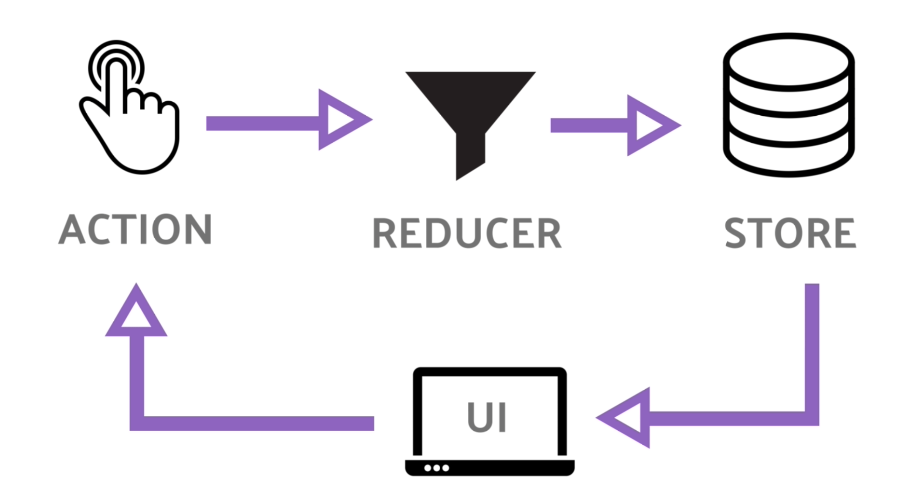
为了更好的向大家阐述这方面的特性,即,使用React Context API和React的useContext、useReducer钩子函数来管理React应用程序的全局状态。用一个计数器的示例来帮助我们理解这方面的特性。
创建一个存储器
首先在src/目录下创建一个store.js文件,用来创建全局状态的存储器。 这个存储器(该文件)包含两个部分:context(上下文)和 state(状态)。使用React.createContext()创建一个React上下文,会返回一个Provider,它会接受一个value值(即props)。Provider将会包裹整个应用程序(App)。而且value将接收useReducer钩子函数创建的状态(state)。该钩子函数接受一个(state, action) => newState类型的Reducer,并返回新的状态(newState)和一个dispatch函数。Reducer(减速器)定义了一组操作(action)以及根据操作类型更新状态的方式。
useContext钩子是组件访问全局存储(Global Store)的方式。最后,创建一个自定义钩子useStore,这样就不必要导出StoreContext,然后导入它和useContext。
// src/store.js
import React, { createContext, useReducer, useContext } from 'react'

const StoreContext = createContext()

const initialState = {
    count: 0,
    message: ''
}

const reducer = (state, action) => {
    switch (action.type) {
        case 'increment':
            return {
                count: state.count + 1,
                message: action.message
            }
        case 'decrement':
            return {
                count: state.count - 1,
                message: action.message
            }
        case 'reset':
            return {
                count: 0,
                message: action.message
            }
        default:
            throw new Error(`未定义的操作类似:${action.type}`)
    }
}

export const StoreProvider = ({ children }) => {
    const [state, dispatch] = useReducer(reducer, initialState)

    return <StoreContext.Provider value={{state, dispatch}}>
        {children}
    </StoreContext.Provider>
}

export const useStore = () => useContext(StoreContext)
让全局存储可以随处被访问
为了让store可以随处可访问,将整个应用程序封装在刚刚创建的Provider中。
// src/App.js
import React from 'react';
import {StoreProvider} from '../src/store'
import './App.css';

const App = () => {
    return <StoreProvider>
        <h4>所有子组件放在这里</h4>
    </StoreProvider>
}

export default App;
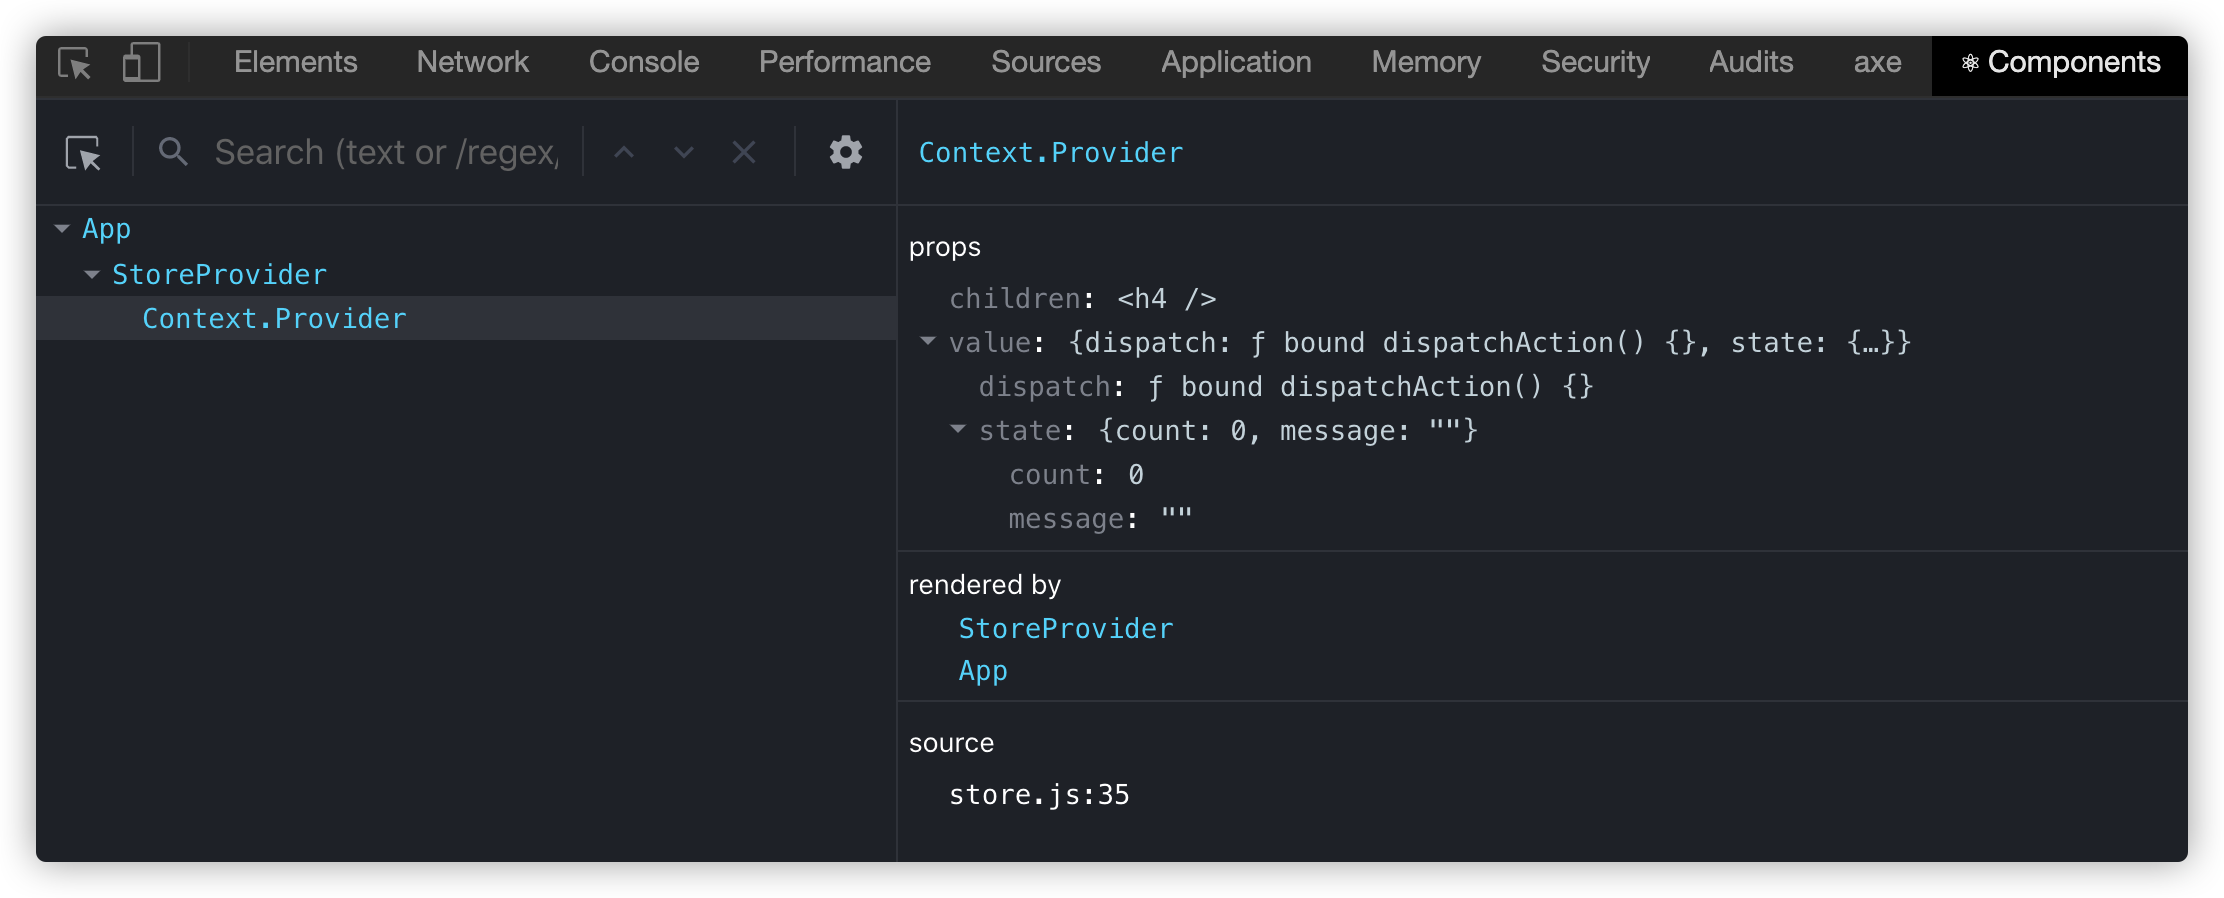
这样我们就要以在任何地方访问useStore。比如新创建的Count组件中,从store中提取state和dispatch函数。dispatch需要调用action类型以及任何有效的负载(Payload)信息,比如本例中的message。
// src/components/Count
import React from 'react'
import { useStore } from '../../store'
import './index.css'

const Count = () => {
    const {state, dispatch} = useStore()

    const incrementClickHandler = () => dispatch({
        type: 'increment',
        message: 'Incremented'
    })

    const decrementClickHandler = () => dispatch({
        type: 'decrement',
        message: 'Decremented'
    })

    const resetClickHandler = () => dispatch({
        type: 'reset',
        message: 'Reset'
    })

    return <div className="count">
        <h1>{state.message} {state.count} </h1>
        <div className="actions">
            <button onClick={incrementClickHandler} className="button increment"><span>+</span></button>
            <button onClick={decrementClickHandler} className="button decrement"><span>-</span></button>
            <button onClick={resetClickHandler} className="button reset"><span>R</span></button>
        </div>
    </div>
}

export default Count
在App的<StoreProvider>中引用Count组件:
const App = () => {
    return <StoreProvider>
        <Count />
    </StoreProvider>
}
看到的效果如下:

虽然示例中提到的这种方式,我们可以很好的管理全局的状态,但也存在一定的缺陷:
每当上下文(
context)被修改时,useContext会重新渲染。
也就是说,订阅全局状态的每个组件将在上下文更新时重新渲染,对页面的性能有直接影响。
React Context API对性能的影响
上面的示例提到过,订阅全局状态的每个组件将在上下文更新时会重新渲染。那么我们要如何避免这方面的问题呢。我们从一个简单的示例开始,一步一步地向大家演示在使用React Context API和React Hooks时在哪些方面要改进,以及组件如何避免上下文更新时重新渲染。
首先在src/目录下创建一个名为GlobalContext.js文件,主要用来存放创建Context所需的逻辑:
// src/GlobalContext.js
import React, { createContext } from 'react'

const GlobalContext = createContext()

export default GlobalContext
创建了一个最简单的上下文GlobalContext,这个时候,我们就可以在App.js中使用它:
// src/App.js

import React from 'react';
import GlobalContext from '../src/GlobalContext'
import './App.css';

const App = () => {
    return <GlobalContext.Provider>
        <h1>子组件放这里</h1>
    </GlobalContext.Provider>
}

export default App;
接着创建一个ProfileCard组件,当它被挂载(mounted)时,会通过调用API得到用户个人信息,然后使用setProfile更新状态并显示它们。
// src/components/ProfileCard
import React, { useState, useEffect } from 'react'

const ProfileCard = props => {
    const [profile, setProfile] = useState([])
    useEffect(() => {
        (async () => {
            const result = await fetch('https://api.github.com/users/airen')
            const data = await result.json()
            setProfile(data)
        })()
    },[])

    const { avatar_url,location, name, bio, public_repos, followers, following, html_url } = profile

    return <div className="profile">
        <div className="header">
            <div className="avatar">
                <a href={html_url}>
                    <img src={avatar_url} alt={name} />
                </a>
            </div>
            <h2>{name} <span>{bio}</span></h2>
            <h3>{location}</h3>
            <div className="footer">
                <ul className="details">
                    <li>
                        <span>{followers}</span>
                        <strong>Followers</strong>
                    </li>
                    <li>
                        <span>{following}</span>
                        <strong>Following</strong>
                    </li>
                </ul>
            </div>
        </div>
    </div>
}

export default ProfileCard
并将ProfileCard组件放到<GlobalContext.Provider>标签内:
// src/App.js
const App = () => {
    return <GlobalContext.Provider>
        <ProfileCard />
    </GlobalContext.Provider>
}
加上CSS之后,看到的效果如下:
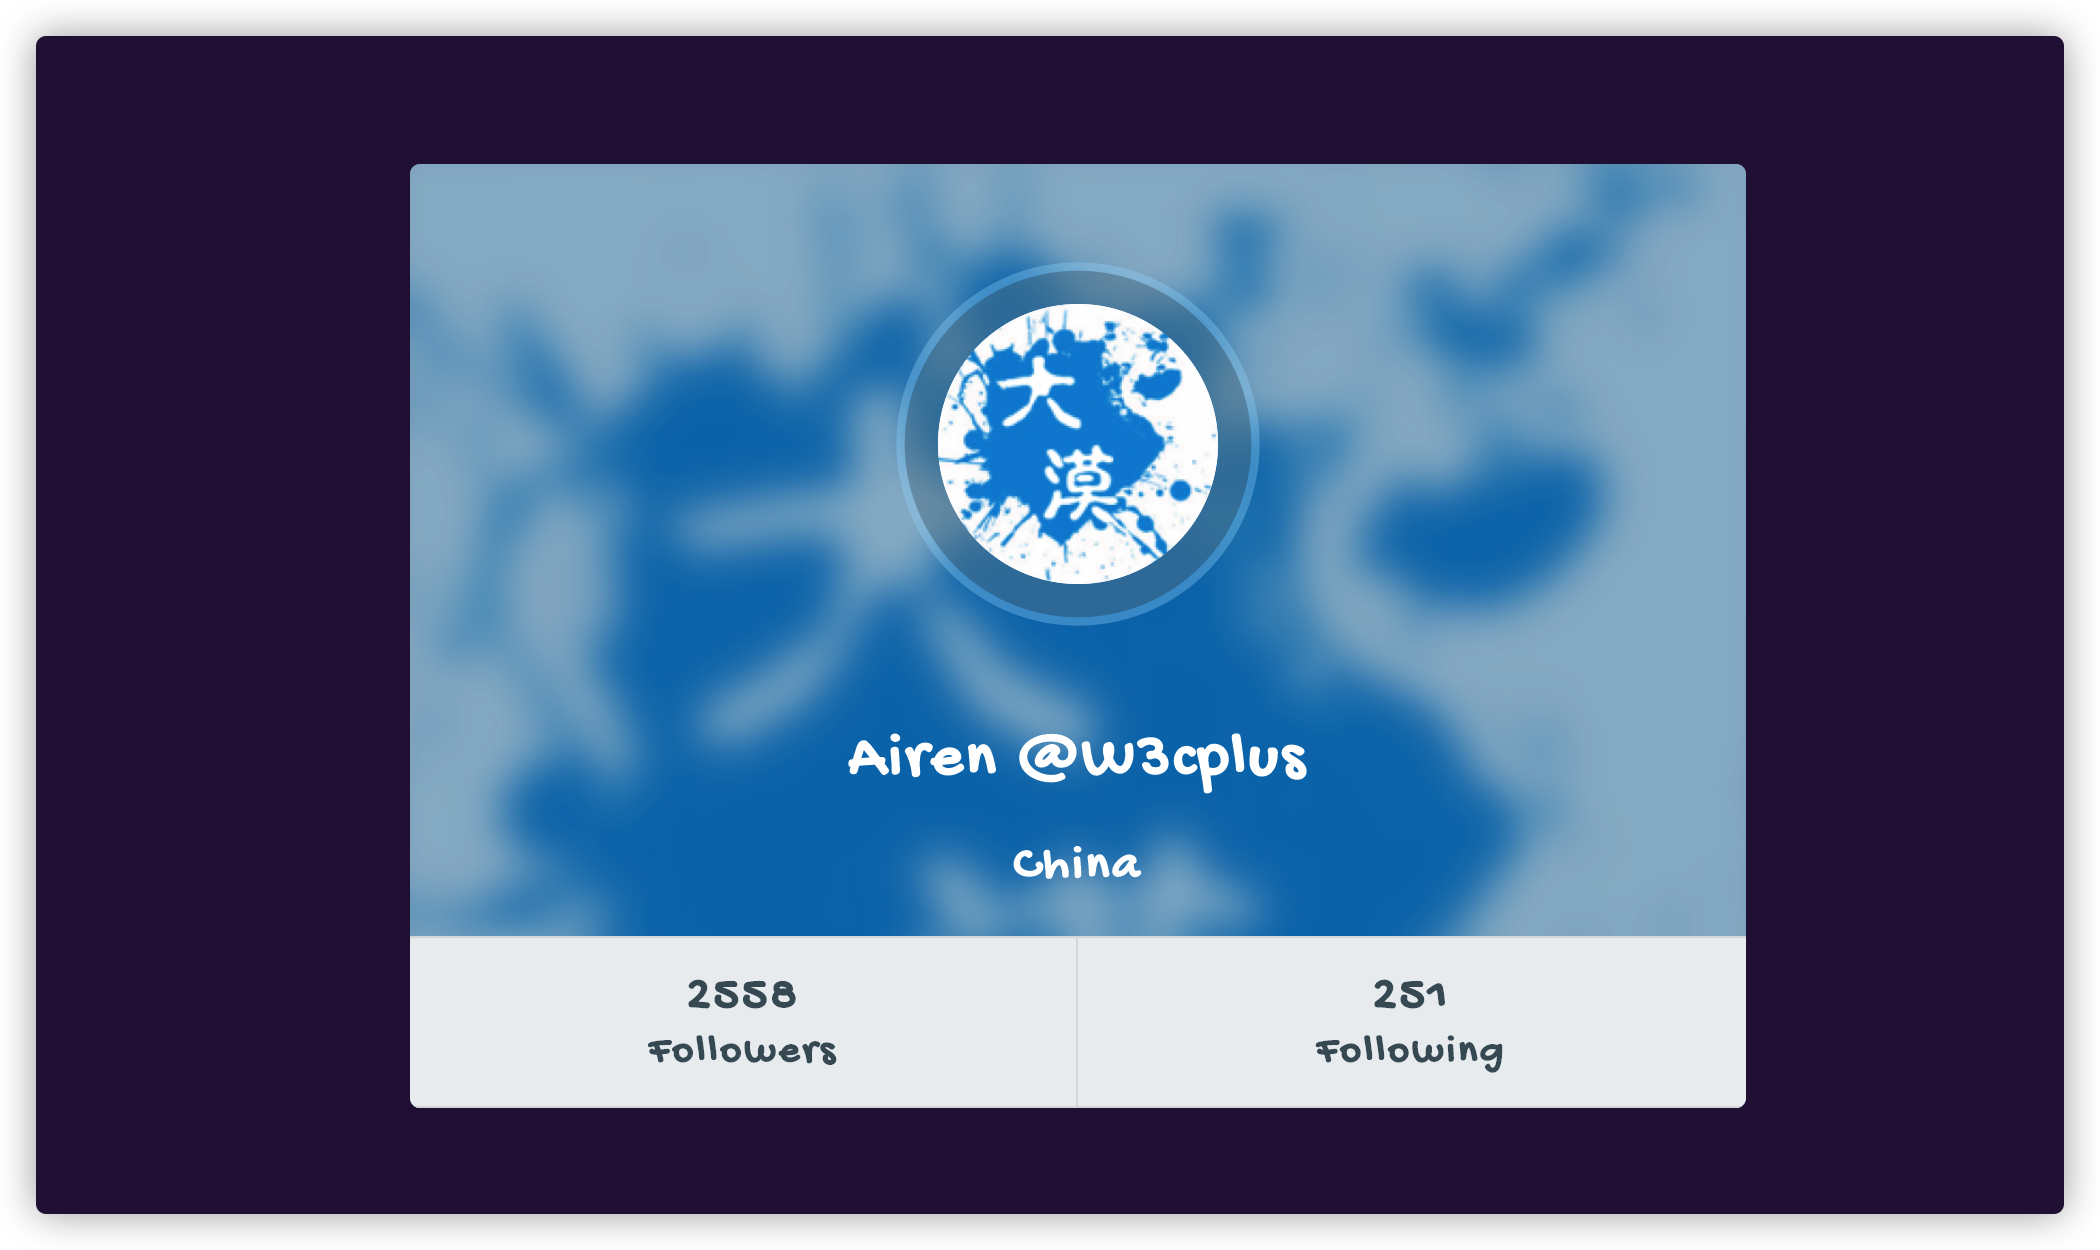
我们请求数据需要有一定的时间,我们创建一个Loading组件,这样在加载数据的时候,可以告诉用户:
// src/components/Loading
import React from 'react'
import './index.css'

const Loading = props => {
    return <div className="global-spinner-overlay">
        <ul className="loading-animation alternate">
            <li></li>
            <li></li>
            <li></li>
            <li></li>
            <li></li>
        </ul>
    </div>
}

export default Loading
同样将该组件引入到App中:
// src/App.js
const App = () => {
    return <GlobalContext.Provider>
        <Loading />
        <ProfileCard />
    </GlobalContext.Provider>
}
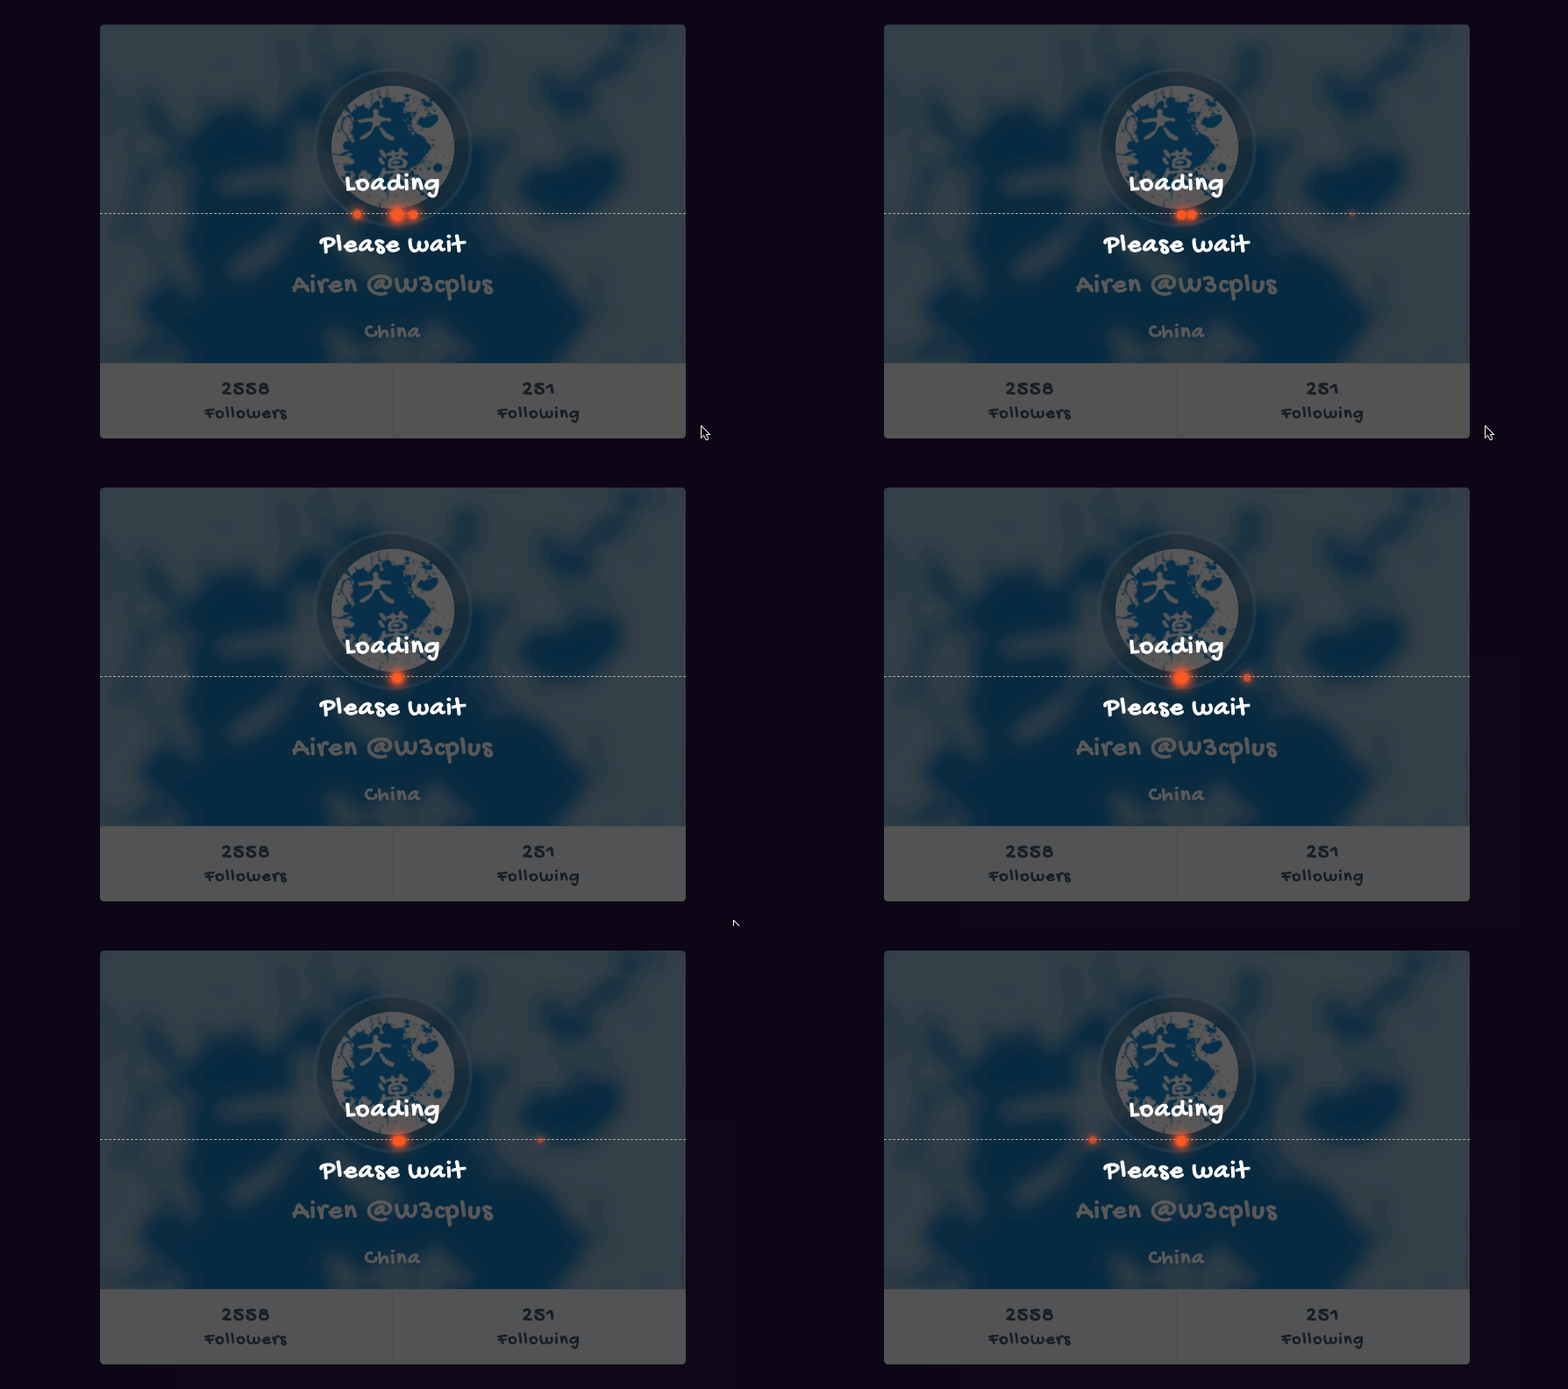
现在的效果并不完美。我们还必须在App.js为Loading组件添加一些逻辑,控制它什么时候显示。接下来,创建一个ContextProvider组件,它将封装这个逻辑,并且让App.js更干净。先对前面的GlobalContext.js做修改,不再导出GlobalContext,而是将它作为一个常量。另外在该文件中创建一个GlobalContextProvider组件,将使用useState钩子一米存储和更新Loading组件可见性状态(state)。为了达到该效果,可能会像下面这样做:
// src/GlobalContext.js
import React, { createContext, useState } from 'react'

export const GlobalContext = createContext()

const GlobalContextProvider = (props) => {
    const [isLoadingOn, setLoading] = useState(false)

    return <GlobalContext.Provider value={{isLoadingOn, setLoading}}>
        {props.children}
    </GlobalContext.Provider>
}

export default GlobalContextProvider
同时App.js中的代码也需要做相应的调整:
// src/App.js
const App = () => {
    return <GlobalContextProvider>
        <Loading />
        <ProfileCard />
    </GlobalContextProvider>
}
然后在Loading组件中,导入GlobalContext而且使用useContext钩子函数引入Provider的isLoadingOn来控制Loading组件的渲染。当isLoadingOn为true时显示Loading,反之不显示:
// src/components/Loading
import React, { useContext } from 'react'
import {GlobalContext} from '../../GlobalContext'
import './index.css'

const Loading = props => {
    const {isLoadingOn} = useContext(GlobalContext)
    return isLoadingOn ? <div className="global-spinner-overlay">
        <ul className="loading-animation alternate">
            <li></li>
            <li></li>
            <li></li>
            <li></li>
            <li></li>
        </ul>
    </div> : null
}

export default Loading
按同样的方式,在ProfileCard中引入GlobalContext,但不需要isLoadingOn,而是需要setLoading函数:
// src/components/ProfileCard
import React, { useState, useEffect, useContext } from 'react'
import {GlobalContext} from '../../GlobalContext'
import './index.css'

const ProfileCard = props => {
    const [profile, setProfile] = useState([])
    const { setLoading } = useContext(GlobalContext)
    useEffect(() => {
        (async () => {
            setLoading(true)
            const result = await fetch('https://api.github.com/users/airen')
            const data = await result.json()
            setProfile(data)
            setLoading(false)
        })()
    },[setLoading])

    const { avatar_url,location, name, bio, followers, following, html_url } = profile

    return <div className="profile">
        <div className="header">
            <div className="avatar">
                <a href={html_url}>
                    <img src={avatar_url} alt={name} />
                </a>
            </div>
            <h2>{name} <span>{bio}</span></h2>
            <h3>{location}</h3>
            <div className="footer">
                <ul className="details">
                    <li>
                        <span>{followers}</span>
                        <strong>Followers</strong>
                    </li>
                    <li>
                        <span>{following}</span>
                        <strong>Following</strong>
                    </li>
                </ul>
            </div>
        </div>
    </div>
}

export default ProfileCard
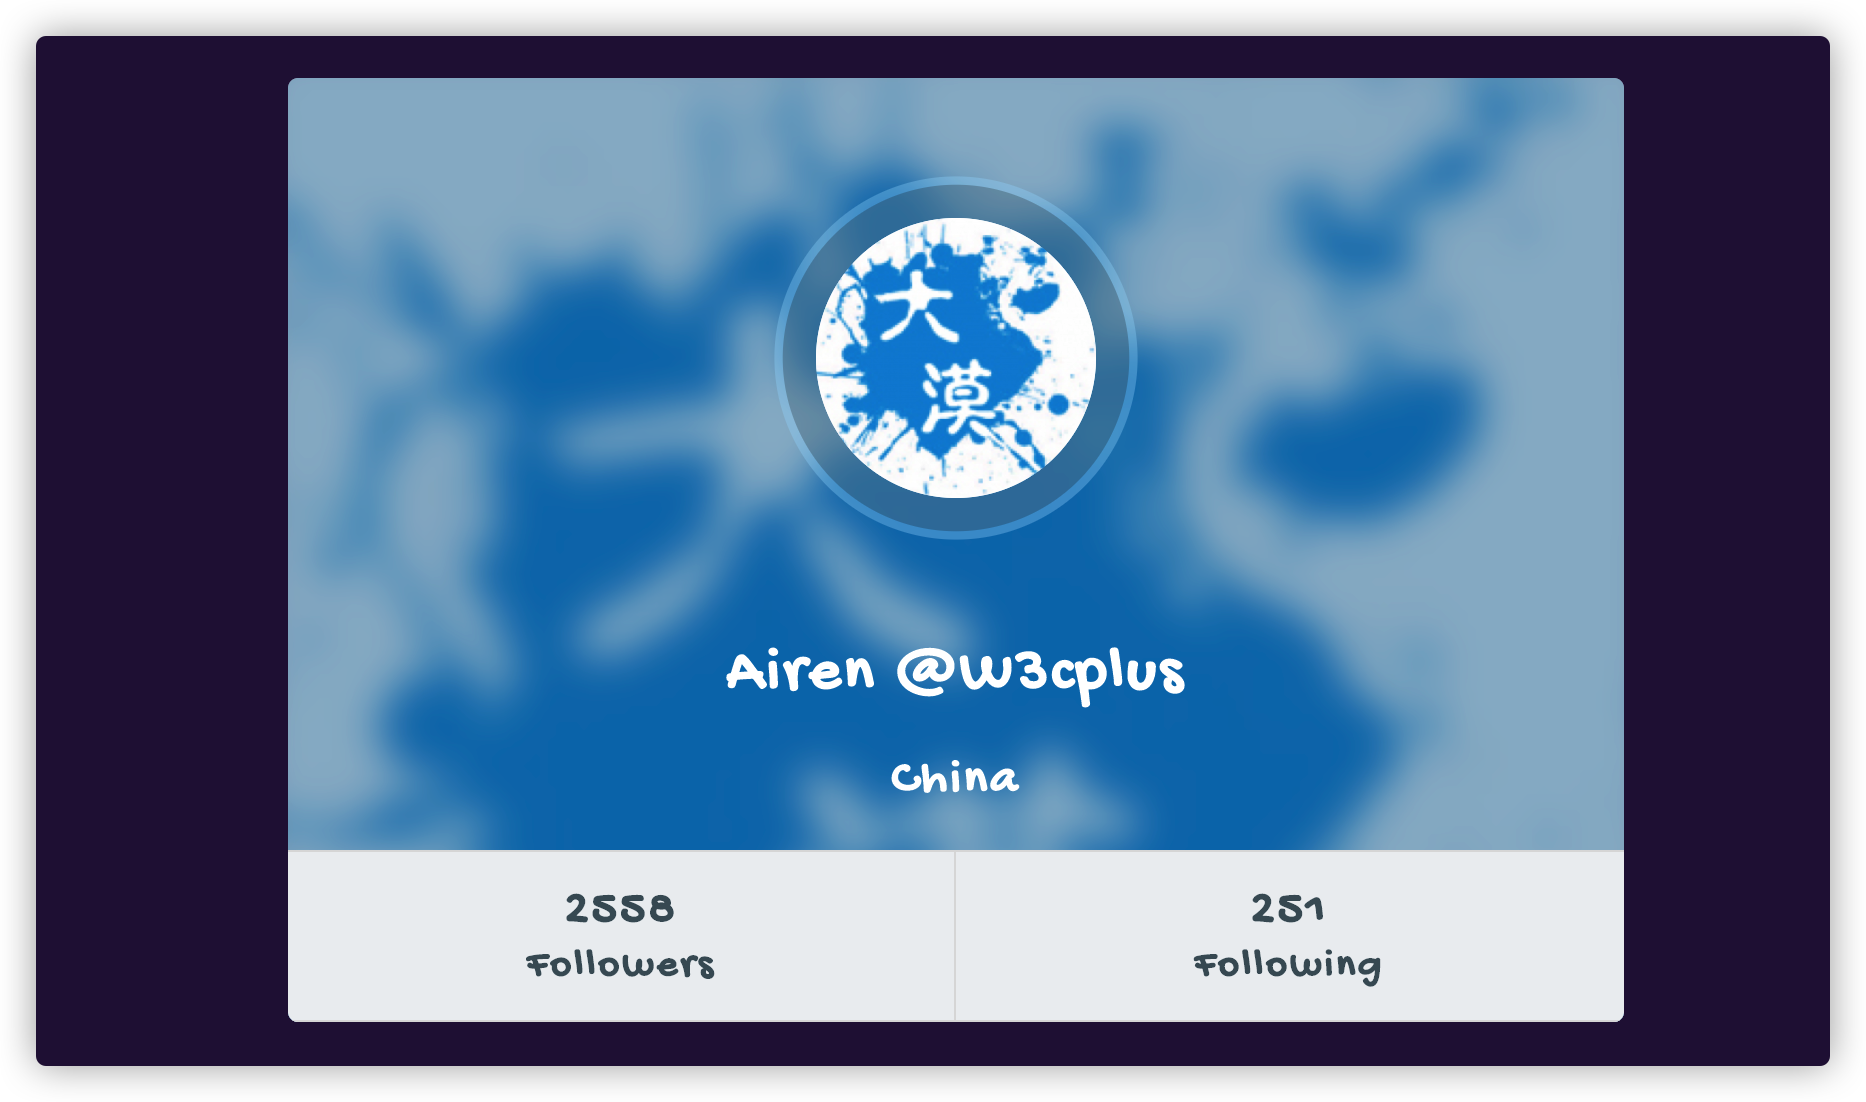
上面演示的是最简单的实现,但它存在一些问题。我们继续在该示例的基础上进行优化。首先需要对GlobalContext进行改造。就是实现如何将isLoadingOn和setLoading传递给上下文的Provider。
<GlobalContext.Provider value={{isGlobalOn, setLoading}}>
    {props.children}
</GlobalContext.Provider>
当传递给Provider的值发生更改时,会重新渲染所有上下文使用者,这也意思味着,如果改变isLoadingOn的值或父组件重新渲染,那么Loading和ProfileCard组件都将重新渲染。这对于页面的性能来说是有很大影响。要解决这个问题,可以使用useMome钩子函数,它会缓存值对象。这样一来,只有isLoadingOn的值发生变化时,它才会被重新创建。
// src/GlobalContext.js
import React, { createContext, useState, useMemo } from 'react'

export const GlobalContext = createContext()

const GlobalContextProvider = (props) => {
    const [isLoadingOn, setLoading] = useState(false)

    const value = useMemo(() =>({
        isLoadingOn,
        setLoading
    }),[isLoadingOn])

    return <GlobalContext.Provider value={value}>
        {props.children}
    </GlobalContext.Provider>
}

export default GlobalContextProvider
这解决了在每个渲染上重新创建一个新对象,从而重新渲染所有消费者(Consumer)的问题。不幸的是,这样还是存在一个问题。即避免重新渲染所有上下文使用者。
现在,只要isLoadingOn值发生变化就会创建一个新的值对象。然而,尽管Loading组件依赖于isLoadingOn,但它并不依赖于setLoading函数。同样,ProfileCard只需要访问setLoading函数。因此,在每次isLoadingOn可见性发彺更改时都重新渲染ProfileCard是没有意义的,因为组件并不直接依赖于它。所以说,为了避免这个问题,我们可以创建另一个上下文来分离isLoadingOn和setLoading。
这个时候GlobalContext.js文件可以改造成:
// src/GlobalContext.js
import React, { createContext, useState, useMemo } from 'react'

export const GlobalContext = createContext()
export const GlobalActionsContext = createContext()

const GlobalContextProvider = (props) => {
    const [isLoadingOn, setLoading] = useState(false)

    return <GlobalContext.Provider value={isLoadingOn}>
        <GlobalActionsContext.Provider value={setLoading}>
            {props.children}
        </GlobalActionsContext.Provider>
    </GlobalContext.Provider>
}

export default GlobalContextProvider
由于有两个上下文提供者(Provider),组件可以准确地使用它们需要的内容。现在,我们需要更新Loading和ProfileCard组件时使用正确的值。
Loading组件原本就是通地GlobalContext来消费Provider提供的数据,所以它不需要做任何的调整。但ProfileCard组件中,需要将GlobalContext更换成新创建的上下文GlobalActionsContext:
// src/components/ProfileCard
import React, { useState, useEffect, useContext } from 'react'
import {GlobalActionsContext} from '../../GlobalContext'
import './index.css'

const ProfileCard = props => {
    const [profile, setProfile] = useState([])
    const setLoading  = useContext(GlobalActionsContext)
    useEffect(() => {
        (async () => {
            setLoading(true)
            const result = await fetch('https://api.github.com/users/airen')
            const data = await result.json()
            setProfile(data)
            setLoading(false)
        })()
    },[setLoading])

    const { avatar_url,location, name, bio, followers, following, html_url } = profile

    return <div className="profile">
        <div className="header">
            <div className="avatar">
                <a href={html_url}>
                    <img src={avatar_url} alt={name} />
                </a>
            </div>
            <h2>{name} <span>{bio}</span></h2>
            <h3>{location}</h3>
            <div className="footer">
                <ul className="details">
                    <li>
                        <span>{followers}</span>
                        <strong>Followers</strong>
                    </li>
                    <li>
                        <span>{following}</span>
                        <strong>Following</strong>
                    </li>
                </ul>
            </div>
        </div>
    </div>
}

export default ProfileCard
这样一来,我们就解决了性能问题。但我们还有地方需要进一步的改进,即使用上下文值的方式有关。
要在任何组件中使用isLoadingOn上下文值,我们必须直接导入上下文以及useContext钩子。通过使用useContext色子调用的包装器,我们可以使它变得不那么单调乏味。我们不再直接导出上下文值,而是使用自定义函数来使用上下文。
// src/GlobalContext.js
import React, { createContext, useState, useContext } from 'react'

const GlobalContext = createContext()
const GlobalActionsContext = createContext()

export const useGlobalContext = () => useContext(GlobalContext)
export const useGlobalActionsContext = () => useContext(GlobalActionsContext)

const GlobalContextProvider = (props) => {
    const [isLoadingOn, setLoading] = useState(false)

    return <GlobalContext.Provider value={isLoadingOn}>
        <GlobalActionsContext.Provider value={setLoading}>
            {props.children}
        </GlobalActionsContext.Provider>
    </GlobalContext.Provider>
}

export default GlobalContextProvider
接下来,我们必须调整Loading和ProfileCard组件,并使用useGlobalContext和useGlobalActionsContext来替换useContext钩子函数:
// src/components/Loading
import React from 'react'
import {useGlobalContext} from '../../GlobalContext'
import './index.css'

const Loading = props => {
    const isLoadingOn = useGlobalContext()
    return isLoadingOn ? <div className="global-spinner-overlay">
        <ul className="loading-animation alternate">
            <li></li>
            <li></li>
            <li></li>
            <li></li>
            <li></li>
        </ul>
    </div> : null
}

export default Loading

// src/components/ProfileCard
import React, { useState, useEffect } from 'react'
import {useGlobalActionsContext} from '../../GlobalContext'
import './index.css'

const ProfileCard = props => {
    const [profile, setProfile] = useState([])
    const setLoading  = useGlobalActionsContext()
    useEffect(() => {
        (async () => {
            setLoading(true)
            const result = await fetch('https://api.github.com/users/airen')
            const data = await result.json()
            setProfile(data)
            setLoading(false)
        })()
    },[setLoading])

    const { avatar_url,location, name, bio, followers, following, html_url } = profile

    return <div className="profile">
        <div className="header">
            <div className="avatar">
                <a href={html_url}>
                    <img src={avatar_url} alt={name} />
                </a>
            </div>
            <h2>{name} <span>{bio}</span></h2>
            <h3>{location}</h3>
            <div className="footer">
                <ul className="details">
                    <li>
                        <span>{followers}</span>
                        <strong>Followers</strong>
                    </li>
                    <li>
                        <span>{following}</span>
                        <strong>Following</strong>
                    </li>
                </ul>
            </div>
        </div>
    </div>
}

export default ProfileCard
由于useContext只能在Context.Provider中调用。为了确保我们不会在Provider之外使用上下文,我们可以检查是否有上下文值。
// src/GlobalContext.js
import React, { createContext, useState, useContext } from 'react'

const GlobalContext = createContext()
const GlobalActionsContext = createContext()

export const useGlobalContext = () => {
    const context = useContext(GlobalContext)

    if (context === undefined) {
        throw new Error(`useGlobalContext must be called within GlobalContextProvider`)
    }

    return context
}

export const useGlobalActionsContext = () => {
    const context = useContext(GlobalActionsContext)

    if (context === undefined) {
        throw new Error(`useGlobalActionsContext must be called within GlobalContextProvider`)
    }

    return context
}

const GlobalContextProvider = (props) => {
    const [isLoadingOn, setLoading] = useState(false)

    return <GlobalContext.Provider value={isLoadingOn}>
        <GlobalActionsContext.Provider value={setLoading}>
            {props.children}
        </GlobalActionsContext.Provider>
    </GlobalContext.Provider>
}

export default GlobalContextProvider
正如上面代码所示,我们首先检查context值,而不是立即返回useContext的结果。如果context未定义,则抛出相应错误。然而,对于每个useContext消费者(Consumer)都这样做有点重复,因此,我们可以将其抽取出来重复使用。
// src/GlobalContext.js
import React, { createContext, useState, useContext } from 'react'

const GlobalContext = createContext()
const GlobalActionsContext = createContext()

/* eslint-disable*/
const useContextFactory = (name, context) => {
    return () => {
        const ctx = useContext(context)
        if (ctx === undefined) {
            throw new Error(`use${name}Context must be use withing a ${name}ContextProvider`)
        }
        return ctx
    }
}

/* eslint-enable */

export const useGlobalContext = useContextFactory('GlobalContext', GlobalContext)
export const useGlobalActionsContext = useContextFactory('GlobalActionsContext', GlobalActionsContext)

const GlobalContextProvider = (props) => {
    const [isLoadingOn, setLoading] = useState(false)

    return <GlobalContext.Provider value={isLoadingOn}>
        <GlobalActionsContext.Provider value={setLoading}>
            {props.children}
        </GlobalActionsContext.Provider>
    </GlobalContext.Provider>
}

export default GlobalContextProvider
有关于这方面的介绍还可以阅读《Global state with React》一文。
小结
React Context API是React的一个特性,在React中可以很好的用来处理组件之间的数据通讯,也能更易于处理状态的管理。但React Context API也不是银弹,也不是全能的,可以用于任何场景之中。在实际使用之中,我们还是需要根据具体场景做出正确的选择。在文章中我们主要对React Context API做了一些初步的探讨,学习了这方面最基础知识和运用。如果你在这方面有经验,欢迎在下面的评论分享。
