学习React应该具备的JavaScript基础知识
React是众多主流JavaScript框架之一,如果想要较好的掌握React,那么对于JavaScript方面的知识还是非常重要的。但在很多开发者眼里反而顾此失彼,觉得掌握了JavaScript框架就可以无敌,事实上并非如此,至少Web发展至今,HTML、CSS和JavaScript还是Web三大基石。只有更好的掌握这些基础,在平时的工作中才能游刃有余。在接下来的内容中,我们就来一起探讨一下,在学习React的时候,应该具备哪些JavaScript相关的知识,这样才能更有助于我们更好的掌握React。
模板字符串
模板字符串就像是超能力的常规字符串:

正如上图所示,在ES6之前我们会常采用的字符串拼接方式:
// 字符串拼接
const str1 = 'happy';
const str2 = 'green';
const str = "I'm " + str1 + " " + str2 + " puzzle";
console.log(str)

// » I'm happy green puzzle
如果我们使用ES6模板字符串,会变得更为简易:
// ES6 模板字符串
const str1 = 'happy'
const str2 = 'green'
const str = `I'm ${str1} ${str2} puzzle`

console.log(str)
// » I'm happy green puzzle
在React中,ES6模板字符串的身影可以说到处可见,比如在写JSX的时候、Styled-components等都可以看到ES6模板字符串的身影。
const TestComponent = () => {
    const str1 = 'happy';
    const str2 = 'green';
    const str = `I'm ${str1} ${str2} puzzle`;

    const markup =(
        <h3>{str}</h3>
    );

    return <div id="app">{ markup }</div>;
};
特别是在React中JSX模板中用到多类名的时候,ES6模板字符串的情景更常见:
class Post extends Component {
    state = { loading: false };

    render() {
        return (
            <div className={`post-wrapper ${this.state.loading ? 'post-wrapper--loading' : ''}`}></div>
        );
    }
}
如果你在React中使用Styled-Components的话,那ES6模板字符串的身影更多:
const Title = styled.h1`
    font-size: 1.5em;
    text-align: center;
    color: palevioletred;
`;

const Wrapper = styled.section`
    padding: 4em;
    background: papayawhip;
`;

render(
    <Wrapper>
        <Title>Hello World!</Title>
    </Wrapper>
);
有关于ES6模板字符串更多的介绍可以阅读:
- 模板字符串
- A guide to JavaScript Template Literals
- Getting Literal With ES6 Template Strings
- ES6 Template Literals, the Handlebars killer?
- Strings and Template Literals in ES6
对象初始化
可以通过new Object()、Object.create()方法或者使用字面量标记(初始化标记)初始化对象。一个对象初始化器,由大括号{}包含的一个由零个或多个对象属性名和其关联值组成的一个逗号分隔的列表构成。
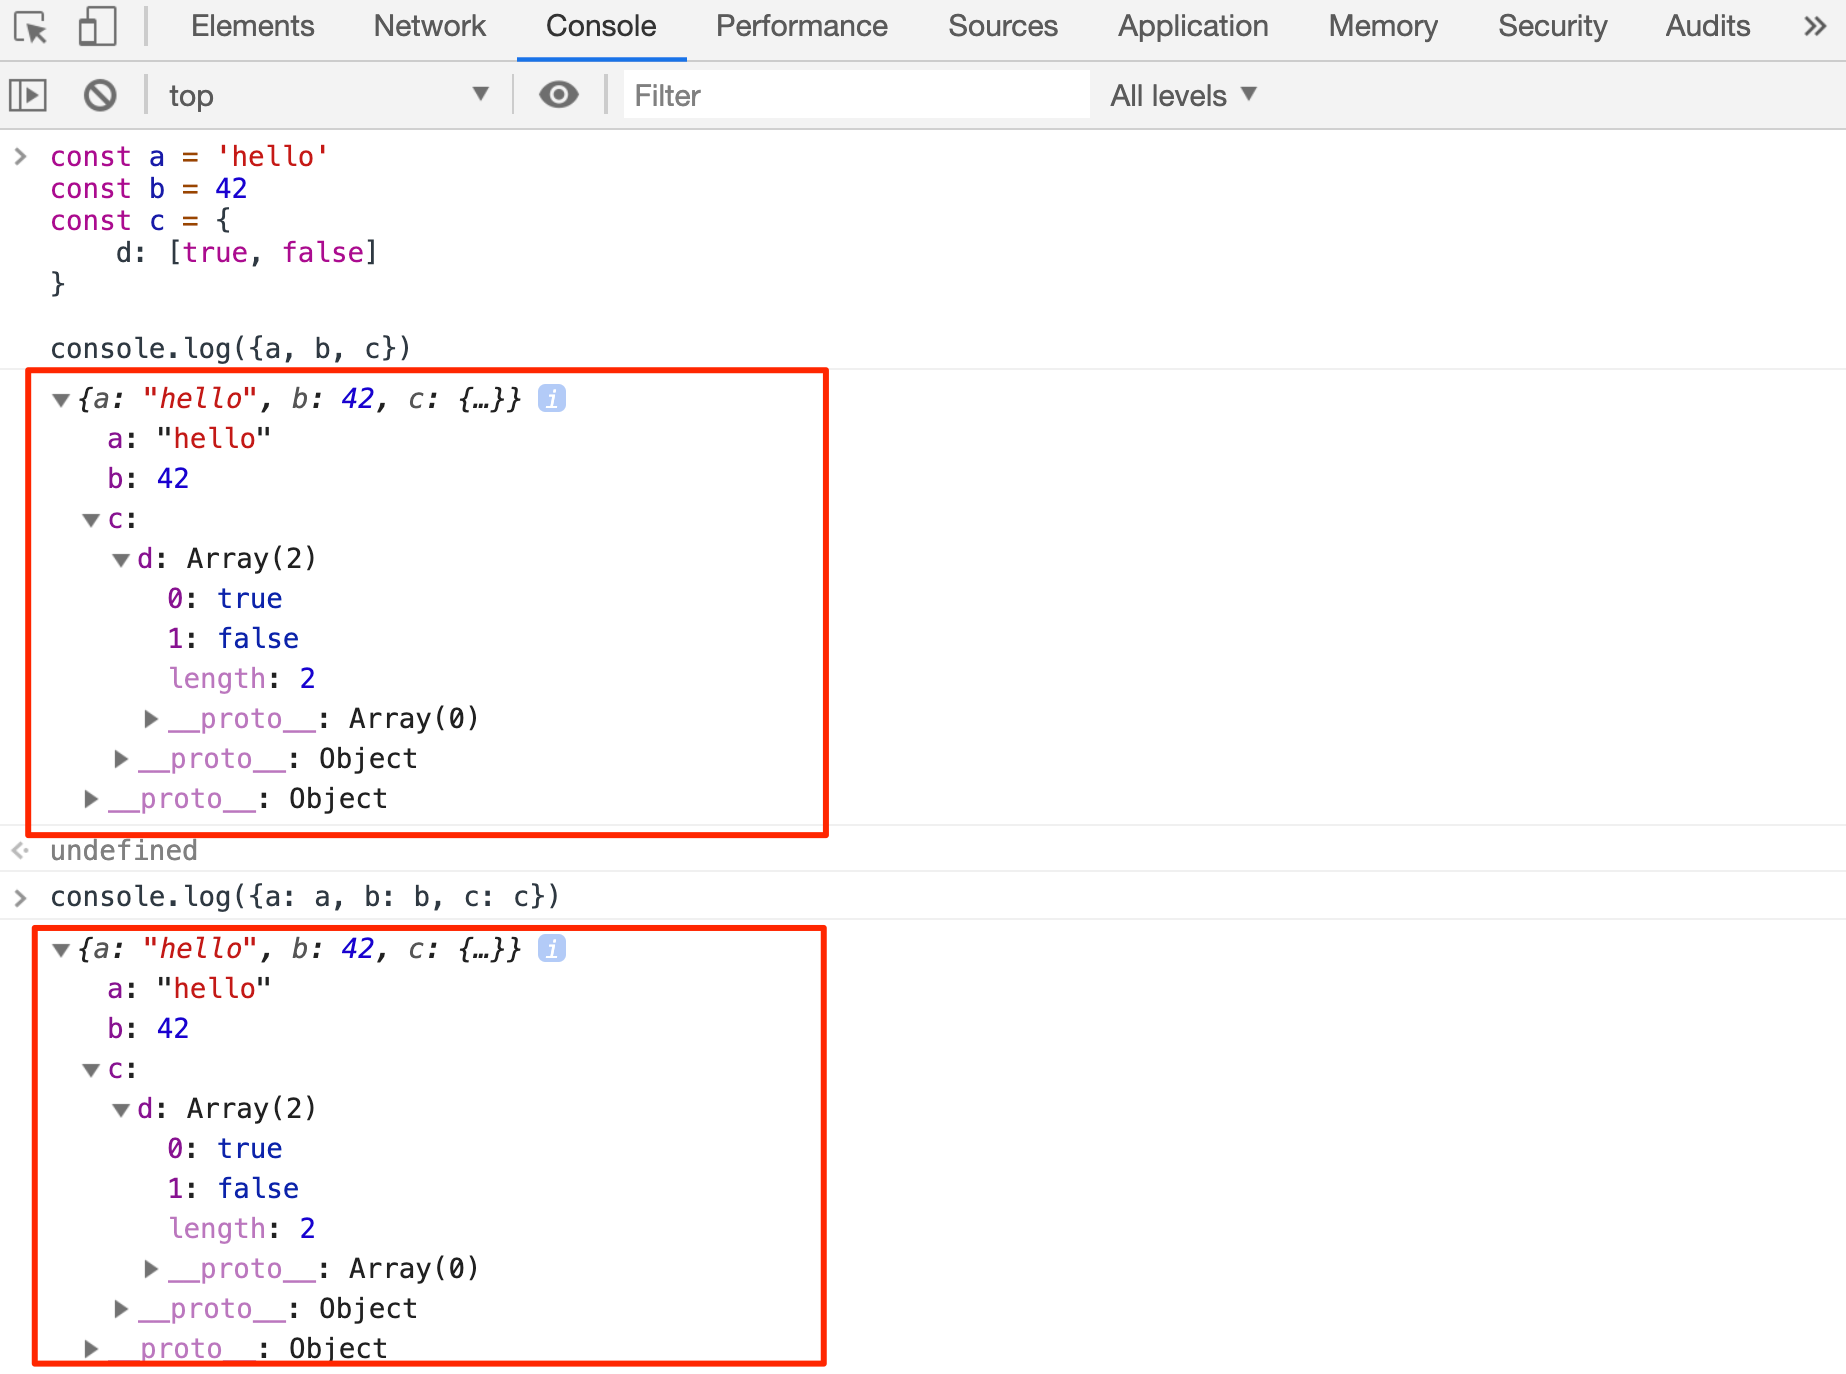
该方法可以让我们简写属性名,在React中的使用也非常的普遍和有用。比如:
const a = 'hello'
const b = 42
const c = {
    d: [true, false]
}

console.log({a, b, c})
// 等同于
console.log({a: a, b: b, c: c})
在React中有关于对象初始化的使用场景也很多,比如:
const Counter = () => {
    const [count, setCount] = React.useState(0);

    const requestRef = React.useRef();
    const previousTimeRef = React.useRef();

    const animate = time => {
        if (typeof previousTimeRef.current !== 'undefined') {
            const delta = (time - previousTimeRef.current) * 0.01;
            setCount(prevCount => (prevCount + delta) % 100);
        }
        previousTimeRef.current = time;
        requestRef.current = requestAnimationFrame(animate);
    };

    React.useEffect(() => {
        requestRef.current = requestAnimationFrame(animate);

        return () => cancelAnimationFrame(requestRef.current);
    }, []);
    return <div>{Math.round(count)}</div>;
};
该示例来自于@Hunor Márton Borbély的《Using requestAnimationFrame with React Hooks》一文。
有关于对象初始化更多的介绍可以阅读:
- Object initializer
- Understanding JavaScript Prototypes
- Understanding Prototypes and Inheritance in JavaScript
- A Deep Dive into Classes
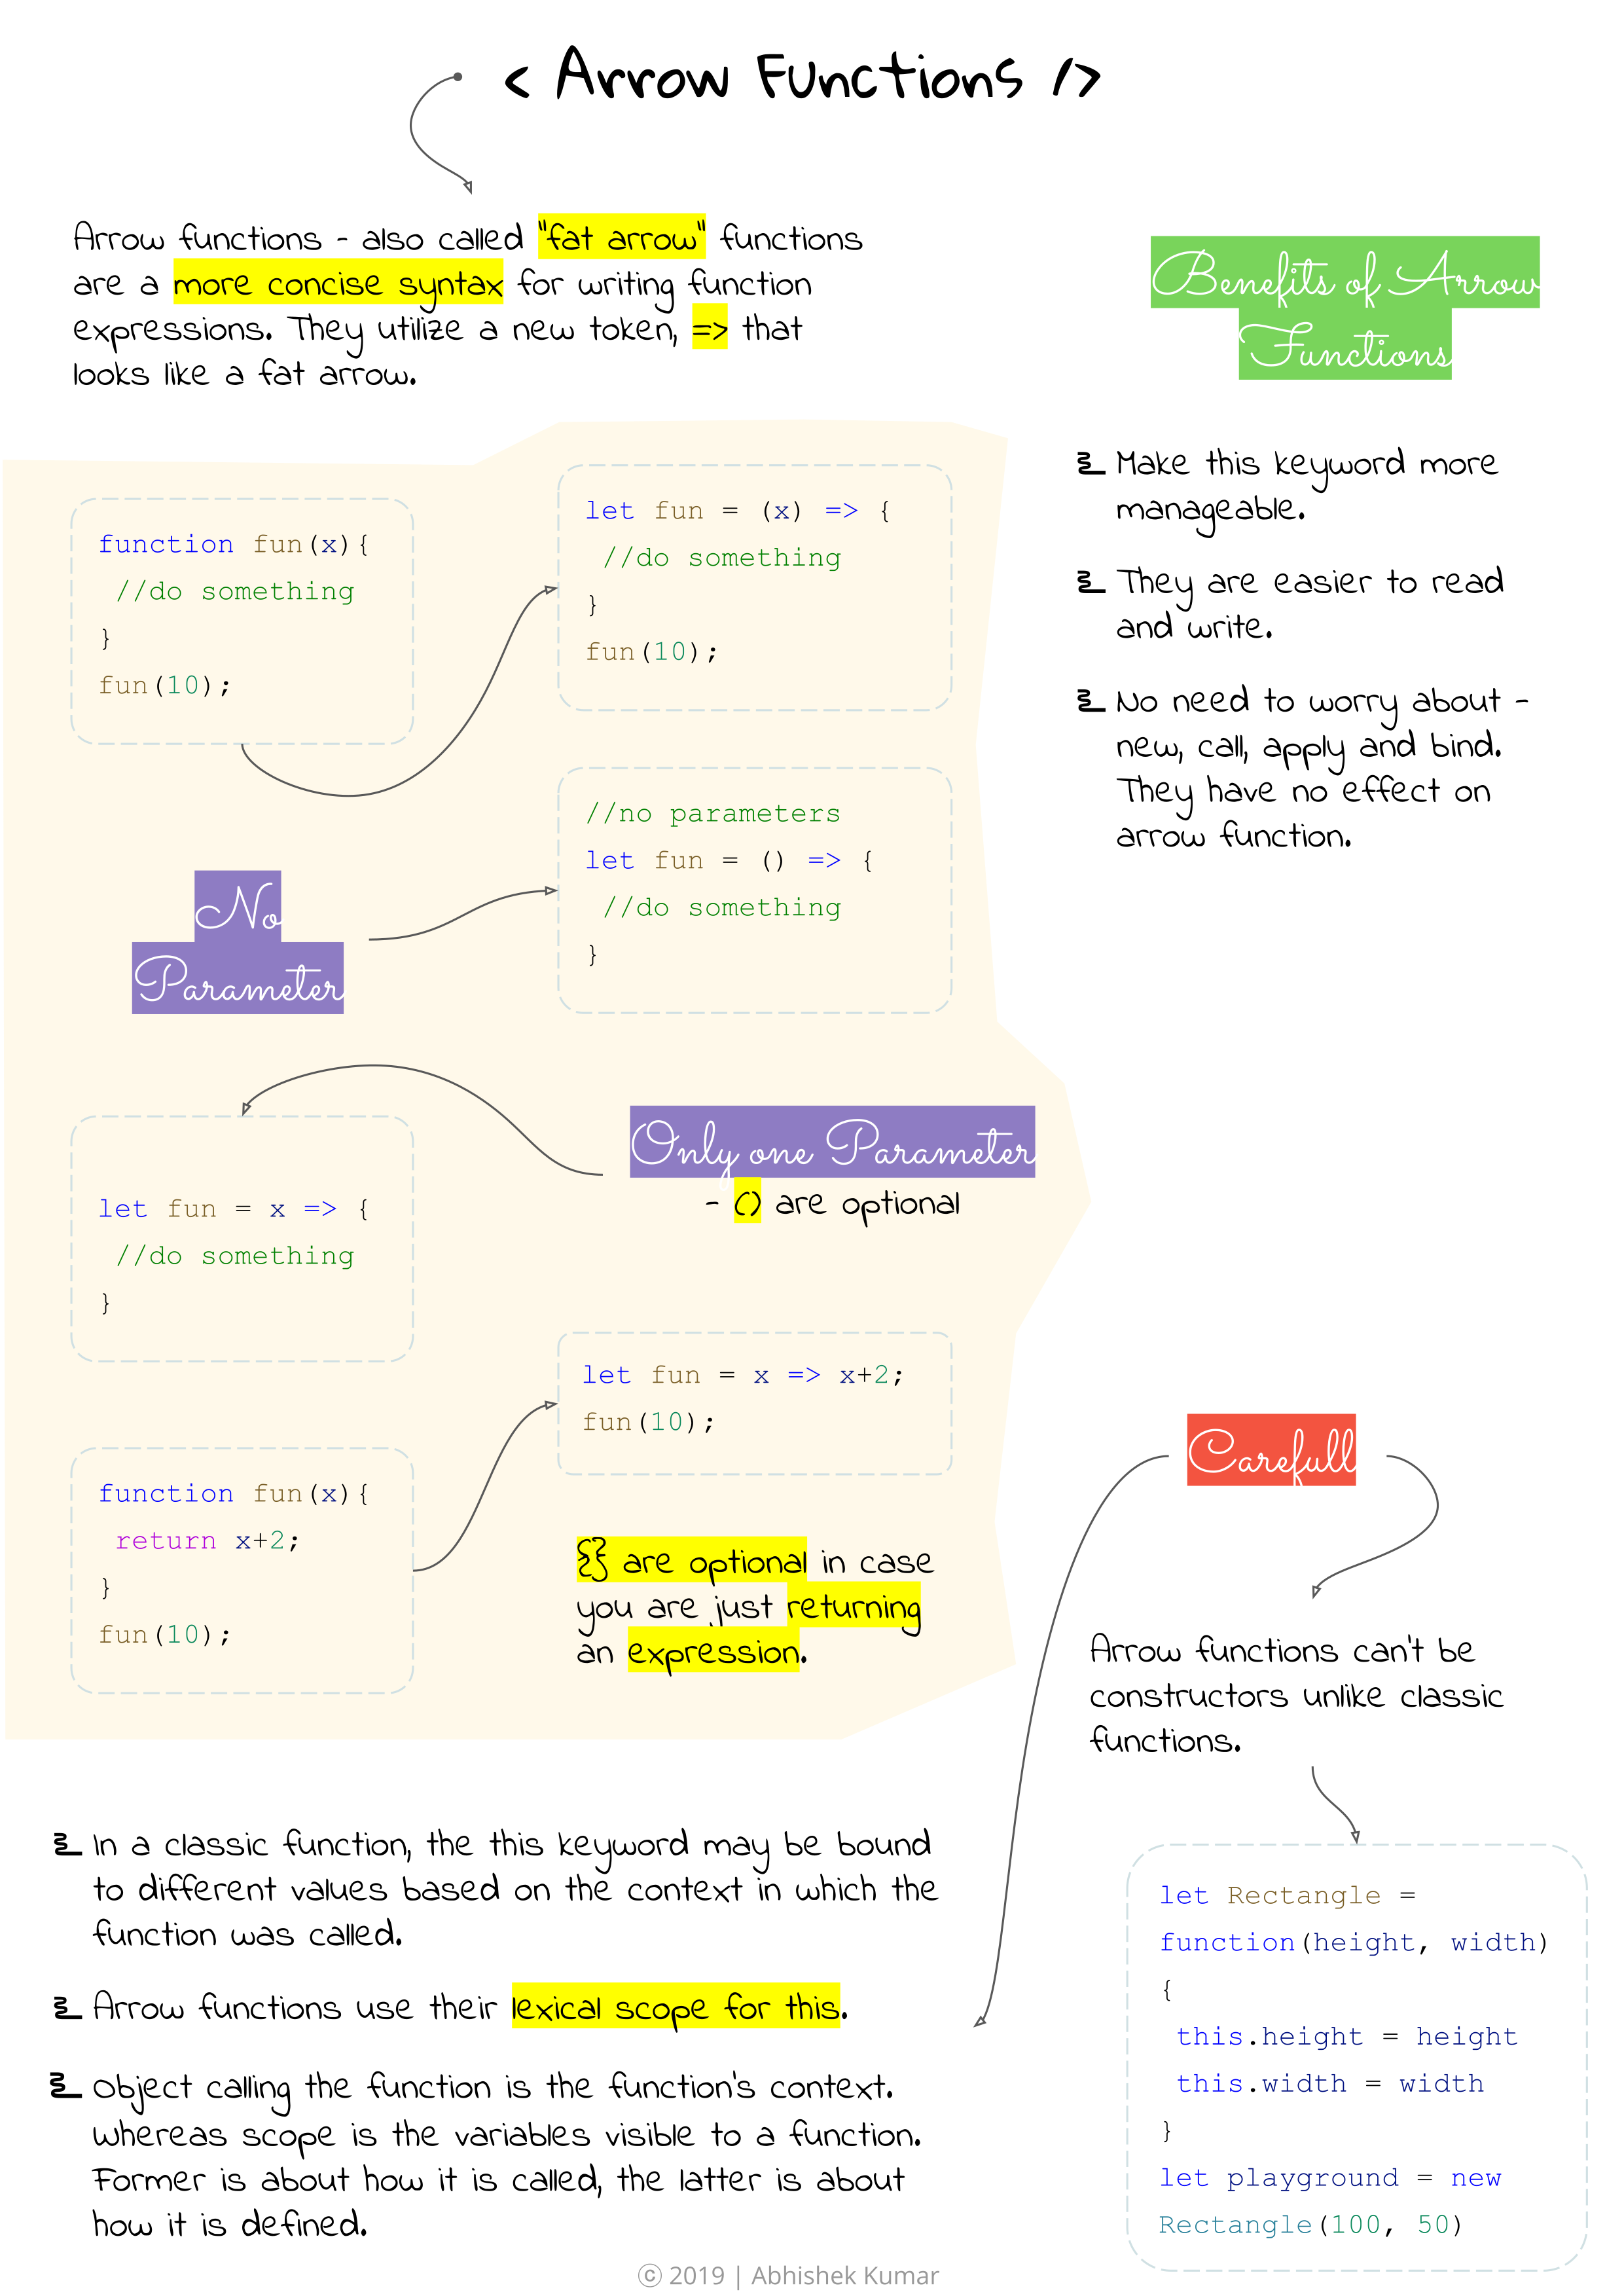
箭头函数
箭头函数是ES6的一种新特性,它是编写函数的另一种方法,在现代代码库中几乎被广泛地使用,因为它使代码简洁易读。它允许我们使用更短的语法编写函数。
const getFive = () => 5

// 等同于

function getFive() {
    return 5
}

const addFive = a => a + 5

// 等同于
function addFive(a) {
    return a + 5
}

const divide = (a, b) => a / b

// 等同于
function divide(a, b) {
    return a / b
}
用@Abhishek Kumar绘制的一张图来阐述ES6箭头函数会更清晰一些:
ES6箭头函数也通常会运用于React中,以保持代码简洁和可读性。下面的内容你将看到ES6箭头函数在React中是如何被普遍使用的。
函数作为React中的组件
在Reac中编写组件的时候,我们可以使用class的方式和函数的方式。在面向对象编程时,使用class方式来创建React组件是一种较好的方式(React组件API,比如this.setState()和this.state可以继承类方法和类属性)。另一方面,React(及其生态系统)也使用了许多函数式编程的概念。比如,React的函数组件是在React中定义组件的另一种方法。导致React中出现函数组件的问题是:如果组件可以像函数一样使用会怎么样?
function Greeting(props) {
    return <h1>{props.greeting}</h1>
}
它是一个函数,传入props参数,并返回需要显示的HTML元素(视图)。在底层,该函数只需要使用React组件中的render()方法的渲染机制。
函数组件是React中定义组件的首选方法。与React类组件相比,它具有更少的模板文件、更少的复杂性和更简单的维护。你可以使用React Hooks很轻松地将类组件迁移到函数组件。
前面我们提到过,使用ES6箭头函数可以让React函数组件变得更为简单。比如上面的示例,在ES5和ES6创建相同功能的组件时,写法有较大的差异:
// ES5
function Greeting(props) {
    return <h1>{props.greeting}</h1>
}

// ES6
const Greeting = (props) => {
    return <h1>{props.greeting}</h1>
}
在ES6中传递的参数只有一个参数时,其中的()可以省略;如果箭头函数只有一行时,还可以省略return关键词和{},比如上面的代码,我们还可以写成:
// ES6
const Greeting = props => <h1>{props.greeting}</h1>
如果将上面的函数组件,我们用类组件的方式来构建的话,可能会如下:
class Greeting extends Component {
    render() {
        return (
            <h1>{props.greeting}</h1>
        )
    }
}
在 React 应用程序中使用箭头功能可使代码更简洁。 但它也会从组件中删除状态的使用。 这种类型的组件称为无状态功能组件。 你会在许多 React 教程中看到这个名字。
React类组件语法
React定义组件的方式随着时间的推移也有所不同。在早期阶段,大多数情况都是使用React.createClass()方法创建React类组件。但随着ES6的兴起,以前使用的React类组件语法变成了默认语法(只是在引用React函数组件之前)。
然而,JavaScript在不断地发展。因此你会经常地发现React类组件有不同的语法。比如使用状态和类方法定义React类组件就是其中的一种方法:
class Counter extends React.Component {
    constructor(props) {
        super(props);

        this.state = {
            counter: 0,
        };

        this.onIncrement = this.onIncrement.bind(this);
        this.onDecrement = this.onDecrement.bind(this);
    }

    onIncrement() {
        this.setState(state => ({ counter: state.counter + 1 }));
    }

    onDecrement() {
        this.setState(state => ({ counter: state.counter - 1 }));
    }

    render() {
        return (
            <div>
                <button onClick={this.onIncrement} type="button">+</button>
                <span>{this.state.counter}</span>
                <button onClick={this.onDecrement} type="button">-</button>
            </div>
        );
    }
}
然而,当实现大量的React组件时,构造函数中类方法的绑定(首先要有一个构造函数)将成为冗余代码。但幸运的是,有一种简写语法可以同时处理这两种情况:
class Counter extends React.Component {
    state = {
        counter: 0,
    };

    onIncrement = () => {
        this.setState(state => ({ counter: state.counter + 1 }));
    }

    onDecrement = () => {
        this.setState(state => ({ counter: state.counter - 1 }));
    }

    render() {
        return (
            <div>
                <button onClick={this.onIncrement} type="button">+</button>
                <span>{this.state.counter}</span>
                <button onClick={this.onDecrement} type="button">-</button>
            </div>
        );
    }
}
通过使用ES6箭头函数,可以自动绑定类方法,而不必在构造函数中绑定它们。当不使用这些props时,也可以直接将状态定义为类属性来省略构造函数。
有关于ES6箭头函数更多的介绍可以阅读:
- I Don’t Hate Arrow Functions
- ES6 Arrow Functions in Depth
- When (and why) you should use ES6 arrow functions — and when you shouldn’t
- Arrow Functions in JavaScript
- A Practical Guide to ES6 Arrow Functions
- Arrow functions are disrupting React.Components
解构赋值 和 扩展运算符(剩余参数)
解构赋值是ES5中的另一个特性。解构赋值只是复制对象或数组的一部分并将它放入命名变量中。在React中,通常情况下,你必须从state或组件的props中访问大量属性。这个时候,ES6解构赋值可以让整个事情变得更简单,因为你不再需要逐个将它们分配给变量。比如:
// 未使用ES6解构赋值
reactFunction = () => {
    const users = this.state.users
    const counter = this.state.counter
    return <h1>{ users }:{ counter }</h1>
}

// 使用ES6解构赋值
reactFunction = () => {
    const { users, counter } = this.state
    return <h1>{ users }:{ counter }</h1>
}
或者在无状态的函数组件中:
// 未使用ES6解构
const Greeting = (props) => {
    return <h1>{props.greeting}</h1>
}

// 使用ES6解构
const Greeting = ({ greeting }) => {
    return <h1>{ greeting }</h1>
}
ES6的解构也适用于JavaScript数组。通常用于折分对象的一部分,但将剩余属性保留在另一个对象中。比如:
const UserAvatar = ({userName = 'airen', ...props}) => {
    return <img src={`//github.com/${userName}.png`} {...props} />
}
上面的代码中...props前面的...语法可以看作是一种“集合”语法,它对一组值进行操作。比如:
const arr = [1, 2, 3, 4, 5]
Math.max(...arr) // » 5

// 等同于
Math.max.apply(null, arr) // » 5

const obj1 = {
a: 'a from obj1',
b: 'b from obj1',
c: 'c from obj1',
d: {
    e: 'e from obj1',
    f: 'f from obj1',
},
}
const obj2 = {
b: 'b from obj2',
c: 'c from obj2',
d: {
    g: 'g from obj2',
    h: 'g from obj2',
},
}
console.log({...obj1, ...obj2})

// 等同于
console.log(Object.assign({}, obj1, obj2))

function add(first, ...rest) {
    return rest.reduce((sum, next) => sum + next, first)
}

// 等同于
function add() {
    const first = arguments[0]
    const rest = Array.from(arguments).slice(1)
    return rest.reduce((sum, next) => sum + next, first)
}

扩展运算符(...)在不同的语境中有着不同的含义,所以学习其的细微差别会对你有所帮助。
正如上面的示例所示,在React中也会经常使用扩展运算符。比如我们来看一个示例,即重构高阶组件:
function Loading(Component) {
    return class LoadingComponent extends {
        render() {
            const { isLoading, ...props } = this.props

            if (isLoading) {
                return <p>Loading...</p>
            }

            return <Component {...props} />
        }
    }
}
当isLoading为true时,此高阶组件仅用于显示条件加载指示符。否则它渲染输入组件。在上面的示例代码中,你已看到解构和扩展运算符。后者可以在渲染的Component中看到,因为props对象的所有剩余属性都传递给Component。
重构上面的高阶组件,我们可以先将返回的React类组件重构为无状态组件:
function Loading(Component) {
    return function ({ isLoading, ...props} ) {
        if (isLoading) {
            return <p>Loading...</p>
        }

        return <Component {...props} />
    }
}
接下来,我们可以借助ES6箭头函数,让该高阶组件变得更简洁些:
const Loading = Component => ({isLading, ...props}) => {
    if(isLoading) {
        return <p>Loading...</p>
    }
    return <Component {...props} />
}
如果我们把三元运算符用进来,代码还可以变得更简洁:
const Loading = Component => ({ isLoading, ...props}) => isLoading ? <p>Loading...</p> : <Component {...props} />
一行代码就解决了。
正如你所见,在React中运用JavaScript的各种特性,比如 箭头函数、解构、扩展运算符和三元运算符等,会让整个代码变得更简洁,更易阅读和维护。
有关于ES6的解构或扩展运算符更多的介绍可以阅读:
- Destructuring assignment
- Spread syntax
- Rest parameters
- ES6 Destructuring: The Complete Guide
- ES6 Spread and Butter in Depth
- ES6 JavaScript Destructuring in Depth
- An Easy Guide to Object Rest/Spread Properties in JavaScript
- A Simple Guide to Destructuring and ES6 Spread Operator
- ES6 magical stuffs — Spread (…) syntax in depth
- Advanced ES6 Destructuring Techniques
- Destructuring assignment
- Javascript spread operator and rest parameters (...)
- Destructuring and parameter handling in ECMAScript 6
- Object rest and spread properties
- JavaScript Destructuring: Extract Data from Arrays and Objects
- Spread Operator and Destructuring arrays and objects in JavaScript
函数默认参数
函数默认参数允许在没有值或undefined被传入时使用默认形参。这是一种非常强大的方法,可以声明性地表示函数参数的默认值。
function add(a, b = 0) {
return a + b
}

// 等同于

const add = (a, b=0) => a + b

// 也等同于
function add(a, b) {
    b = b === undefined ? 0 : b
    return a + b
}

add(1)      // » 1
add(1, 2)   // » 3
这种特性也常在React中使用。
const CatComponent = ({ catName, eyeColor, age}:any) => {
    return <h1>{catName || 'Sandy'} Cat, Eye Color: {eyeColor || 'deepblue'}, Age: {age || '120'}</h1>
}

<CatComponent />
<CatComponent catName="Tonik" eyeColor="blue" age="20" />

在React中,我们有一个defaultProps可以帮助我们设置静态的默认参数。使用defaultProps后,上面的CatComponent组件可以改成:
const CatComponent = ({ catName, eyeColor, age}:any) => {
    return <h1>{catName} Cat, Eye Color: {eyeColor}, Age: {age}</h1>
}

CatComponent.defaultProps = {
    catName: 'Sandy',
    eyeColor: 'deepblue',
    age: '120'
}

<CatComponent />
<CatComponent catName="Tonik" eyeColor="blue" age="20" />
最终得到的效果是一样的。有关于这方面更多的介绍可以阅读:
- 默认参数值
- Understanding Default Parameters in Javascript
- Using Default Parameters in ES6
- Default Parameters in JavaScript | ES6 | ES2015
- 3 Ways to Set Default Value in JavaScript
- React, TypeScript and
defaultPropsdilemma - How to use Default Props in React with TypeScript
- A complete guide to default props in React
- Understanding React Default Props
- Props and PropTypes in React
- Packaging and PropTypes
ES Modules
ESModules指的是ES6的import和export。该系统使JavaScript能够导入和导出文件。比如下面这段代码(使用Create React App创建的一个项目的App.js):
import React, { Component } from 'react';
import logo from './logo.svg';
import './App.css';

class App extends Component {
    render() {
        return (
            <div className="App">
                <header className="App-header">
                    <img src={logo} className="App-logo" alt="logo" />
                    <p>
                        Edit <code>src/App.js</code> and save to reload.
                    </p>
                    <a
                        className="App-link"
                        href="https://reactjs.org"
                        target="_blank"
                        rel="noopener noreferrer"
                    >
                        Learn React
                    </a>
                </header>
            </div>
        );
    }
}

export default App;
在第一行代码中我们看到了import语句:
import React, { Component } from 'react';
在最后一行代码中我们看到了export语句:
export default App;
那么import和export语句是如何工作呢?假设你要在一个文件(比如src/utile.js)中导出以下值(可以是对象、函数或变量):
// src/util.js

const firstName = '大漠'
const lastName = 'w3cplus'

export {firstName, lastName}
然后,我们可以在src/App.js中引入它:
// src/App.js
import { firstName, lastName } from './util.js'

console.log(firstName) //  » 大漠
console.log(lastName) //  » w3cplus
因此,它不一定是关于import、export组件或函数,而是关于共享可分配给变量的所有东西。你还可以将另一个文件中的所有导出变量作为一个对象导入。比如上面的firstName和lastName可以作为Person对象导入:
// src/App.js
import * as Person from './util.js'

console.log(Person.firstName) //  » 大漠
console.log(Person.lastName) //  » w3cplus
在导入的时候还可以有别名。比如:
// src/App.js
import {firstName as userFirstName, lastName as userLastName} from './util.js'

console.log(userFirstName) //  » 大漠
console.log(userLastName)  //  » w3cplus
前面的示例,我们都被命名为import或export。但事实上也存在默认声明。它可以用于:
- 导出或导入单个功能模块
- 突出显示模块的导出API的主要功能
- 具有后备导入功能
比如:
// src/util.js
const Person = {
    name: '大漠',
    age: 30
}

export default Person
你可以省略导入的大括号,就可以导入默认导出:
// src/App.js
import Person from './util.js'

console.log(Person.name) //  » 大漠
console.log(Person.age)  //  » 30
另外,导入名称可能和导出的默认名称不同。你还可以将它与命名的export和import语句一起使用:
const userName = '大漠'
const userAge = 40

const User = {
    userName,
    userAge
}

export {
    userName,
    userAge
}

export default User
并在另一个文件中导入默认导出或命名导出:
import Person, {userName, userAge} from './util.js'

console.log(Person) //  » {userName: '大漠', userAge: 40}
console.log(userName, userAge) //  » 大漠 40
你还可以节省额外的行并直接为命名导出:
export const userName = '大漠'
export const userAge = 40
这些是ES6模块的主要功能。它们可以帮助您组织代码,维护代码和设计可重用的模块API。您还可以导出和导入功能以测试它们。
有关于ES Modules更多的介绍可以阅读:
- Modules
- Modules, introduction
- ES6 Modules in Depth
- JavaScript modules
- JavaScript module systems
- JavaScript Module Pattern
- JavaScript modules
- Exports and Imports and Defaults, Oh My!
ES6的类和类继承
在ES6之前,JavaScript开发人员一直在使用函数模拟类,但现在终于不再需要使用函数来模拟类了。类一直是许多语言的重要组成部分,同样的在React中,基于类的组件也很常见,因此理解ES6类的工作原理及其语法非常重要。
类是对象的模板。面向对象编程(OOP)是一个很大的主题,所以在学习React之前很有必要的了解JavaScript中的类。接下来这些示例是JavaScript中有关于类的基本示例。
在JavaScript中常常使用class类名来声明一个类,按照惯例,class后面会紧跟类的名称,而且这个类的名称的第一个字母应该大写:
class Cat {
    constructor(name, color, age) {
        this.name = name
        this.color = color
        this.age = age
    }

    hello() {
        return `${this.name} Cat, Eye Color: ${this.color}, Age: ${this.age}`
    }
}

const cat = new Cat('Sandy', 'deepblue', 120)
console.log(cat)
console.log(cat.hello())
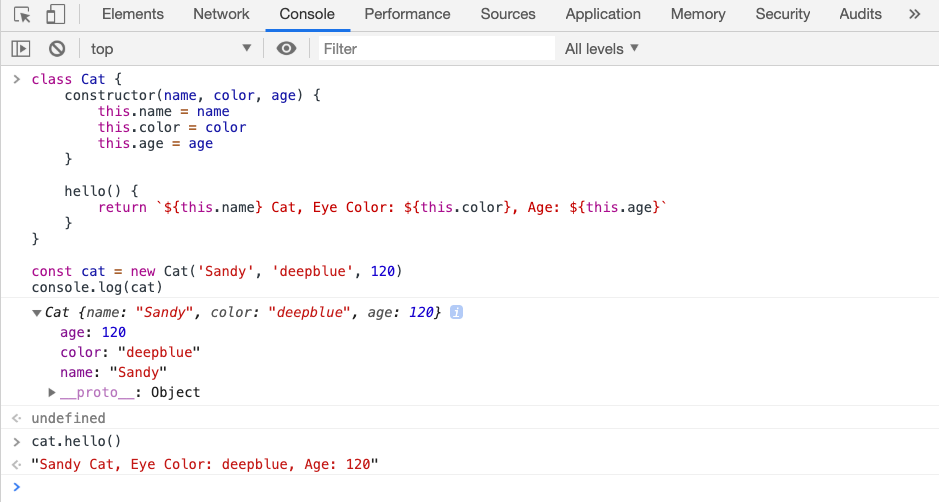
比如上面的示例,创建的类Cat,它其实用来描述了猫这样的一个实体(实体实例)。一旦使用new语句创建了类的实例(new Cat()),就会调用该类的构造函数,会实例化该类的实例。因此,类通常可以具有其构造函数中的属性。此外,类方法(比如hello())可以用于读取(或写入)实例的数据。类的实例在类中表示为此对象,但实例外部仅指定给JavaScript变量。
通常,类用于而对对象编程中的继承。在JavaScript的类中也可以有子类,用于扩展另一个类,因此 子类继承原始类的属性和方法。
在JavaScript中,使用extends语句来扩展另一个类,这在React中创建一个新组件时,常能看到:
class App extends Component {
    // ...
}
我们来创建一个新的类,该类继承于前面的Cat类:
class Cat {
    constructor(name, color, age) {
        this.name = name
        this.color = color
        this.age = age
    }

    hello() {
        return `${this.name} Cat, Eye Color: ${this.color}, Age: ${this.age}`
    }
}

class Doraemon extends Cat {
    constructor(name, eye, age) {
        this.name = name
        this.eye = eye
        this.age = age
    }
}

const doraemon = new Doraemon('Jack', 'green', 10)
像上面这样做会报错:
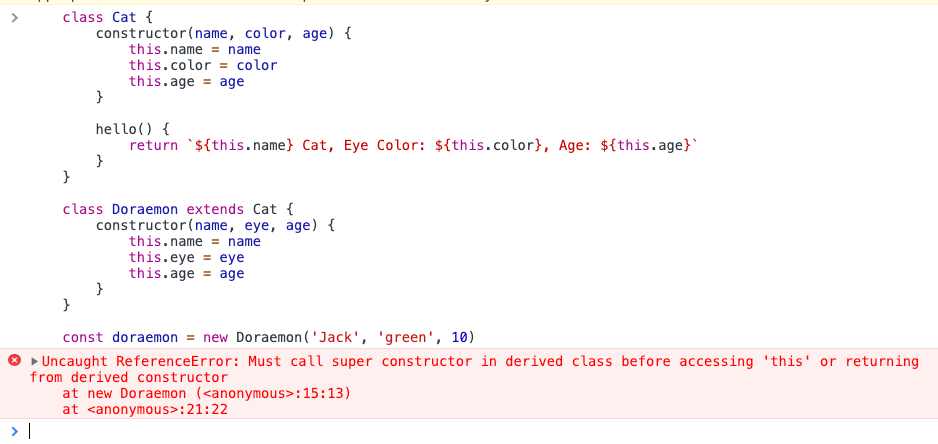
因为子类总是需要调用子类构造函数中的super():
class Doraemon extends Cat {
    constructor(name, color, age) {
        super(name, color, age)
        this.room = 1
    }
    enroll() {
        return `${this.name} is enrolled`
    }
}

const doraemon = new Doraemon('Jack', 'blue', 10)

console.log(doraemon)
console.log(doraemon.hello())
console.log(doraemon.enroll())
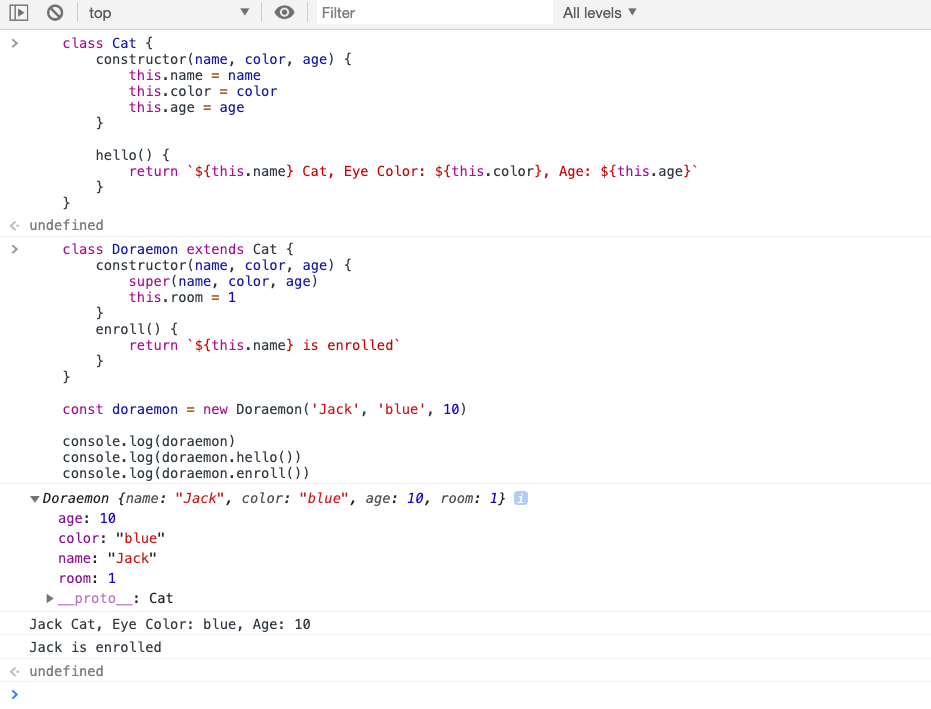
通过调用super(),我们将调用父类构造函数方法。这将允许我们在子类中使用this关键词,还可以添加更多的属性和方法。
现在我们对ES6中的类和继承有了一点了解之后就可以很好的理解React中有关于类的使用了。在React的项目中,我们可以看到代码中有:
import React, { Component } from 'react';
我们只需要理解React类组件,可以理解src/App.js中定义的React类。这是一个**React组件**,但它实际上只是一个普通的ES6,它继承了从React包导入的React Component类的定义。这使得我们能够使用render()方法,this.state和其他方法:
import React, { Component } from 'react';

class App extends Component {
    render() {
        return <h1>Hello World!</h1>
    }
}
所有的这些定义都在Component类中。
此外,如果不从React组件扩展,将无法使用其他生命周期的方法。比如,不存在componentDidMount()生命周期方法,因为该组件将是纯JavaScript(Vanilla JavaScript)类的实例。并且不仅生命周期方法会消失,React的API方法(比如this.state)也不可用。
但是,正如你所看到的,使用JavaScript类有利于使用你的专业行为扩展通用类。因此,你可以引入自己的类方法或属性:
import React, { Component } from 'react';

class App extends Component {
    getGreeting() {
        return 'Welcome to React';
    }

    render() {
        return (
            <div>
                <h1>{this.getGreeting()}</h1>
            </div>
        );
    }
}

export default App;
现在您知道为什么React使用JavaScript类来定义React类组件。当您需要访问React的API(生命周期方法,this.state和this.setState())时,可以使用它们。不过,在Reactk,class不是定义React Component的唯一方法。如果你不需要状态和其他生命周期方法,则可以使用函数组件的方式。
后面我们将会花较多的学习来学习类组件和函数组件的差异。
有关于JavaScript中的类和继承更多的介绍可以阅读:
- ES6 Classes in Depth
- Class basic syntax
- Class inheritance
- Class Composition in JavaScript
- Javascript Classes and Inheritance ES6, ES5
- A guide to prototype-based class inheritance in JavaScript
- React – Composition Vs. Inheritance
- Use class properties to clean up your classes and React components
- Working With React Pure Components
- React State without Constructor
- How Are Function Components Different from Classes?
- Convert a React Class-Based Component to a Functional One Using a State Hook
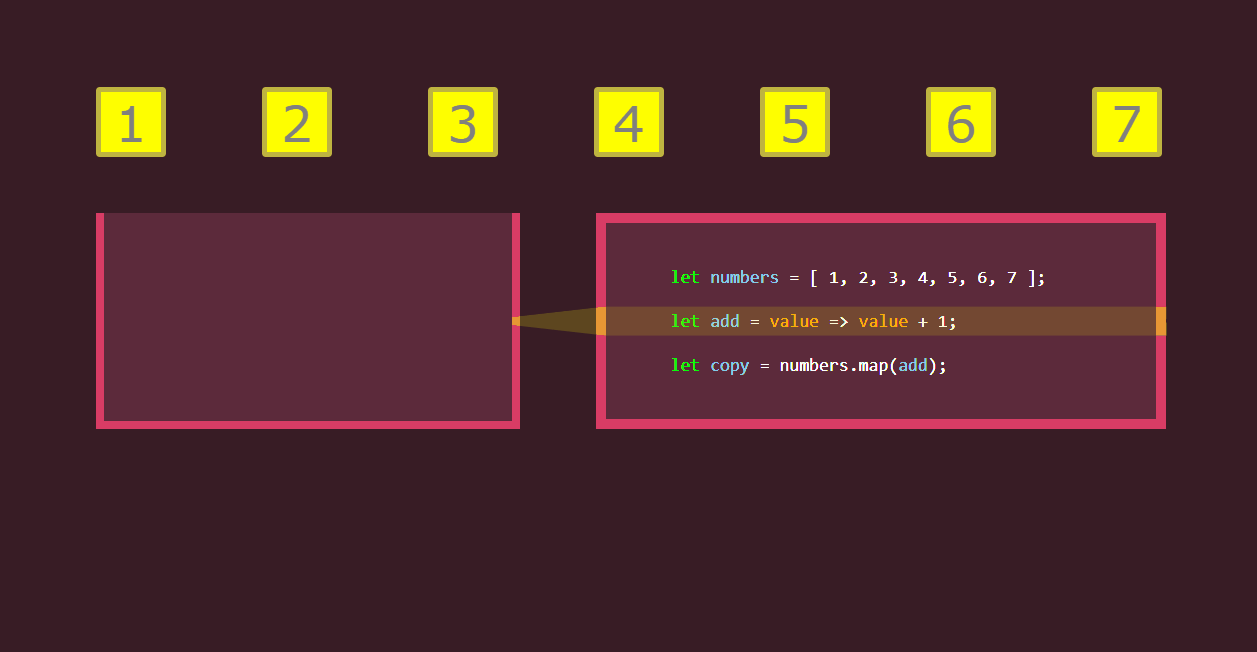
数组方法
JavaScript中数组方法有很多。最常用到的可能有find、some、every、map、filter和reduce等。而在React中,数组中最常用到的方法可能是map、filter和reduce。
用几张图来描述map、filter和reduce:

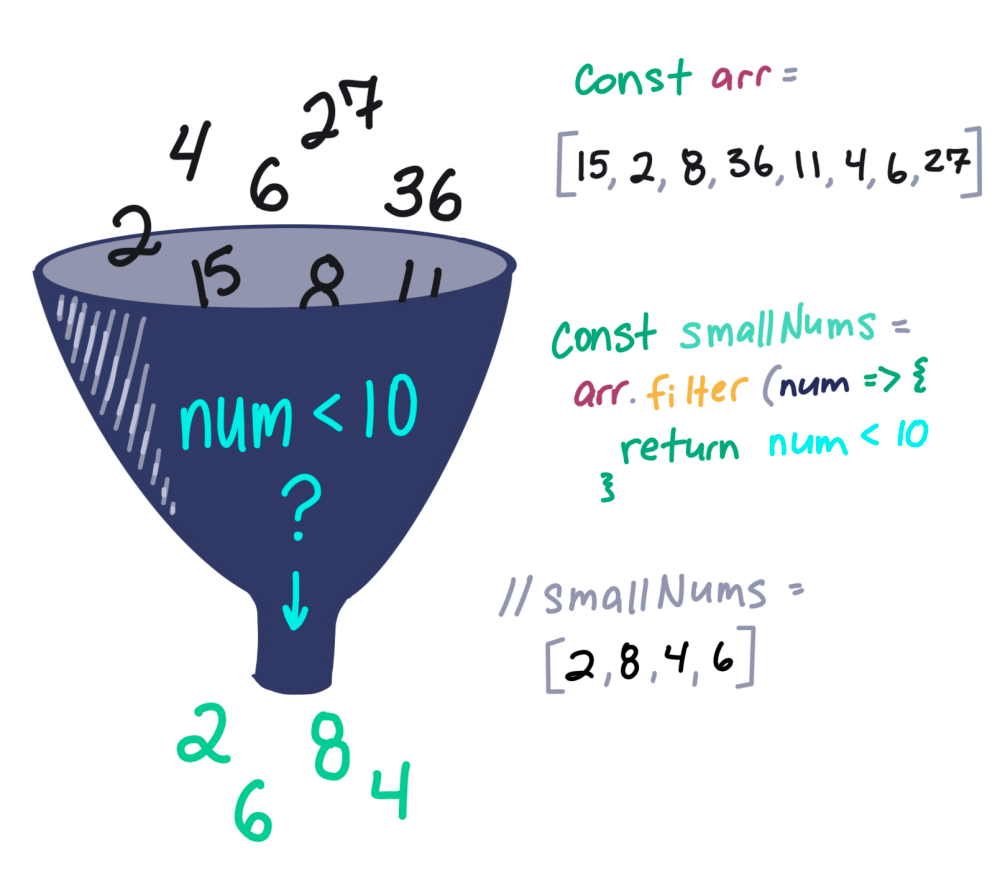
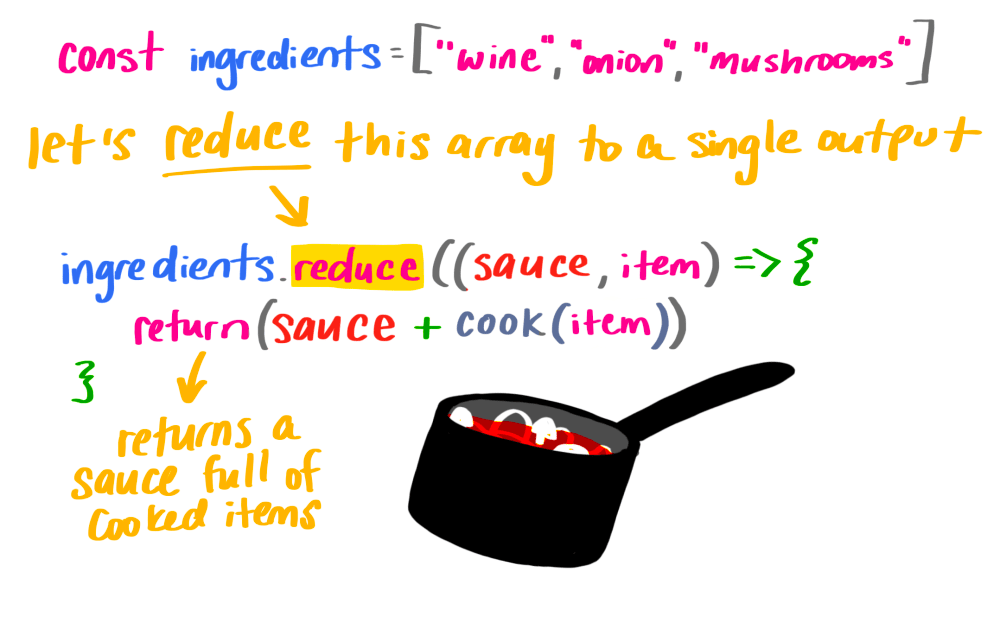
上图来自于@Una Kravets的手绘图
@JavaScript Teacher还为这几个API设计了相应的动态图
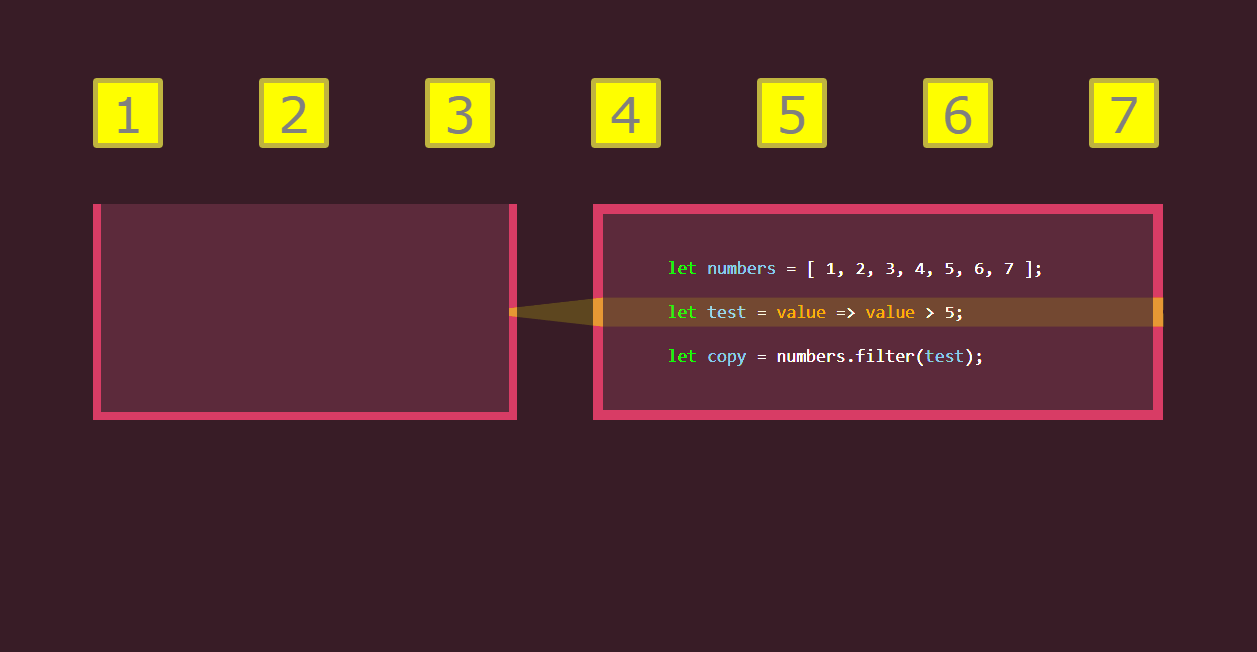
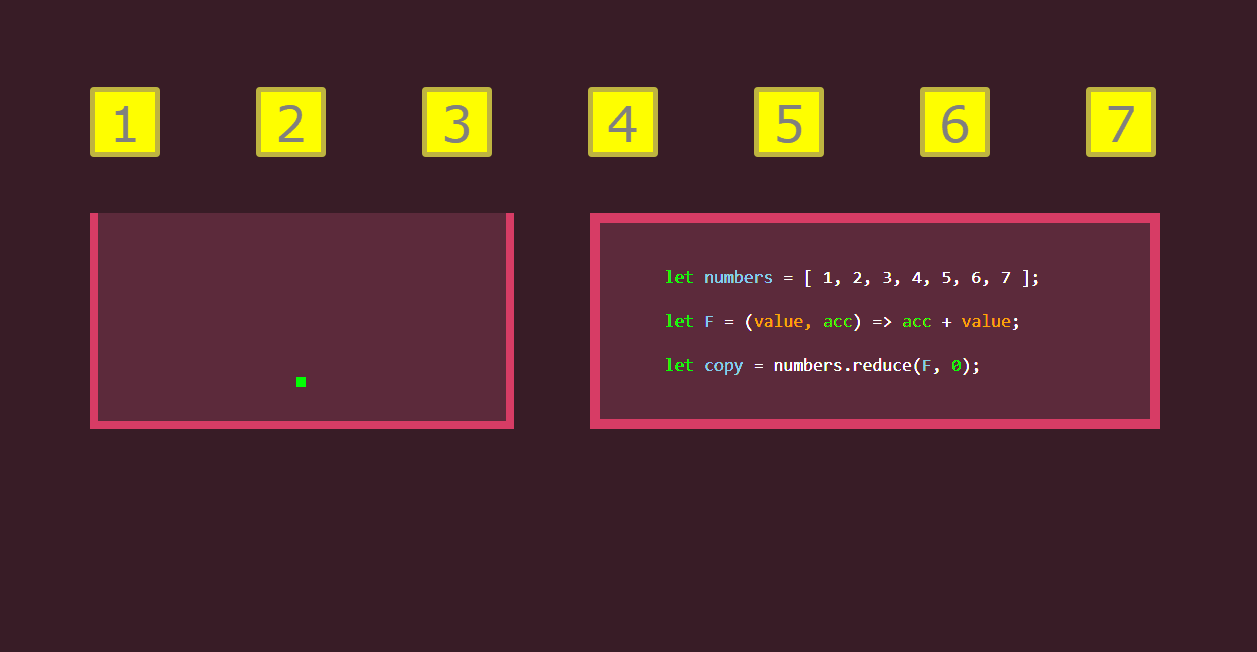
在React中,这几个数组方法对于我们来说非常地实用,特别是在处理数组数据的时候。就拿渲染一个列表来举例吧。在React中没有一个特定的API,比如像Vue中的v-for指令来帮助我们渲染一个列表。也就是说,在React中要渲染一个列表就需要使用纯JavaScript的方法,这个时候数组的map、filter和reduce等方法就可以派上用场了。
假设我们的数据中有一个数组;
const users = [
    {
        name: 'Jack',
        age: 25,
        nationality: 'USA'
    },
    {
        name: 'Tony',
        age: 30,
        nationality: 'Japan'
    },
    {
        name: 'Jony Li',
        age: 20,
        nationality: 'China'
    }
]
使用map函数可以在React中渲染一个列表:
import React, {Component} from 'react'

class UserList extends Component {
    render() {
    const users = [
            {
                name: 'Jack',
                age: 25,
                nationality: 'USA'
            },
            {
                name: 'Tony',
                age: 30,
                nationality: 'Japan'
            },
            {
                name: 'Jony Li',
                age: 20,
                nationality: 'China'
            }
        ]

        return (
            <ul>
                { users.map(user => <li>{user.name} is {user.age} years old and from {user.nationality}</li>) }
            </ul>
        )
    }
}
同样,可以通过filter对数据进行筛选:
return (
    <ul>
        { users.filter(user => user.age > 26).map(user => <li>{user.name} is {user.age} years old and from {user.nationality}</li>) }
    </ul>
)
有关于数组更多的介绍可以阅读:
- Exploring the hidden potential of JavaScript arrays!
- All about JavaScript Arrays in 1 article
- Javascript Arrays – Tips, tricks and examples
- Let’s get those Javascript Arrays to work fast
- How to manage React State with Arrays
- Rendering Arrays in React
Promises和async/await
什么是Promise。简而言之,Promise是将来会发生的事情,但可能不会马上发生。这是一种帮助我们处理异步代码的方法。作为一名React开发人员,你需要做的最重要的事情是了解如何使用Promise,为什么?因为当你调用一个API时,它会返回一个Promise。要知道某事是一个Promise,最简单的方法就是通过.then()方法来调用。
其中Promise可以帮助我们管理异步代码,并从许多DOM API和第三方库中返回。而async/wait语法是处理Promise的一种特殊语法。两者相辅相成的。
function promises() {
    const successfulPromise = timeout(100).then(result => `success: ${result}`)
    const failingPromise = timeout(200, true).then(null, error =>
        Promise.reject(`failure: ${error}`),
    )
    const recoveredPromise = timeout(300, true).then(null, error =>
        Promise.resolve(`failed and recovered: ${error}`),
    )
    successfulPromise.then(log, logError)
    failingPromise.then(log, logError)
    recoveredPromise.then(log, logError)
}

function asyncAwaits() {
    async function successfulAsyncAwait() {
        const result = await timeout(100)
        return `success: ${result}`
    }
    async function failedAsyncAwait() {
        const result = await timeout(200, true)
        return `failed: ${result}`
    }
    async function recoveredAsyncAwait() {
        let result
        try {
            result = await timeout(300, true)
            return `failed: ${result}` // this would not be executed
        } catch (error) {
            return `failed and recovered: ${error}`
        }
    }
    successfulAsyncAwait().then(log, logError)
    failedAsyncAwait().then(log, logError)
    recoveredAsyncAwait().then(log, logError)
}

function log(...args) {
    console.log(...args)
}

function logError(...args) {
    console.error(...args)
}

function timeout(duration = 0, shouldReject = false) {
    return new Promise((resolve, reject) => {
        setTimeout(() => {
            if (shouldReject) {
                reject(`rejected after ${duration}ms`)
            } else {
                resolve(`resolved after ${duration}ms`)
            }
        }, duration)
    })
}
在React中,我们也时常会将Promise和async/wait的结合在一起来使用:
function GetGreetingForSubject({subject}) {
    const [isLoading, setIsLoading] = React.useState(false)
    const [error, setError] = React.useState(null)
    const [greeting, setGreeting] = React.useState(null)
    React.useEffect(() => {
        async function fetchGreeting() {
            try {
                const response = await window.fetch('https://example.com/api/greeting')
                const data = await response.json()
                setGreeting(data.greeting)
            } catch (error) {
                setError(error)
            } finally {
                setIsLoading(false)
            }
        }
        setIsLoading(true)
        fetchGreeting()
    }, [])
    return isLoading ? (
        'loading...'
    ) : error ? (
        'ERROR!'
    ) : greeting ? (
        <div>{greeting} {subject}</div>
    ) : null
}
有关于Promise和async/wait更多的介绍可以阅读:
- Promises: The Definitive Guide
- Javascript Promises – The Definitive Guide
- Asynchronous JavaScript: From Callback Hell to Async and Await
- Promises for asynchronous programming
- “Asynchronous JavaScript Programming with Promises”
- JavaScript Promises for Dummies
- Re-Think Promises When You Write Async JavaScript
- A Simple Guide to ES6 Promises
- HOW TO RUN ASYNC JAVASCRIPT FUNCTIONS IN SEQUENCE OR PARALLEL
- Using ES2017 Async Functions
- Debugging Asynchronous JavaScript with Chrome DevTools
- 7 Reasons Why JavaScript Async/Await Is Better Than Plain Promises
- Faster async functions and promises 【译文】
- Await and Async Explained with Diagrams and Examples
- Keep Your Promises in TypeScript using async/await
- Async JavaScript: From Callbacks, to Promises, to Async/Await
- Async Await
- Async JavaScript From Pure Callbacks to Promises to Async-Await
- Understanding JavaScript’s async await
- How JavaScript works: Event loop and the rise of Async programming + 5 ways to better coding with async/await
- Exploring Async/Await Functions in JavaScript
- Promises, async/await
- Deeply Understanding JavaScript Async and Await with Examples 【译文】
- Improve async programming with JavaScript promises
- JavaScript async and await
- 异步函数 - 提高 Promise 的易用性
- avaScript Promise:简介
- JavaScript Promise combinators: .all(), .race(), .allSettled()
- About Promises and async / await
使用let和const来声明变量
因为JavaScript的var关键词是声明全局的变量,所以在ES6中引入了两个新的关键词来声明变量,即 let 和 const。它们都可以用来声明变量。区别在于const声明后不能改变它的值,而let则可以。另外这两个关键词声明的变量都是局部的,意味着如果在函数作用域内声明,则不能在函数外部调用。
按以往经验来说,默认使用 const 声明变量。 稍后当您编写应用程序时,当你意识到 const 的值需要更改,才是你应该将 const 重构为 let 时。 希望它会让你习惯新的关键字,并且你将开始认识到应用程序中需要使用 const 或 let 的模式。
在React中使用var、let和const声明的不同变量对于React新手来说可能会造成混淆,即使它们不是React特有的。在React中,我更建议使用let和const来声明变量:
import React, { Component } from 'react';

class App extends Component {
    render() {
        const users = [
            { name: 'Jack' },
            { name: 'Tony' }
        ];

        return (
            <ul>
                {users.map(user => <li>{user.name}</li>)}
            </ul>
        );
    }
}

export default App;
在React中可以使用下面的经验法则来声明变量:
- 不要使用
var,因为let和const更具体 - 默认为
const,因为它不能重新分配或重新声明 - 重新赋值变量时使用
let
虽然let通常用于for循环来递增迭代器,但const通常用于保持JavaScript变量不变。尽管在使用const时可以更改对象和数组的内部属性,但变量声明显示了保持变量不变的意图。
小结
React是一个优秀的JavaScript框架,如果想要更好的掌握React,还是需要具备较好的JavaScript基础知识。这篇文章整理了一些在学习React应该掌握的JavaScript知识点。希望该文提到的点对于初学React的同学有所帮助,如果您和我一样也是刚入门的话,就很有必要针对性的掌握文章提到的JavaScript基础知识,特别是文章中提到JavaScript的类、继承、Promise和async/wait等。另外为了让大家更好的获取相关的知识点,每个小节都提供了一些资源。
扩展阅读
- JavaScript to Know for React
- JavaScript Basics Before You Learn React
- 10 Things to Know About ES6 before Learning React JS
- Must know JavaScript for react developers
- JavaScript fundamentals before learning React
- 5 Topics To Master Before Learning React
- JavaScript fundamentals before learning React via @Hacker News