CSS Grid布局:网格区域
在CSS Grid Layout中除了可以使用风格线实现网格布局之外,还可以使用网格区域来实现布局。在《CSS Grid布局:网格单元格布局》和《CSS Grid布局:合并单元格布局》文中都已经领略了CSS Grid Layout中gird-area实现的单元格和合并单元格的布局,但这仅是网格布局使用较为简单、基础的应用。在这篇文章中,将和大家一起探讨CSS Grid Layout中grid-area其他的功能与使用。
##网格区域的概念
网格区域(grid-area)是一个逻辑空间,主要用来放置一个或多个网格单元格(Grid Cell)。他是由四条网格线(Grid line),网格区域每边一条,四边相交组织的网格轨道(Grid Track)。简单点理解,网格区域是有四条网格线交织组成的网格空间,这个空间中可能是一个网格单元格,也可能是多个网格单元格。如下图所示:
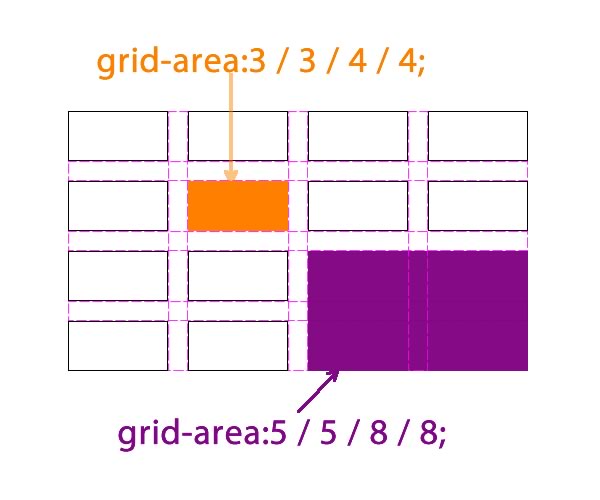
上图橙色的网格区域是由行网格线line3、line4和列网格线line3、line4组成,其仅仅是一个网格。紫色的网格区域是由行网格线line5、line8和列网格线line5、line8组成,其包含了九个网格单元格。
##定义网格区域
在CSS Grid Layout中定义网格区域有两种方式,一种是通过网格线来定义,另一种是通过grid-template-areas来定义。接下来看看两种定义网格区域的方法在具体使用过程中有何不同。
###网格线定义网格区域
使用网格线定义网格区域的方法非常的简单,首先依赖于grid-template-columns和grid-template-rows显式定义网格线,甚至是由浏览器隐式创建网格线,然后通过grid-area属性通过取网格线,组成网格线交织区域,那么这个区域就是所讲的网格区域。在使用grid-area属性调用网格线,其遵循的规则是grid-area: row-start / column-start / row-end / column-end。
一起来看一个常见的两列布局:
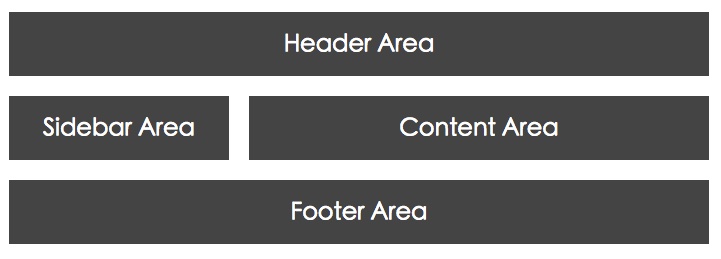
在这里咱们不探讨这个布局有多少方法可以实现,我们需要观注的是如何使用CSS Grid Layout中的grid-area来完成上图这样的布局。其实你要是阅读过《CSS Grid布局:网格单元格布局》和《CSS Grid布局:合并单元格布局》任何一篇文章,您都可以使用grid完成。
我们还是简单的说说怎么使用grid-area配合网格线完成。
#####HTML
<div class="wrapper">
  <div class="header box">Header Area</div>
  <div class="content box">Content Area</div>
  <div class="sidebar box">Sidebar Area</div>
  <div class="footer box">Footer Area</div>
</div>
#####CSS
.wrapper {
  display: grid;
  grid-template-columns: 220px 20px 220px 20px 220px;
  grid-template-rows: auto 20px auto 20px auto;
}
.header {
  grid-area: 1 / 1 / 2 / 6;
}
.content {
  grid-area: 3 / 3 / 4 / 6;
}
.sidebar {
  grid-area: 3 / 1 / 4 / 2;
}
.footer {
  grid-area: 5 / 1 / 6 / 6;
}
如此一来,在你的浏览器中就能看到上图展示的布局效果。
###grid-template-areas定义网格区域
除了使用网格线的交组来定义网格区域之外,在CSS Grid Layout中还可以通过grid-template-areas属性来定义网格区域的名称,然后需要放在对应网格区域的元素,可以通过grid-area属性来指定。而且重复区域可以使用同一个名称来实现跨区域。另外对于空的轨道区域,可以使用点号.来代表,比如侧边栏与主内容之间的间距。
接下来使用自定义网格区域名称的方法来实现上例的布局效果:
.wrapper {
  display: grid;
    grid-template-columns: 220px 20px 220px 20px 220px;
    grid-template-rows: auto;
  grid-template-areas:
    "header header header header header"
    "sidebar . content content content"
    "footer footer footer footer footer"
}

.header {
  grid-area:header;
}
.content {
  grid-area: content;
}
.sidebar {
  grid-area: sidebar;
}
.footer {
  grid-area: footer;
}
不过这样使用,行与行之间那20px间距没有了。如下图所示:

为了能显示出行与行之间的间距,这里我使用margin-bottom:20px;来模拟:
.box {
  background-color: #444;
  color: #fff;
  font-size: 150%;
  padding: 20px;
  text-align: center;
  margin-bottom: 20px;
}
这样也就实现了所需要的布局风格:

##无法自适应高度
在上例的基础上,做一个小修改,在.content中添加一些内容:
<div class="wrapper">
  <div class="header box">Header Area</div>
  <div class="content box">
    <h2>Content Area</h2>
    <ul>
      <li>List item</li>
      <li>List item</li>
      <li>List item</li>
      <li>List item</li>
    </ul>
  </div>
  <div class="sidebar box">Sidebar Area</div>
  <div class="footer box">Footer Area</div>
</div>
运行出来的效果可以发现,侧边栏无法自动匹配右侧主内容的高度,如下所示:
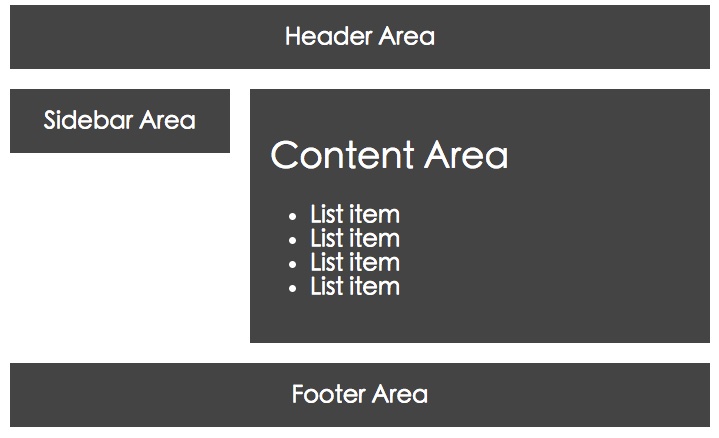
其实这种现像在《CSS Grid布局:合并单元格布局》文章中介绍网格合并创建布局就碰到过行无法显示合并后高度。最后通过给元素添加height:100%;box-sizing:border-box;来模拟实现。但此处我想使用同样的方法来模拟,却无法达到预期希望的效果:
.sidebar {
  grid-area: sidebar;
  background-color:orange;
  height: 100%;
  box-sizing:border-box;
}
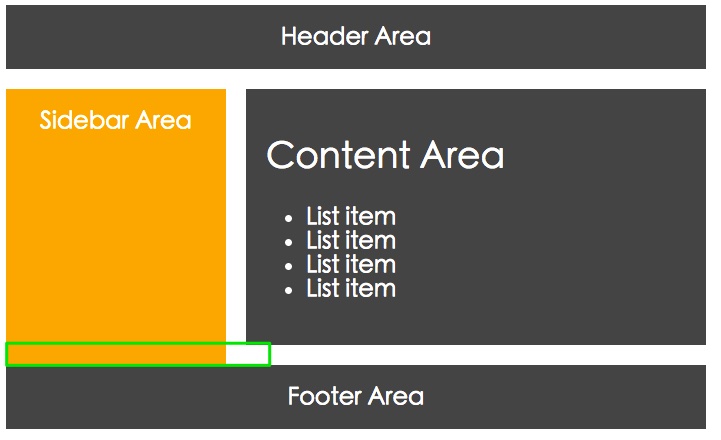
一直在想,我已经通过box-sizing:border-box修改盒模型方式了,难道是.box中margin-bottom:20px;引起的?重置margin-bottom:0;问题依旧,这下蛋蛋的忧伤来了,搞不清楚Grid的盒模型是如何渲染的了。最终使用calc()来计算:
.sidebar {
  grid-area: sidebar;
  background-color:orange;
  /*height: 100%;*/
  box-sizing:border-box;
 /* margin-bottom:0;*/
  height: calc(100% - 20px);
}
从表面上效果看,似呼OK了。但是不是真的OK,我也不清楚,希望知道为什么的同学能一起分享。
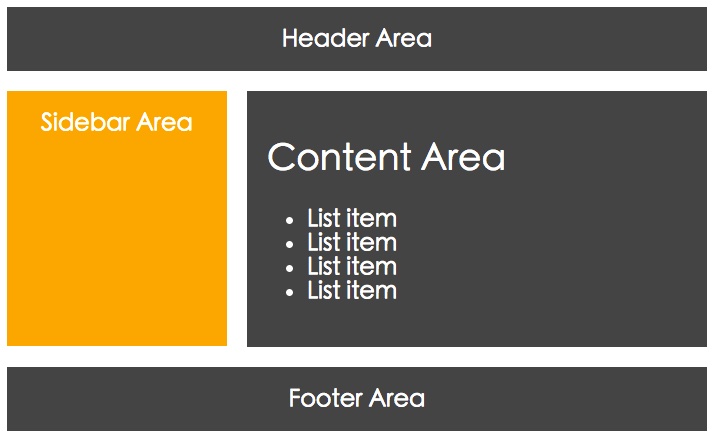
CSS Grid Layout的盒模型有待探讨和深挖。
##通过媒体查询重新配置网格区域
通过CSS3的媒体查询功能与网格区域的配合,可以很容易实现不同的布局风格。比如:
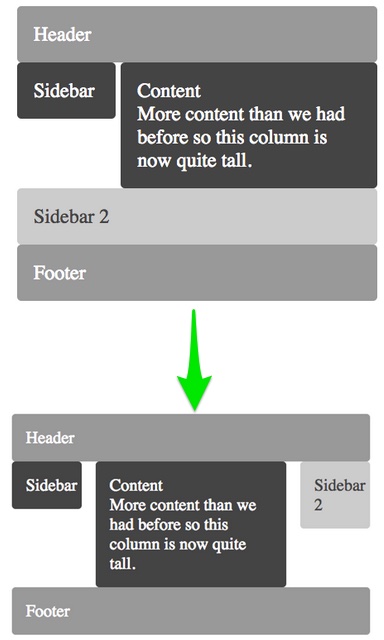
实现这样的布局,我们只需要在媒体查询外部使用grid-area调用grid-template-areas定义好的区域名称,而在不同的断点内使用grid-template-columns、grid-template-rows定义网格轨道,并且使用grid-template-areas定义区域名称。来看一个实现上较效果的简单实例:
#####HTML
<div class="wrapper">
  <div class="box header">Header</div>
    <div class="box sidebar">Sidebar</div>
    <div class="box sidebar2">Sidebar 2</div>
    <div class="box content">
    <h2>Content</h2>
    <p>More content than we had before so this column is now quite tall.</p>
  </div>
    <div class="box footer">Footer</div>
</div>
#####CSS
body {
  margin: 40px;
}
.wrapper {
    background-color: #fff;
    color: #444;
}
.box {
    background-color: #444;
    color: #fff;
    border-radius: 5px;
    padding: 20px;
    font-size: 150%;
}

.header,
.footer {
    background-color: #999;
}
.sidebar2 {
    background-color: #ccc;
    color: #444;
}

.sidebar {
    grid-area: sidebar;
}
.sidebar2 {
    grid-area: sidebar2;
}
.content {
    grid-area: content;
}
.header {
    grid-area: header;
}
.footer {
    grid-area: footer;
}

@media only screen and (min-width: 400px) and (max-width: 540px)  {
    .wrapper {
        display: grid;
        grid-template-columns: 20% 5% auto;
        grid-template-rows: auto;
        grid-template-areas:
      "header header header"
         "sidebar . content"
         "sidebar2 sidebar2 sidebar2"
         "footer footer footer";
    }
}

@media only screen and (min-width: 540px) {
    .wrapper {
        display: grid;
        grid-template-columns: 100px 20px auto 20px 100px;
        grid-template-rows: auto;
        grid-template-areas:
      "header header header header header"
         "sidebar . content . sidebar2"
         "footer footer footer footer footer";
            max-width: 600px;
    }
}
慢慢缩小您的浏览器,你将看到效果从:
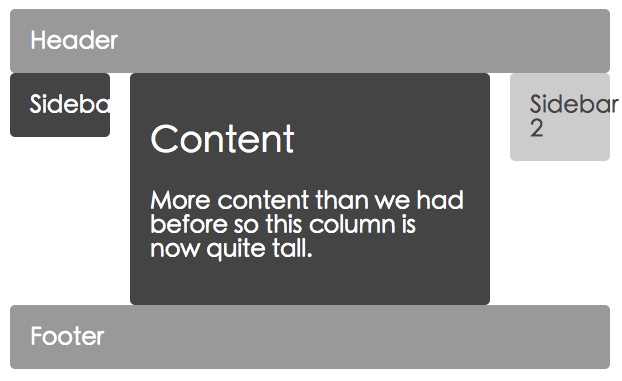
过渡到:
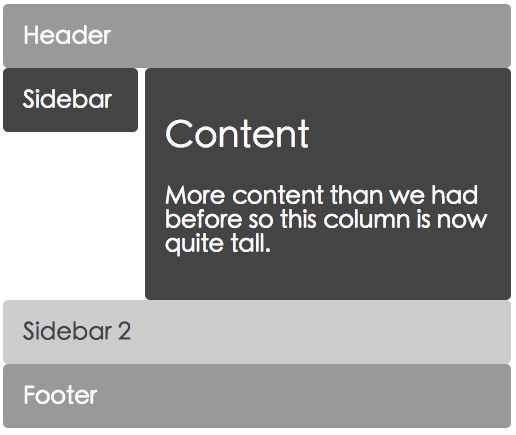
拓宽一下思路,使用CSS Grid Layout和媒体查询结合,实现Responsvie设计要比以前所使用的布局方法来得简单与灵活呢?虽然现在浏览器对CSS Grid Layout支持还不完美,不过我想不出多久,这将会让大家受益的。
##总结
本文主要介绍了定义网格区域(grid-area)的两种方法,一种是使用原始的网格线来定义;另外一种是通过grid-template-areas自定义网格区域的名称,然后通过grid-area来调用。并且使用一些简单的实例,展示了如何使用网格区域创建两列布局。最后将网格区域与媒体查询结合在一起,实现一个简单的响应式布局效果。
最后希望这篇文章能帮助大家更好的理解网格区域的使用,以及能使用网格区域实现自己需要的布局效果。如果您有相关的使用经验,欢迎在下面的评论中与我们一起分享,让更多的前端爱好者受益。
