CSS Houdini和CSS Paint API
特别声明:此篇文章内容来源于@lonekorean的《SAY HELLO TO HOUDINI AND THE CSS PAINT API》一文。
很长时间以来,我都没有对浏览器新的技术感到兴奋。
Houdini是一个强大的项目,它给开发者提供了比以往任何时候都还要更强大的CSS能力。这个项目的第一部分是CSS Paint API。这篇文章将解释为什么Houdini会如此令人兴奋,然后再告诉你如何开始使用CSS Paint API。
令人窒息的失望
有多少次你听说过一个杀手级的新CSS功能,并想:
哇,太棒了!迫不及待地想用它...当浏览器支持它,还得等2年。
有时候我们不想等待,所以我们转向CSS Polyfill。但这些往往幕后有很多复杂的东西存在,试图模仿该特性的每个细微差别。这就导致了很多潜在的边界问题,以及一些性能方面的影响,因为Polyfill的JavaScript无法与浏览器原生的效率相匹敌。
如果您需要更有力的说服力,可以点击这里查看CSS Polyfill相关的黑暗面。
新的希望将至
这有点让人沮丧,但如果我告诉你有一天,你会听到一个新的CSS特性,然后想:
哇,太棒了!等不及了...现在就要使用!
这就是Houdini正在努力实现的。Houdini本着可扩展Web的精神,让开发者可以直接访问浏览器的CSS引擎。这使开发人员有能力创建他们自己自定义的CSS特性,并让这些特性在浏览器的原生渲染管道中高效运行。
这些自定义的CSS特性是在worklets中定义的,它只是JavaScript文件,您可以像其他JavaScript文件一样部署到您的网站(它们执行的方式不同,稍后会花点时间讨论这方面的细节)。然后,任何访问你网站的人都可看到你定制的CSS特性,就好像它被嵌套到他们的浏览器中一样。
这意味着,在浏览器厂商实现它们之前,可以通过Houdini实现新的CSS特性。或者你可以通过制定你想要的CSS特来挠痒,但是浏览器厂商永远不会实现。
浏览器支持度
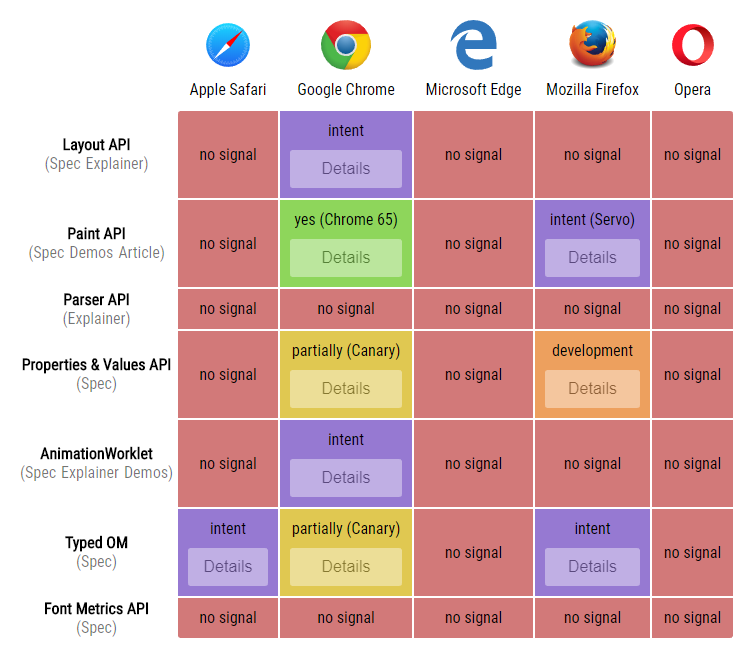
值得庆幸的是Houdini得到了Apple,Google,Microsoft,Mozilla和Opera众多公司的支持。坏消息的是,到目前为止,只有Google的Chrome实现了任何功能。下图是写这篇文章时,浏览器对Houdini的支持度:
这张图涉及很多东西,我来简单的解释一下。
Houdini是一个API的集合,拼图中的碎片表示浏览器对Houdini各API的支持情况。Layout API允许你控制元素如何使用CSS来实现Web的布局,Parser API允许你增加如何解析CSS表达式等等。正如你所看到的,Houdini是一项正在进行中的工作。
虽然Houdini的API得到浏览器支持的并不多,但是有一个Houdini的API你现在是可以玩起来的:CSS Paint API。这个API允许你使用CSS属性来绘制图像 —— 例如background-image和list-style-image。
如果你现在就想在Chrome中使用Paint API。在最新版本的Chrome中默认启用。如果你使用的版本比Chrome(Android手机可能?)早一些,那么使用Paint API需要到chrome://flags中开启实验的Web平台特性。
要通过JavaScript检查Paint API的支持,可以使用下面的代码:
if ('paintWorklet' in CSS) {
    // good to go!
}
如果使用CSS检查Paint API,可以使用下面的代码:
@supports (background: paint(id)) {
    /* good to go! */
}
下面的示例使用了两种方法来检查你的浏览器是否支持Paint API。如果你看到双勾,那就很好了!
一些技巧
一个重要的警告是,Paint API只在https或localhost可运行。如果你正在本地开发,http-server可以让你的页面轻易的在localhost上运行起来。
worklets会被浏览器缓存,所以一定要禁用缓存,以便代码更新之后可以查看到效果。
还有一点需要知道的是,不能设置断点,也不能在worklets中使用debugger调试语句。值得庆幸的是,仍然可以使用console.log()。
一个简单的Paint Worklet
我们接下来使用Paint API做点东西吧!先从最简单的东西开始,就是在元素中绘制一个X。用来做占位符框,通常在模型或线框图中可以看到图像的位置。比如下面这样的效果:
绘图代码放在Paint Worklet中,它使用它自己的JavaScript文件。Paint Worklet的范围和功能是有限的。它们无法访问DOM,许多全局函数(比如setInterval)都无法访问。这有助于保持它们的高效和潜在的多线程(还没有完成,但是它在wishlist上)。
class PlaceholderBoxPainter {
    paint(ctx, size) {
        ctx.lineWidth = 2;
        ctx.strokeStyle = '#666';

        // 从左上角到右下角绘制一条线
        ctx.beginPath();
        ctx.moveTo(0, 0);
        ctx.lineTo(size.width, size.height);
        ctx.stroke();

        // 从右上角到左下角绘制一条线
        ctx.beginPath();
        ctx.moveTo(size.width, 0);
        ctx.lineTo(0, size.height);
        ctx.stroke();
    }
}

registerPaint('placeholder-box', PlaceholderBoxPainter);
每当需要绘制元素时,就会调用paint()函数。这个函数提供了两个输入参数。ctx是我们所使用的对象,就像CanvasRenderingContext2D对象(这里有详细文档),但是有一些限制(比如不能绘制文本)。size是用来设置我们要绘制元素的height和width。
接下来,我们告诉页面关于我们的Paint Worklet。我们还可以在这里加一个<div>和一个占位符。
<script>
    CSS.paintWorklet.addModule('worklet.js');
</script>

<div class="placeholder"></div>
最后,我们用一些简单的CSS将Paint Worklet与<div>连接起来。
.placeholder {
    background-image: paint(placeholder-box);

    /* other styles as needed... */
}
就是这样。祝贺你,你在使用Paint API!
使用输入属性
就像现在这样,我们的Paint Worklet让硬编码X有粗细和颜色的效果。如果它能自动地使用元素的border来控制硬编码的粗细和颜色是不是会更好?
我们可以通过输入属性,(Typed Object Model(或Typed OM)提供)来实现这一点。这是Houdini的另一部分,但与Paint API不同,它仍然要在chrome://flags中开启实验性的Web平台特性。
可以使用下面的代码来检查Typed OM是否得到浏览器支持。
if ('CSSUnitValue' in window) {
    // good to go!
}
现在让我们更新我们的Paint Worklet的代码。
class PlaceholderBoxPropsPainter {
    static get inputProperties() {
        return ['border-top-width', 'border-top-color'];
    }

    paint(ctx, size, props) {
        // default values
        ctx.lineWidth = 2;
        ctx.strokeStyle = '#666';

        // set line width to top border width (if exists)
        let borderTopWidthProp = props.get('border-top-width');
        if (borderTopWidthProp) {
            ctx.lineWidth = borderTopWidthProp.value;
        }

        // set stroke style to top border color (if exists)
        let borderTopColorProp = props.get('border-top-color');
        if (borderTopColorProp) {
            ctx.strokeStyle = borderTopColorProp.toString();
        }

        // same drawing code as before goes here...
    }
}

registerPaint('placeholder-box-props', PlaceholderBoxPropsPainter);
我们已经添加了inputProperties来告诉Paint Worklet让查找CSS属性。之后,paint()函数可以使用第三个传入函数props来访问这些属性的值。现在我们的占位符框变得更灵活了。
在CSS中使用border效果很好,但是请记住,它实际上是CSS的12不同属性的缩写。
.shorthand {
    border: 1px solid blue;
}

.expanded {
    border-top-width: 1px;
    border-right-width: 1px;
    border-bottom-width: 1px;
    border-left-width: 1px;
    border-top-style: solid;
    border-right-style: solid;
    border-bottom-style: solid;
    border-left-style: solid;
    border-top-color: blue;
    border-right-color: blue;
    border-bottom-color: blue;
    border-left-color: blue;
}
Paint Worklet需要我们指定具体的CSS属性,在这个示例中,我们使用了border-top-width和border-top-color两个属性。
很酷的是,border-top-width被转换为像素,因为它被传递到Paint Worklet中。这是完美的,因为这是ctx.lineWidth预期的测量单位。为了证明效果,上面的示例中第三个占位符框的border-top-width是1rem,但Paint Worklet给的值是16px。
制作一个锯齿状的边缘
对于我们的下一个技巧,我们将制作一个绘制锯齿状边缘的Paint Worklet。下面是示例效果:
这是Paint Worklet的代码:
class JaggedEdgePainter {
    static get inputProperties() {
        return ['--tooth-width', '--tooth-height'];
    }

    paint(ctx, size, props) {
        let toothWidth = props.get('--tooth-width').value;
        let toothHeight = props.get('--tooth-height').value;

        // lots of math to ensure teeth are collectively centered
        let spaceBeforeCenterTooth = (size.width - toothWidth) / 2;
        let teethBeforeCenterTooth = Math.ceil(spaceBeforeCenterTooth / toothWidth);
        let totalTeeth = teethBeforeCenterTooth * 2 + 1;
        let startX = spaceBeforeCenterTooth - teethBeforeCenterTooth * toothWidth;

        // start drawing teeth from left
        ctx.beginPath();
        ctx.moveTo(startX, toothHeight);

        // draw the top zig-zag for all the teeth
        for (let i = 0; i < totalTeeth; i++) {
            let x = startX + toothWidth * i;
            ctx.lineTo(x + toothWidth / 2, 0);
            ctx.lineTo(x + toothWidth, toothHeight);
        }

        // surround the area below the teeth and fill it all in
        ctx.lineTo(size.width, size.height);
        ctx.lineTo(0, size.height);
        ctx.closePath();
        ctx.fill();
    }
}

registerPaint('jagged-edge', JaggedEdgePainter);
我们再次使用inputProperties,这次用来控制每个牙齿的width和height。但是请注意,使用了--tooth-width和--tooth-height,这都是自定义属性(也称为CSS变量)。这通常要比现有的CSS属性更有意义,但它确定需要另一个步骤。
你可以看到,浏览器知道某些内置的CSS属性是长度值(比如前面的border-top-width)。但是自定义属性可以用于各种各样的东西。你的浏览器不能假定自定义属性被用于长度,所以我们必须告诉它。
Properties和Values API允许我们这样做。这也是Houdini的另一个API,也需要在chrome://flags中开启实验的Web平台特性。
你可以在代码中使用下面的代码来检查Properties和Values API是否得到支持。
if ('registerProperty' in CSS) {
    // good to go!
}
一旦启用,我们可以添加下面的JavaScript代码(在Paint Worklet文件外)。
CSS.registerProperty({
    name: '--tooth-width',
    syntax: '<length>',
    initialValue: '40px'
});
CSS.registerProperty({
    name: '--tooth-height',
    syntax: '<length>',
    initialValue: '20px'
});
现在我们可以在--tooth-width和--tooth-height使用各种长度值,你的浏览器将理解它们并将它们转换为我们的Paint Worklet的像素值。我们甚至可以使用calc()表达式。如果我们忘记设置它们或者给它们无效的长度值,它们就会回到initialValue。
.jagged {
    background: paint(jagged-edge);

    /* other styles as needed... */
}

.slot:nth-child(1) .jagged {
    --tooth-width: 50px;
    --tooth-height: 25px;
}

.slot:nth-child(2) .jagged {
    --tooth-width: 2rem;
    --tooth-height: 3rem;
}

.slot:nth-child(3) .jagged {
    --tooth-width: calc(33vw - 31px);
    --tooth-height: 2em;
}
<length>不是唯一允许的语法,正如你在这里看到的。所以我们也可以注册一个--tooth-color属性的语法<color>,但是我有更好的想法。通过使用-webkit-mask-image和我们的Paint Worklet一起使用,我们可以绘制出锯齿状的边缘形状和任何我们想要的背景。CSS是这样的。
.jagged {
    --tooth-width: 80px;
    --tooth-height: 30px;
    -webkit-mask-image: paint(jagged-edge);

    /* other styles as needed... */
}

.slot:nth-child(1) .jagged {
    background-image: linear-gradient(to right, #22c1c3, #fdbb2d);
}

.slot:nth-child(2) .jagged {
    /* pixel art from Iconoclasts, fun game! http://www.playiconoclasts.com/ */
    background-image: url('iconoclasts.png');
    background-size: cover;
    background-position: 50% 0;
}
Paint Worklet代码是完全一样的。现在来看看我们新的奇特的锯齿状边缘效果。
输入参数
你还可以使用输入参数将值传递到你的Paint Worklet中。这些参数允许你在CSS中指定参数。
.solid {
    background-image: paint(solid-color, #c0eb75);

    /* other styles as needed... */
}
Paint Worklet使用inputArguments声明它所期望的值,然后,paint()函数可以从第四个传入参数中获取这些参数,这是一个名为args的数组,如下所示。
class SolidColorPainter {
    static get inputArguments() {
        return ['<color>'];
    }

    paint(ctx, size, props, args) {
        ctx.fillStyle = args[0].toString();
        ctx.fillRect(0, 0, size.width, size.height);
    }
}

registerPaint('solid-color', SolidColorPainter);
说实话,我个人并不喜欢输入参数。我觉得自定义属性更加通用。它们还有助于创建更好的自已的CSS文档化,因为你可以使用描述性属性名称。
制作动画的新方法
我们来做最后一个效果。使用我们前面介绍过的熟悉的概念,创建下面这个漂亮的褪色圆点图案。
我们首先要注册一些自定义属性用来控制波尔卡圆点(Polka dots)。
CSS.registerProperty({
    name: '--dot-spacing',
    syntax: '<length>',
    initialValue: '20px'
});
CSS.registerProperty({
    name: '--dot-fade-offset',
    syntax: '<percentage>',
    initialValue: '0%'
});
CSS.registerProperty({
    name: '--dot-color',
    syntax: '<color>',
    initialValue: '#fff'
});
然后在Paint Worklet中使用这些自定义属性,这里还使用了一些数学公式,主要用来绘制波尔卡圆点图案。
class PolkaDotFadePainter {
    static get inputProperties() {
        return ['--dot-spacing', '--dot-fade-offset', '--dot-color'];
    }

    paint(ctx, size, props) {
        let spacing = props.get('--dot-spacing').value;
        let fadeOffset = props.get('--dot-fade-offset').value;
        let color = props.get('--dot-color').toString();

        ctx.fillStyle = color;
        for (let y = 0; y < size.height + spacing; y += spacing) {
            for (let x = 0; x < size.width + spacing; x += spacing * 2) {
                // every other row shifts x to create staggered dots
                let staggerX = x + ((y / spacing) % 2 === 1 ? spacing : 0);

                // calculate dot radius based on horizontal position and fade offset
                let fadeRelativeX = staggerX - size.width * fadeOffset / 100;
                let radius = spacing * Math.max(Math.min(1 - fadeRelativeX / size.width, 1), 0);

                // draw dot
                ctx.beginPath();
                ctx.arc(staggerX, y, radius, 0, 2 * Math.PI);
                ctx.fill();
            }
        }
    }
}

registerPaint('polka-dot-fade', PolkaDotFadePainter);
最后,这里的CSS设置自定义属性和引用Paint Worklet。
.polka-dot {
    --dot-spacing: 20px;
    --dot-fade-offset: 0%;
    --dot-color: #40e0d0;
    background: paint(polka-dot-fade);

    /* other styles as needed... */
}
现在有一个转折。我们可以在CSS中激活已注册的自定义属性的值。随着值的变化,使用它们的Paint Worklet将会重新绘制,并更新其以前的值。
通过--dot-fade-offset和--dot-color在动画的关键帧中使用这些自定义属性(使用transition也是可以的教程可以)。
.polka-dot {
    --dot-spacing: 20px;
    --dot-fade-offset: 0%;
    --dot-color: #fc466b;
    background: paint(polka-dot-fade);

    /* other styles as needed... */
}

.polka-dot:hover, .polka-dot:focus {
    animation: pulse 2s ease-out 6 alternate;

    /* other styles as needed... */
}

@keyframes pulse {
    from {
        --dot-fade-offset: 0%;
        --dot-color: #fc466b;
    }
    to {
        --dot-fade-offset: 100%;
        --dot-color: #3f5efb;
    }
}
鼠标悬浮或点击下面示例中的图案,可以看到动画效果。
这里的潜力真是令人兴奋!我们可以使用带有自定义属性的Paint Worklets创建全新类型的动画效果。
优缺点
让我们来回顾一下Houdini(特别是CSS Paint API)的一些好东西。
- 给你创造你自己视觉效果的自由
- 不依赖于向DOM添加额外的元素或伪元素
- 作为你的浏览器渲染管道的一部分执行,提高效率
- 比Polyfills更高效,更轻便
- 提供了使用CSS Hacks的替代方案
- 作为一处抽象和模块化的方法,通过一个Paint Worklet能包含更多的视觉逻辑
- 让你可以创建全新类型的动画
- 允许开发人员在浏览器实现新特性之前来解决未来浏览器支持问题
- 五大浏览器厂商都打算支持Houdini
当然,有优点就必然有缺点。
- 大量的Houdini仍在发展中
- Houdini本身需要良好的浏览器支持,才能开始缓解未来浏览器的支持问题
- 浏览器必须加载一个Paint Worklet文件,然后才能使用它,这可能导致样式弹出(pop-in)
- 当前的开发者工具不支持设置断点或在Paint Worklet中使用
debugger语句(尽管你仍然可以使用console.log())
总结
Houdini有可能从根本上改变我们如何处理CSS。这仍然是一项正在进行中的工作,但目前为止的几个部分都令人会感到兴奋的,也是非常有趣的。请持续关注Houdini。
本文中所有示例的代码都可以在GitHub的这个仓库中获取。对于更多的案例效果,请查看@iamvdo收集的一些有关于Houdini的示例集合。
最后非常感谢你花时间阅读完这篇文章。
如需转载,烦请注明出处:https://www.fedev.cn/css/say-hello-to-houdini-and-the-css-paint-api.htmljordan shoes for sale outlet infrared


