CSS3美化表格
在Web页面开发中,自从有了<div>的出现,大家就在讨论table。就出现了什么时候?如何使用div,什么时候?如何使用table的争论。虽然争论不少,但最后得出的结论是一致的:当你需要在页面中处理与数据时,table是首选之一。
制作一个表格容易,但是要设计一个表,让它爽心悦目,对于前端攻城师来说可是一个挑战——我们不仅需要考虑表格的外观好看,而且要提高用户的体验,让用户方便阅读表格,方便从表格中找到自己需要的数据。这样就需要你开动大脑进行思考,如果你和我一样不想去思考的话,可以参考Red Team的Red介绍的CSS3制作表格的教程——《Feature table design with CSS3》
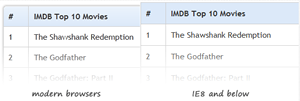
当然你会说,CSS3是强大,但在老式的浏览器中怎么办?我只能说让你的用户在现代浏览器中体验最好的视觉效果,让那些守旧的用户去体验陈旧的美感。说了这么多,今天我们依旧跟着Red来学习——如何使用CSS3创建一个美丽而又爽心悦目的表格。这里我们还使用了jQuery让表格在老式的浏览器下也能运行正常。首先我们一起看一下我们今天要实现的表格效果:
目标
在这篇文章中,你将会看到如何使用CSS3来制作一些很酷而体验又强的表格。
- 没有图片的圆角效果
- 易于更新——没有多余的样式
- 用户体验性强,容易查找数据
HTML Markup
在介绍如何使用CSS3来修饰table之前,我们需要一个table的框架子,下面我们来创建一个普通的table
			<table class="bordered">
			  <thead>
			    <tr>
			        <th>#</th>
			        <th>IMDB Top 10 Movies</th>
			        <th>Year</th>
			    </tr>
			  </thead>
			  <tbody>
					<tr>
			      <td>1</td>
			      <td>The Shawshank Redemption</td>
			       <td>1994</td>
			    </tr>
			    <tr>
			        <td>2</td>
			        <td>The Godfather</td>
			        <td>1972</td>
			    </tr>
			    <tr>
			        <td>3</td>
			        <td>The Godfather: Part II</td>
			        <td>1974</td>
			    </tr>
			    <tr>
			        <td>4</td>
			        <td>The Good, the Bad and the Ugly</td>
			        <td>1966</td>
			    </tr>
				</tbody>
			</table>
在这里我们将这个表格设置了一个类名“bordered”,如果你需要创建一个斑马线表格,你只需将上面的类名换成“zebra”。现在有了HTML结构,接着就是使用样式来美化他了,大家一起接着往下看吧。
CSS Code
			<style type="text/css">
			*{margin: 0;padding: 0;}
			body {
				padding: 40px 100px;
			}
			.demo {
			width: 600px;
			margin: 40px auto;
			font-family: 'trebuchet MS', 'Lucida sans', Arial;
			font-size: 14px;
			color: #444;
			}

			table {
				*border-collapse: collapse; /* IE7 and lower */
				border-spacing: 0;
				width: 100%;
			}
			/*========bordered table========*/
			.bordered {
				border: solid #ccc 1px;
				-moz-border-radius: 6px;
				-webkit-border-radius: 6px;
				border-radius: 6px;
				-webkit-box-shadow: 0 1px 1px #ccc;
				-moz-box-shadow: 0 1px 1px #ccc;
				box-shadow: 0 1px 1px #ccc;
			}

			.bordered tr {
				-o-transition: all 0.1s ease-in-out;
				-webkit-transition: all 0.1s ease-in-out;
				-moz-transition: all 0.1s ease-in-out;
				-ms-transition: all 0.1s ease-in-out;
				transition: all 0.1s ease-in-out;
			}
			.bordered .highlight,
			.bordered tr:hover {
				background: #fbf8e9;
			}
			.bordered td,
			.bordered th {
				border-left: 1px solid #ccc;
				border-top: 1px solid #ccc;
				padding: 10px;
				text-align: left;
			}
			.bordered th {
				background-color: #dce9f9;
				background-image: -webkit-gradient(linear, left top, left bottom, from(#ebf3fc), to(#dce9f9));
				background-image: -webkit-linear-gradient(top, #ebf3fc, #dce9f9);
				background-image: -moz-linear-gradient(top, #ebf3fc, #dce9f9);
				background-image: -ms-linear-gradient(top, #ebf3fc, #dce9f9);
				background-image: -o-linear-gradient(top, #ebf3fc, #dce9f9);
				background-image: linear-gradient(top, #ebf3fc, #dce9f9);
				filter: progid:DXImageTransform.Microsoft.gradient(GradientType=0, startColorstr=#ebf3fc, endColorstr=#dce9f9);
				-ms-filter: "progid:DXImageTransform.Microsoft.gradient (GradientType=0, startColorstr=#ebf3fc, endColorstr=#dce9f9)";
				-webkit-box-shadow: 0 1px 0 rgba(255,255,255,.8) inset;
				-moz-box-shadow:0 1px 0 rgba(255,255,255,.8) inset;
				box-shadow: 0 1px 0 rgba(255,255,255,.8) inset;
				border-top: none;
				text-shadow: 0 1px 0 rgba(255,255,255,.5);
			}
			.bordered td:first-child,
			.bordered th:first-child {
				border-left: none;
			}
			.bordered th:first-child {
				-moz-border-radius: 6px 0 0 0;
				-webkit-border-radius: 6px 0 0 0;
				border-radius: 6px 0 0 0;
			}
			.bordered th:last-child {
				-moz-border-radius: 0 6px 0 0;
				-webkit-border-radius: 0 6px 0 0;
				border-radius: 0 6px 0 0;
			}
			.bordered tr:last-child td:first-child {
				-moz-border-radius: 0 0 0 6px;
				-webkit-border-radius: 0 0 0 6px;
				border-radius: 0 0 0 6px;
			}
			.bordered tr:last-child td:last-child {
				-moz-border-radius: 0 0 6px 0;
				-webkit-border-radius: 0 0 6px 0;
				border-radius: 0 0 6px 0;
			}
			/*----------------------*/
			.zebra td,
			.zebra th {
				padding: 10px;
				border-bottom: 1px solid #f2f2f2;
			}
			.zebra .alternate,
			.zebra tbody tr:nth-child(even) {
				background: #f5f5f5;
				-webkit-box-shadow: 0 1px 0 rgba(255,255,255,.8) inset;
				-moz-box-shadow:0 1px 0 rgba(255,255,255,.8) inset;
				box-shadow: 0 1px 0 rgba(255,255,255,.8) inset;
			}
			.zebra th {
				text-align: left;
				text-shadow: 0 1px 0 rgba(255,255,255,.5);
				border-bottom: 1px solid #ccc;
				background-color: #eee;
				background-image: -webkit-gradient(linear, left top, left bottom, from(#f5f5f5), to(#eee));
				background-image: -webkit-linear-gradient(top, #f5f5f5, #eee);
				background-image: -moz-linear-gradient(top, #f5f5f5, #eee);
				background-image: -ms-linear-gradient(top, #f5f5f5, #eee);
				background-image: -o-linear-gradient(top, #f5f5f5, #eee);
				background-image: linear-gradient(top, #f5f5f5, #eee);
				filter: progid:DXImageTransform.Microsoft.gradient(GradientType=0, startColorstr=#f5f5f5, endColorstr=#eeeeee);
				-ms-filter: "progid:DXImageTransform.Microsoft.gradient (GradientType=0, startColorstr=#f5f5f5, endColorstr=#eeeeee)";
			}
			.zebra th:first-child {
				-moz-border-radius: 6px 0 0 0;
				-webkit-border-radius: 6px 0 0 0;
				border-radius: 6px 0 0 0;
			}
			.zebra th:last-child {
				-moz-border-radius: 0 6px 0 0;
				-webkit-border-radius: 0 6px 0 0;
				border-radius: 0 6px 0 0;
			}
			.zebra tfoot td {
				border-bottom: 0;
				border-top: 1px solid #fff;
				background-color: #f1f1f1;
			}
			.zebra tfoot td:first-child {
				-moz-border-radius: 0 0 0 6px;
				-webkit-border-radius: 0 0 0 6px;
				border-radius: 0 0 0 6px;
			}
			.zebra tfoot td:last-child {
				-moz-border-radius: 0 0 6px 0;
				-webkit-border-radius: 0 0 6px 0;
				border-radius: 0 0 6px 0;
			}
			</style>
通过上面的代码,我们在现代浏览器中就能看到一个美化好的表格了,如DEMO所示。
效果出来了,但我们追求的不只是效果,需要知道是怎么一回事,这样才能是自己的东西。下面我们就来细化一下上面的代码:
1、表格圆角效果
这里有一个技巧,在制作表格圆角效果之前,我们有必要先完成这一步。表格的“border-collapse”的默认值是“separate”,我们需要将其值设置为“0”,也就是“border-spacing:0;”
			table {
			  *border-collapse: collapse; /* IE7 and lower */
			  border-spacing: 0;
			}
为了能兼容IE7以及更低的浏览器我们需要加上一个特殊的属性“border-collapse”,并且将其值设置为“collapse”。
现在我们一起来看圆角的制作
			/*==整个表格设置了边框,并设置了圆角==*/
			.bordered {
				border: solid #ccc 1px;
				-moz-border-radius: 6px;
				-webkit-border-radius: 6px;
				border-radius: 6px;
			}
			/*==表格头部第一个th需要设置一个左上角圆角==*/
			.bordered th:first-child {
				-moz-border-radius: 6px 0 0 0;
				-webkit-border-radius: 6px 0 0 0;
				border-radius: 6px 0 0 0;
			}
			/*==表格头部最后一个th需要设置一个右上角圆角==*/
			.bordered th:last-child {
				-moz-border-radius: 0 6px 0 0;
				-webkit-border-radius: 0 6px 0 0;
				border-radius: 0 6px 0 0;
			}
			/*==表格最后一行的第一个td需要设置一个左下角圆角==*/
			.bordered tr:last-child td:first-child {
				-moz-border-radius: 0 0 0 6px;
				-webkit-border-radius: 0 0 0 6px;
				border-radius: 0 0 0 6px;
			}
			/*==表格最后一行的最后一个td需要设置一个右下角圆角==*/
			.bordered tr:last-child td:last-child {
				-moz-border-radius: 0 0 6px 0;
				-webkit-border-radius: 0 0 6px 0;
				border-radius: 0 0 6px 0;
			}
由于我们在table中设置了一个边框,为了俱有圆角效果,我需要在表格的四个角的单元格上分别设置圆角效果,并且其圆角效果需要和表格的圆角值大小一样,反之,如果你在table上没有设置边框,我们只需要在表格的四个角落的单元素设置圆角,就能实现圆角效果,比如DEMO中的“zebra”表格
			/*==表格头部第一个th需要设置一个左上角圆角==*/
			.zebra th:first-child {
				-moz-border-radius: 6px 0 0 0;
				-webkit-border-radius: 6px 0 0 0;
				border-radius: 6px 0 0 0;
			}
			/*==表格头部最后一个th需要设置一个右上角圆角==*/
			.zebra th:last-child {
				-moz-border-radius: 0 6px 0 0;
				-webkit-border-radius: 0 6px 0 0;
				border-radius: 0 6px 0 0;
			}
			/*==表格最后一行的第一个td需要设置一个左下角圆角==*/
			.zebra tfoot td:first-child {
				-moz-border-radius: 0 0 0 6px;
				-webkit-border-radius: 0 0 0 6px;
				border-radius: 0 0 0 6px;
			}
			/*==表格最后一行的最后一个td需要设置一个右下角圆角==*/
			.zebra tfoot td:last-child {
				-moz-border-radius: 0 0 6px 0;
				-webkit-border-radius: 0 0 6px 0;
				border-radius: 0 0 6px 0;
			}
在上面的代码中,我们使用了许多CSS3的伪类选择器,如果你对这一部分还不怎么熟悉,我建议你阅读本站的相关教程:
除了选择器使用了CSS3外,上面还采用了好多个CSS3的相关属性,比如说
A、box-shadow制作表格的阴影
			.bordered {
				-webkit-box-shadow: 0 1px 1px #ccc;
				-moz-box-shadow: 0 1px 1px #ccc;
				box-shadow: 0 1px 1px #ccc;
			}
			.zebra tbody tr:nth-child(even) {
				-webkit-box-shadow: 0 1px 0 rgba(255,255,255,.8) inset;
				-moz-box-shadow:0 1px 0 rgba(255,255,255,.8) inset;
				box-shadow: 0 1px 0 rgba(255,255,255,.8) inset;
			}
B、transition制作hover过渡效果
			.bordered tr {
				-o-transition: all 0.1s ease-in-out;
				-webkit-transition: all 0.1s ease-in-out;
				-moz-transition: all 0.1s ease-in-out;
				-ms-transition: all 0.1s ease-in-out;
				transition: all 0.1s ease-in-out;
			}
			.bordered tr:hover {
				background: #fbf8e9;
			}
C、gradient制作表头渐变色
			.bordered th {
				background-color: #dce9f9;
				background-image: -webkit-gradient(linear, left top, left bottom, from(#ebf3fc), to(#dce9f9));
				background-image: -webkit-linear-gradient(top, #ebf3fc, #dce9f9);
				background-image: -moz-linear-gradient(top, #ebf3fc, #dce9f9);
				background-image: -ms-linear-gradient(top, #ebf3fc, #dce9f9);
				background-image: -o-linear-gradient(top, #ebf3fc, #dce9f9);
				background-image: linear-gradient(top, #ebf3fc, #dce9f9);
				filter: progid:DXImageTransform.Microsoft.gradient(GradientType=0, startColorstr=#ebf3fc, endColorstr=#dce9f9);
				-ms-filter: "progid:DXImageTransform.Microsoft.gradient (GradientType=0, startColorstr=#ebf3fc, endColorstr=#dce9f9)";
			}
			.zebra th {
				background-color: #eee;
				background-image: -webkit-gradient(linear, left top, left bottom, from(#f5f5f5), to(#eee));
				background-image: -webkit-linear-gradient(top, #f5f5f5, #eee);
				background-image: -moz-linear-gradient(top, #f5f5f5, #eee);
				background-image: -ms-linear-gradient(top, #f5f5f5, #eee);
				background-image: -o-linear-gradient(top, #f5f5f5, #eee);
				background-image: linear-gradient(top, #f5f5f5, #eee);
				filter: progid:DXImageTransform.Microsoft.gradient(GradientType=0, startColorstr=#f5f5f5, endColorstr=#eeeeee);
				-ms-filter: "progid:DXImageTransform.Microsoft.gradient (GradientType=0, startColorstr=#f5f5f5, endColorstr=#eeeeee)";
			}
其中还使用了text-shadow来制作文字阴影效果,rgba改变颜色透明度等。
2、jQuery处理hover效果
大家从所周知,在IE6下“:hover”只有a元素支持,如果需要在IE6支持下面的效果:
			.bordered tr:hover {
				background: #fbf8e9;
			}
如果需要在IE6下解决上面的CSS样式效果,我们就需要借助jQuery来模拟“:hover”效果:
			$('.bordered tr').mouseover(function(){
			    $(this).addClass('highlight');
			}).mouseout(function(){
			    $(this).removeClass('highlight');
			});
同时需要在你的样式中加入“.highlight”样式代码:
			.highlight {
				background: #fbf8e9;
			}
这样一来我们也在IE6下实现了“.bordered tr:hover”悬停效果。有关于“:hover”在IE6下的处理方法,大家感兴趣的会还可以点击《浏览器兼容之旅的第四站:IE常见Bug——part2》。这里还存在一个问题,由于“:hover”只是在IE6下不能运用在别的元素上,但在其他浏览器上是不会出现这样的Bug,可是我们就这样运用上面的jQuery代码的话,将在所有浏览器中都会运行,这样就离我们最初的想法有点不同,为了只让IE6解析上面的代码,我们就需要把这段代码加上一个条件,让它只能在IE6下识别。具体操作大家可以点击Red的《How to solve common IE bugs》一文,同时也你可以到本站阅读前面的教程——《浏览器兼容之旅的第一站:如何创建条件样式》。
3、jQuery实现斑马线表格效果
这里有一个问题同样会发生在IE6中,那就是CSS3的选择器——“:nth-child(even)”,在IE6中也是沅法识别的,这样就造成了下面这段代码在IE6下是没有任何效果的
			.zebra tbody tr:nth-child(even) {
				background: #f5f5f5;
				-webkit-box-shadow: 0 1px 0 rgba(255,255,255,.8) inset;
				-moz-box-shadow:0 1px 0 rgba(255,255,255,.8) inset;
				box-shadow: 0 1px 0 rgba(255,255,255,.8) inset;
			}
为了能让所有浏览器解决表格偶数行高亮,就需要使用jQuery来实现
$(".zebra tr:even").addClass('alternate');
同样需要在你的样式文字中加入:
			.alternate {
			    background: #f5f5f5;
			    -webkit-box-shadow: 0 1px 0 rgba(255,255,255,.8) inset;
			    -moz-box-shadow:0 1px 0 rgba(255,255,255,.8) inset;
			    box-shadow: 0 1px 0 rgba(255,255,255,.8) inset;
			}
这样一来,我们也借助jQuery解决了IE6下的斑马线效果,当然也需要记得前提条件中,不然在部分浏览器中就重复使用了。
兼容的浏览器
如果在你的代码中运用了上面的jQuery代码话,在IE6下也将会有不错的效果,只别表格在IE6-8下的外观将丢失圆角,阴影等效果,如图所示:
加上我们这里在讨论的是使用 CSS3来美化表格,所以我们不需要考虑IE下太我的问题,因此你要是现在还在使用那该死的IE话,我强烈建议你马上安装:Mozilla Firefox、Google Chrome、Safari或者Opera等现代浏览器,你将能在这些浏览器中看到一个很美很酷的表格。
总结
在这个教程中我们学习了如何使用CSS3来美化你的表格。在结束之前稍作规纳:“在本次教程中,我们主要使用了CSS3的相关属性来美化一个表格,主要涉及到了CSS3的选择器,比如说CSS3选择器——伪类选择器,用来控制选中的单元格;而且在制作效果中,使用了CSS3的一些常用属性,border-radius来表格的圆角或单元格的圆角效果、gradient来制作表格标题的背景效果、box-shadow制作了表格的阴影效果以使用transition来实现动画效果,而且还使用了text-shadow制作文字阴影,rgba改元素元素相关属性的透明度。最后为了让IE6下具有相同的“:hover”和“斑马线”效果,我们还借助了jQuery和IE的条件注解来实现效果。”
你喜欢这样的表格吗?要是喜欢就快点动手体验一下如何制作吧。最后非常感谢Red Team的Red给我们带来这么好的教程《Practical CSS3 tables with rounded corners》。当然你可以根据你的创造力制作出更美的表格,同时感谢阅读这篇文章,如果你有更好的东西分享可以直给在评论中留言与我们一起分享您的成果。
如需转载烦请注明出处:W3CPLUS
NIKE HYPERLIVE EP

